FortiManager provides centralized management for FortiGate devices, enabling consistent policy control, configuration management, and simplified operations across multiple firewalls. This article explains how to register a FortiGate on FortiManager, covering both supported registration methods: adding the device from FortiManager or initiating the request directly from the FortiGate.
Pre-requisites#
- FortiManager firmware is in a compatible version with FortiGate FortiOS version (see https://docs.fortinet.com/compatibility-tool/fortimanager/fortigate)
- A compatible ADOM version for managing the FortiGate exists on FortiManager.
- ADOM version 7.6 manage devices with firmware version 7.2, 7.4, 7.6
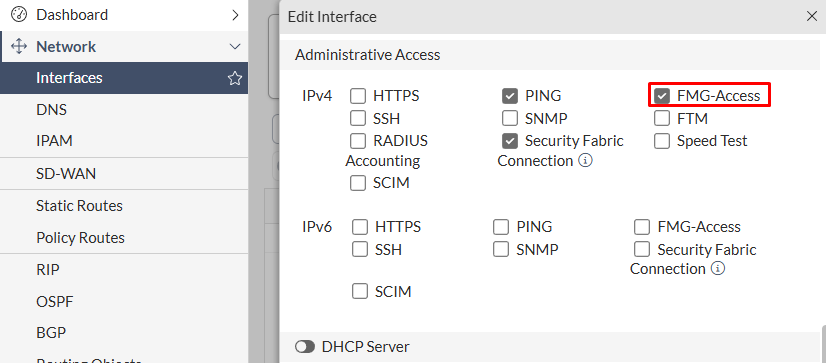
- If FortiGate Security Fabric role is
Join Existing Fabric(configured underSecurity Fabric > Fabric Connectors > Security Fabric Setup), it won’t be possible to add this device to FortiManager directly, using either of the device registration methods. FMG-Accessadministrative access must be enabled on the FortiGate interface that will be contacted by FortiManager to be managed if the request is initiated from FortiManager:
- Starting FortiManager 7.6.3, a new security enhancement was introduced regarding new VMs registration to FortiManager. To allow VM devices including FortiGate-VM to be registered on FortiManager, the following setting must be set to
enable:
config system global
set fgfm-allow-vm enable
end
See FortiManager 7.6.3 Administration Guide - Adding VM devices and FortiManager 7.6.0 New Features - Security enhancement to control new VM device registration to FortiManager
- Also take in consideration the FortiManager ports used to talk with FortiGate in the next section.
FortiManager Ports#
FortiManager requires different TCP and UDP ports to work properly. Depending on the direction of the traffic, the following ports are required when communicating with a FortiGate device:
- Incoming: FortiManager incoming ports from FortiGate (FortiGate > FortiManager)
- Outgoing: FortiManager outgoing ports to FortiGate (FortiManager > FortiGate)
| Usage | Port | Direction |
|---|---|---|
| IPv4 FGFM management | TCP 541 | incoming + outgoing |
Web filter queries, AV, and IPS updates (*) | UDP 53, UDP/TCP 8888, TCP 80 | incoming |
Antispam (*) | UDP/TCP 8889 | incoming |
Registration (license validation) and UTM updates - AV, IPS (*) | TCP 8890, TCP 443 | incoming |
FortiGuard and FortiClient web filter and email filter (*) | TCP 8900, TCP 443 | incoming |
AV and IPS push updates (*) | UDP 9443 | outgoing |
(*) Only required if FortiManager works as a local FortiGuard server.
FortiManager internal services and management, required the following ports to be permitted in the network:
| Usage | Port | Direction |
|---|---|---|
| HTTPS management | TCP 443 | incoming |
| SSH management | TCP 22 | incoming |
| DNS lookup | UDP 53 | outgoing |
| Syslog | UDP/TCP 514 | outgoing |
Check the complete list of incoming and outgoing ports of FortiManager in the following links:
- FortiManager 7.6.0 FortiManager Ports - Incoming ports
- FortiManager 7.6.0 FortiManager Ports - Outgoing ports
Method 1 - Add Device wizard#
This method uses the FortiManager Add Device wizard for adding a compatible device.
This wizard allows to import devices in different states:
- Add FortiGate devices with an existing configuration (imports policies, objects into Policy & Objects database)
- Add FortiGate devices that are not yet online (
Add Model Deviceoption on wizard) - Add FortiGate HA clusters
- Add devices from a CSV file
When a FortiGate with an existing configuration is imported, the device firewall policies can be imported into a new policy package, while the objects are saved in the common object database for the ADOM. This ADOM database where the objects are saves is shared between all the FortiGate devices in the same ADOM. When the configuration is being imported, FortiManager checks for duplicate names and conflicts.
To add a FortiGate device with an existing configuration using the Discover Device option of the Add Device wizard, follow these steps:
- On FortiManager, select the desired ADOM where the FortiGate will be added. Then navigate to
Device Manager > Device & Groups:
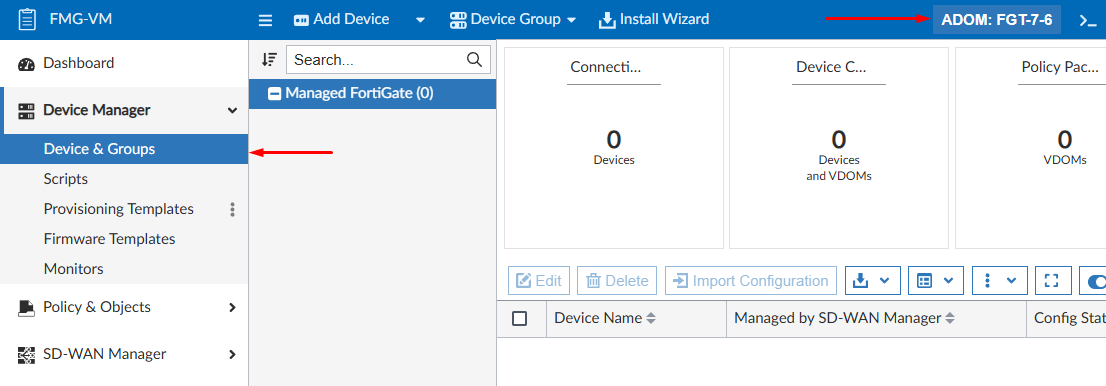
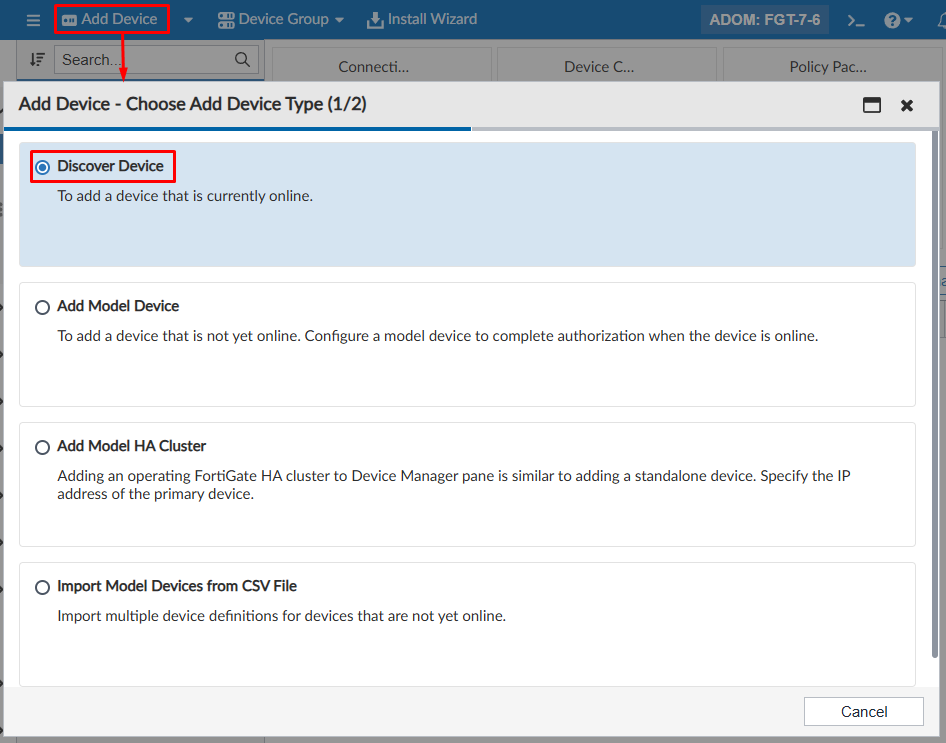
- Select the
Add Deviceoption, then selectDiscover Deviceas the method:
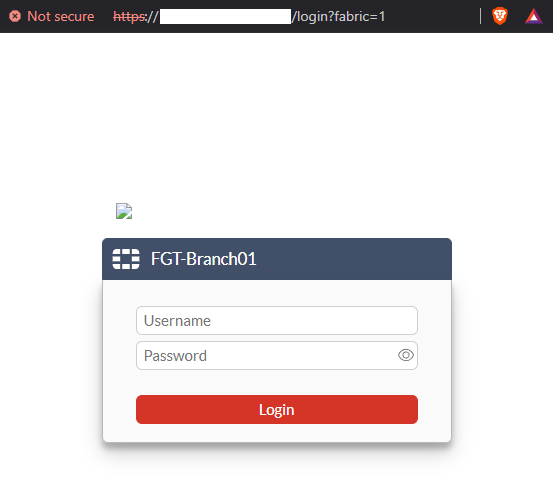
- Specify the FortiGate
IP Addressthat will be contacted by FortiManager and click onNext:
fgfm administrative access enabled.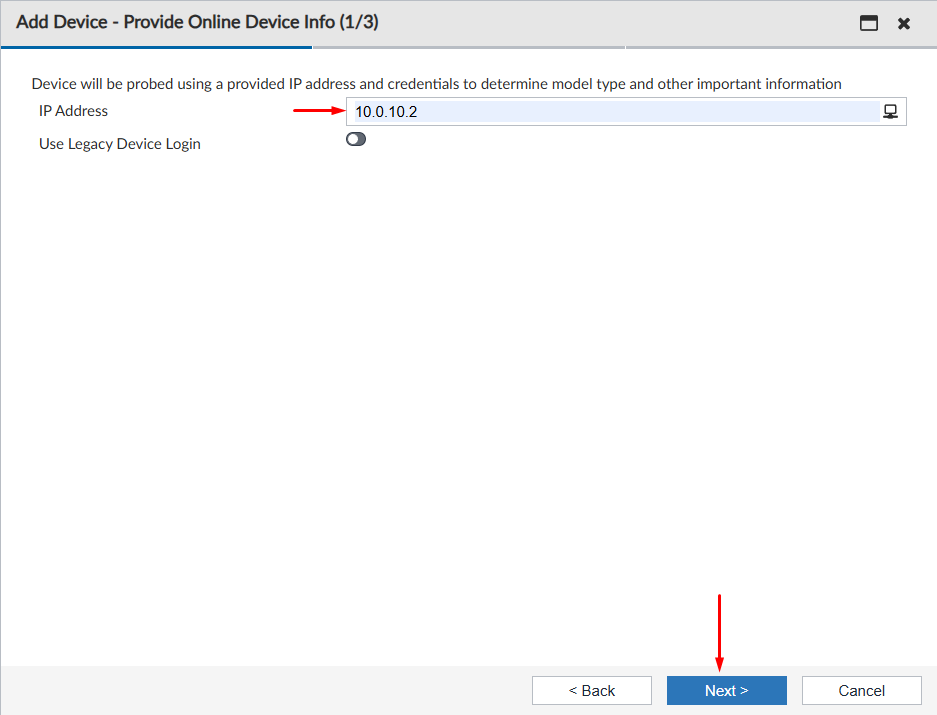
- A pop-up window shows up asking for FortiGate credentials using the OAuth protocol:
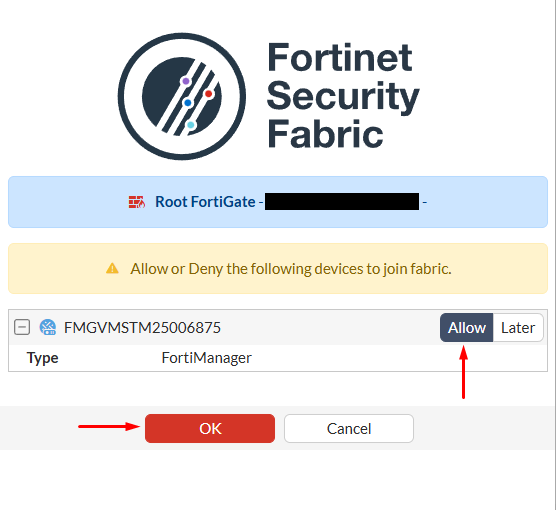
The IP address and port used to load the FortiGate login window corresponds to the management IP and port defined for the Security Fabric settings of the FortiGate device (Security Fabric > Fabric Connectors > Security Fabric Setup).
- After logging in, set the FortiManager device to
Allow, and pressOK:
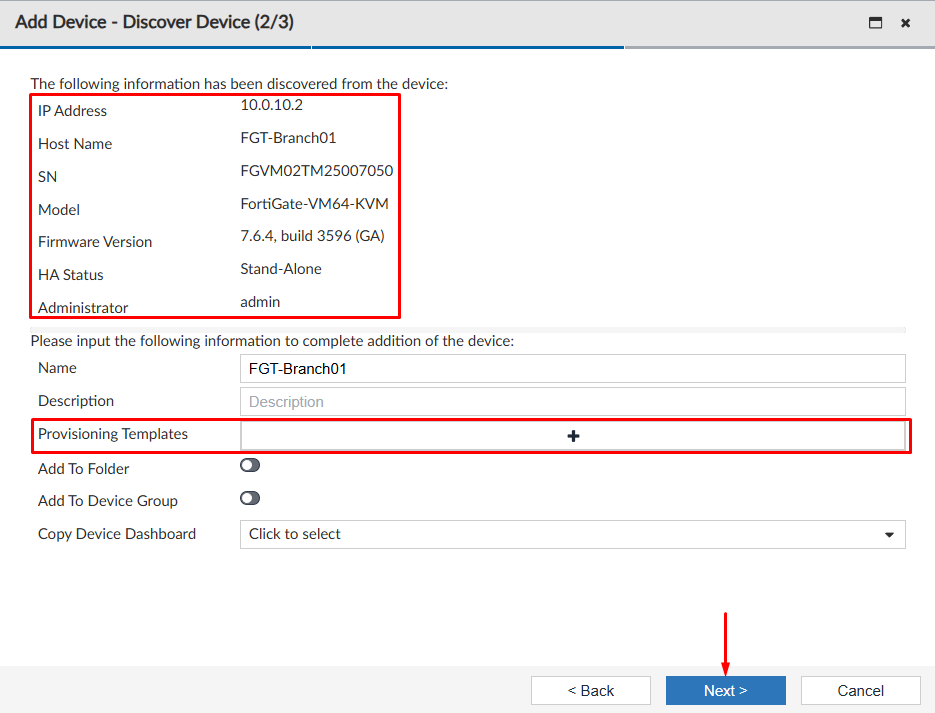
- The popup window closes and the next step of the
Add Devicewizard continues in FortiManager. Here, general information about the FortiGate device to be added is shown. Optionally, aProvisioning Templatescan be applied on the device. SelectNext:
- The last step of the wizard will show the FortiGate integration process to FortiManager:
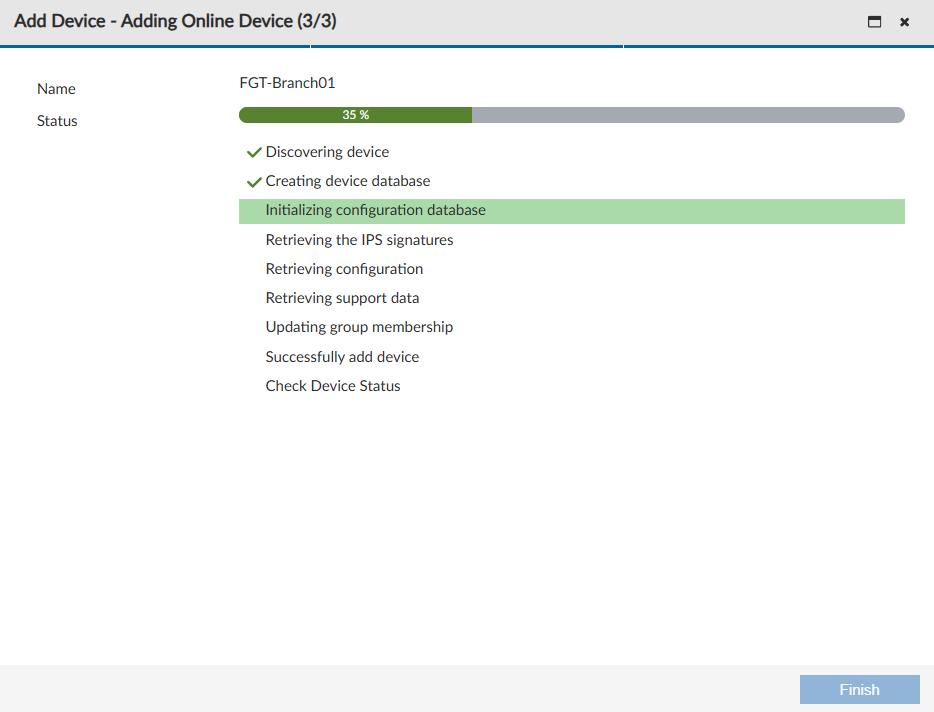
Some tasks that FortiManager perform here is the creation of the initial configuration file in the revision history, including all used objects and policies. Furthermore, FortiManager checks the support contract and IPS signatures.
- Wait until the adding process finishes. In this last step you have the option to import policies and objects.
Import Now- policies are added to a new policy package and objects are added to the common shared ADOM database. Other FortiGate devices that are part of the same ADOM can use these imported objects.Import Later- FortiGate policies and objects are not imported, however they can later be imported with theImport Configurationwizard. Only device-level settings are added to the device database.
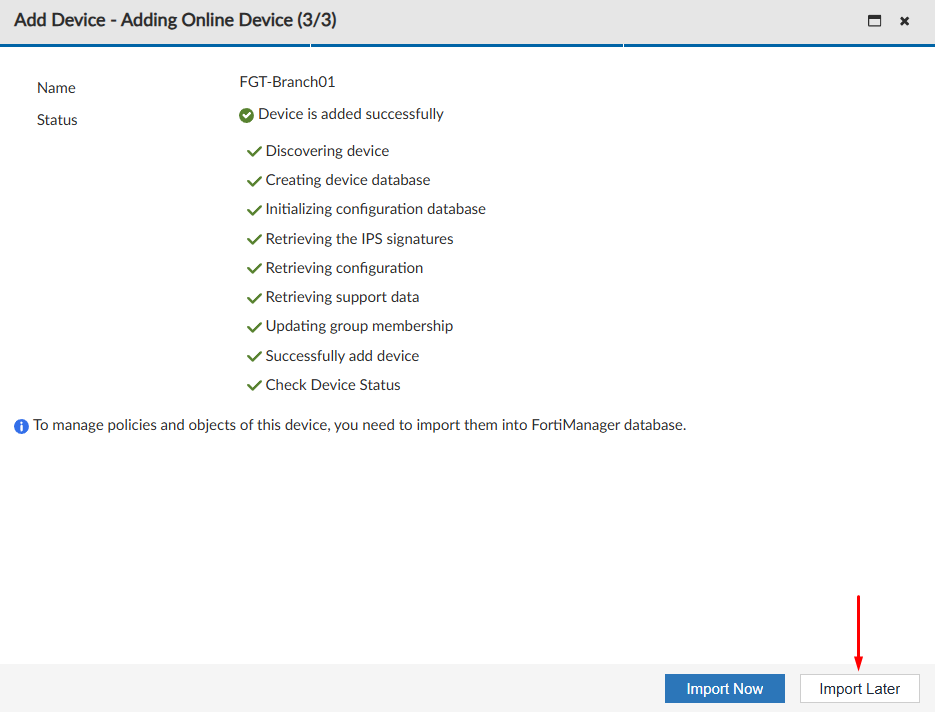
- Select
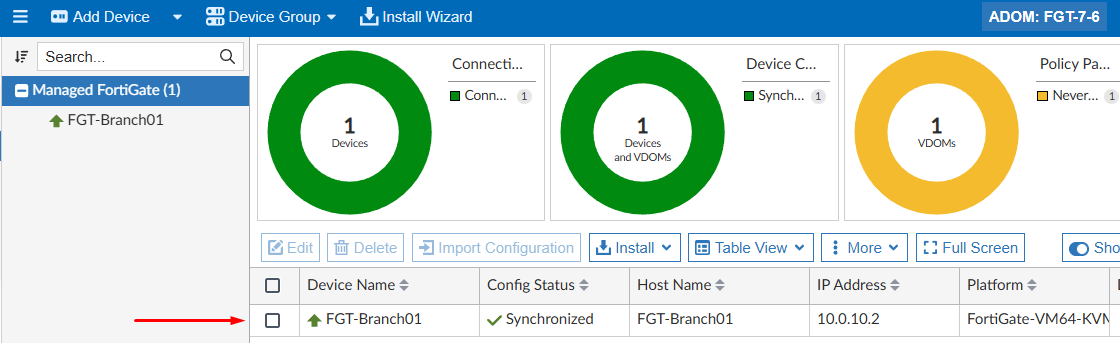
Import Laterto finish the process and verify that the registered FortiGate device is now managed by the FortiManager ADOM:
When FortiGate is registered on FortiManager, it goes through a two step process:
- Discovery: FortiManager sends a
get system statuscommand to FortiGate to get a minimal information for modeling the device. - Adding: complete FortiGate configuration is retrieved by FortiManager, and then stored in the device database. Multiple commands are sent to FortiGate (e.g.
get system interface,get system interface physical,get hardware status,get mgmt-data status,get ips rule status, etc.).
Method 1 - Add Device wizard with Legacy Device Login#
An alternative method for adding a FortiGate device is enabling the User Legacy Device Login option:

This legacy method can be used in situations where the computer you are using to manage FortiManager doesn’t have access to the FortiGate GUI management directly. This is also the required method if FortiGate FortiOS version is 6.4 or older.
The inserted login credentials must have full read-write permissions on FortiGate. In this way, FortiManager can read the full configuration of the managed FortiGate and deploy any future configuration on the device.
Method 2 - Request from supported device#
Using this method, the administrator of the supported device sends a registration request to FortiManager. Then, the FortiManager administrator accepts the request.
To register a FortiGate on FortiManager starting the request from the FortiGate itself, follow these steps:
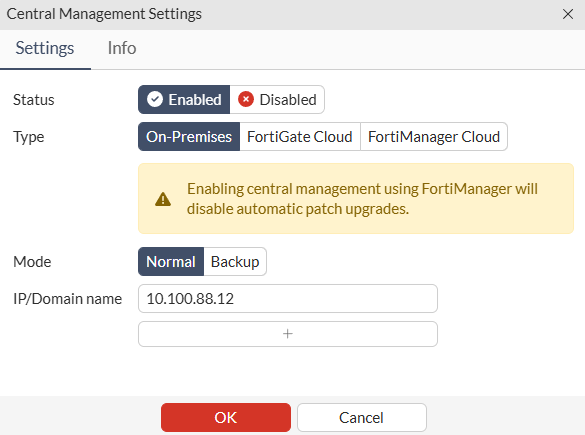
- On FortiGate, navigate to
Security Fabric > Fabric Connectors, selectCentral Managementand clickEdit:

- Set the
StatustoEnabledand proceed configuring the FortiManager settings, including the type, mode, and IP address:
- Press
OK. The FortiManager certificate is send to FortiGate for verifying the FMG serial number. PressAcceptto proceed.

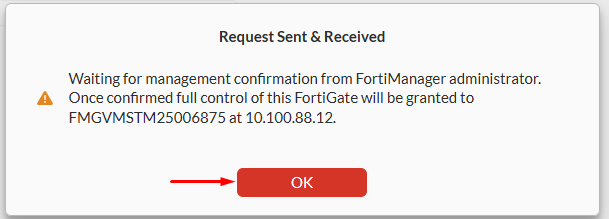
- A pop-up message confirms that a request was send to the configured FortiManager. Select
OKto proceed:
FortiGate gives the user the possibility to open a FortiManager window according to the set IP address if clicking on Authorize. However, you can also connect to FortiManager in a new window and proceed with the registration.
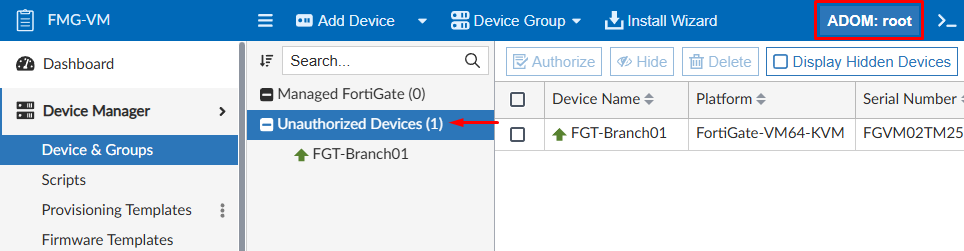
- Connect to FortiManager GUI, select the
rootADOM and navigate toDevice Manager > Device & Groups. The FortiGate device that sent the request should be listed underUnauthorized Deviceslist:
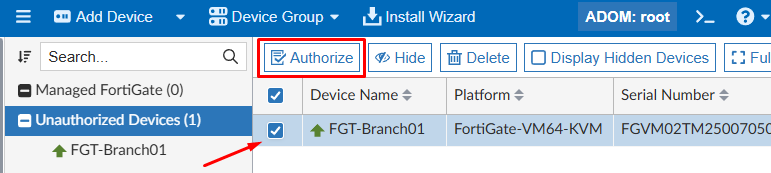
- Next, select the device and press
Authorize:
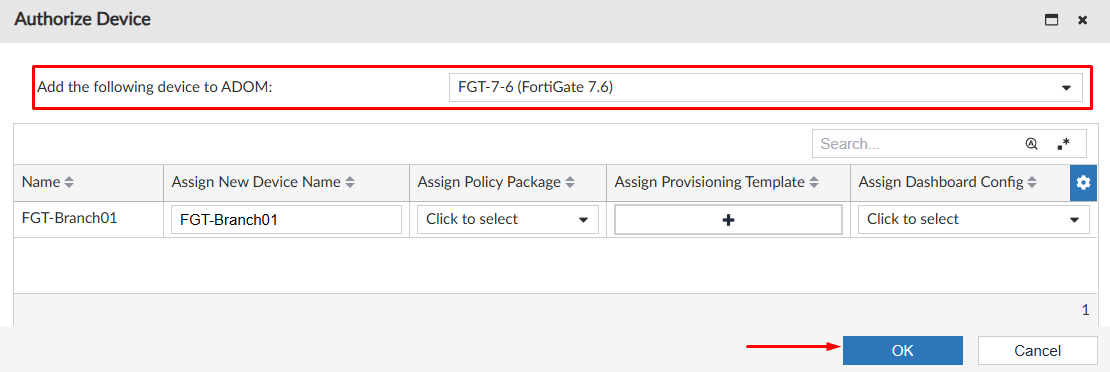
- Next, you can select the ADOM where the device will be added. A policy package, provisioning template and dashboard config can also be assigned in this screen. Press
OKto proceed:
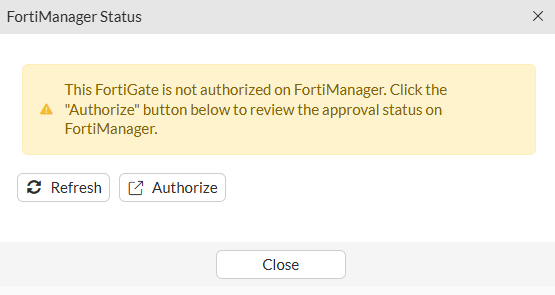
- Wait for the process to finish. Then click
Close:
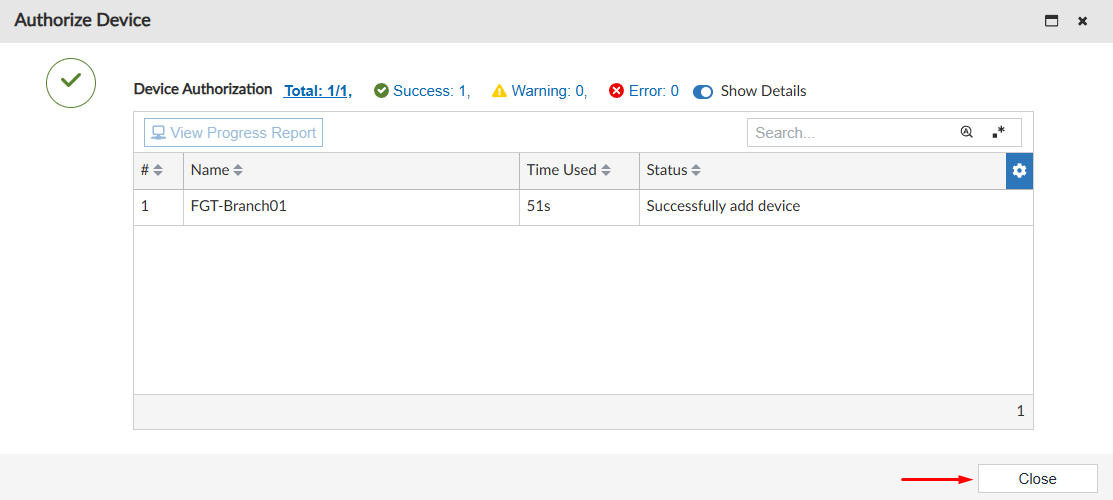
After the device has been authorized, the two step register process consisting of Discovery and Adding runs.
- You can go to the ADOM where the device was configured to be added and verify it’s listed as a managed device:
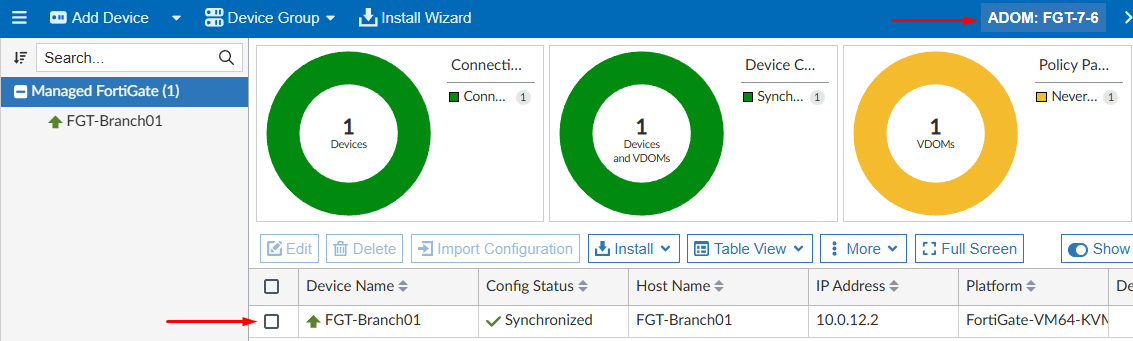
From FortiGate-side, the FortiManager connector should now show a Connected status:

Communication validation for both methods#
Depending on where the communication originated for establishing a secure management tunnel with the other end (FortiGate or FortiManager), the traffic will flow in different ways. However, the destination port will always be TCP/541 in either case, which is used for the FGFM management protocol.
The following logs were captured on a firewall between FortiManager (10.100.88.12) and the registered FortiGate (10.0.10.2), in the two previous discussed device registration methods on FortiManager.
- Method 1 - Add Device wizard - Connection initiated from FortiManager:
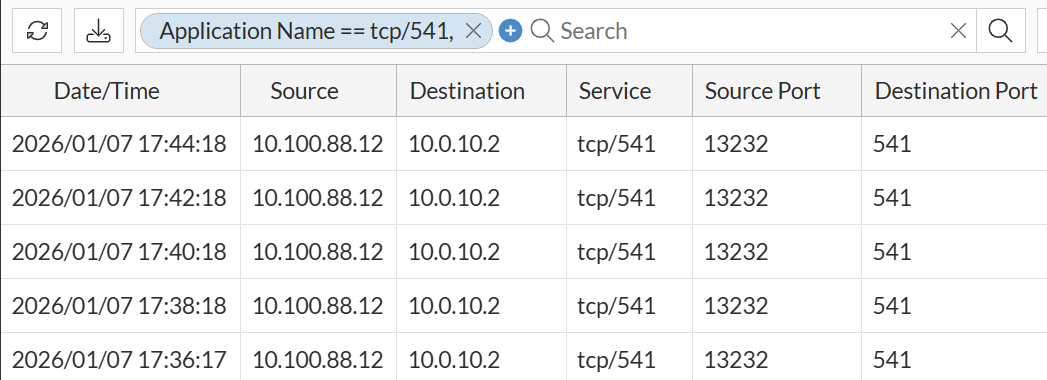
In this case, after FortiGate device was registered on FortiManager, subsequent logs show that sessions are initiated from FortiManager (10.100.88.12) to FortiGate (10.0.10.2) on port TCP/541.
- Method 2 - Request from supported device - Connection initiated from FortiGate:
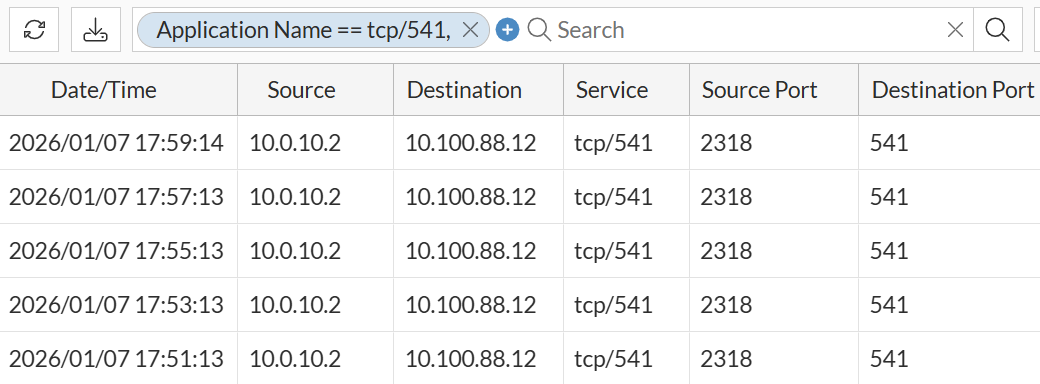
In this case, after FortiGate device was registered on FortiManager, subsequent logs show that sessions are initiated from FortiGate (10.0.10.2) to FortiManager (10.100.88.12) on port TCP/541.