A ZTNA Access Proxy allows the FortiGate to enforce Zero Trust Network Access policies to clients trying to connect to internal applications by working as an access proxy. Instead on placing users on the network directly, like with traditional VPNs, HTTP and TCP traffic is proxied to the protected resources after verifying policy, identify, and security posture (tags).
An HTTPS access proxy works as a reverse proxy for a HTTP web server. A TCP forwarding access proxy (TFAP) works like a specialized HTTPS reverse proxy. It encapsulates TCP traffic inside HTTPS, sends it through the access proxy, and then forwards that traffic to the destination resource.
SSL certificate-based authentication can be used for authenticating clients trying to access a protected resource through a ZTNA access proxy. This client certificate is generated when an endpoint with FortiClient register to the EMS.
This guide explains the process of configuring a ZTNA HTTPS Access Proxy with SSL certificate-based authentication in FortiGate and EMS.
Topology#
The topology that will be used for the configuration is composed of the following:
- A Windows 10 client with
10.0.3.2IP address, emulating a remote client connected on the internet (WAN) trying to access an internal resource protected by the FortiGate. Its default gateway is NOT the FortiGate’s WAN interface. - A web server with
10.88.0.3IP address connected to the DMZ network. - The FortiGate as an access proxy, that will proxy the client connections to the server by doing an IP + port translation (
10.0.3.10:11443>10.88.0.3:11443).
Pre-requisites#
- FortiGate’s EMS Fabric connector is connected to the EMS. This is required for EMS to share the client certificate details (FortiClient ID and ZTNA serial number) to FortiGate. Refer to the following article for more details: Connecting FortiGate with EMS and Syncing tags - LabFound
- FortiClient is connected to EMS, to generate a client certificate that will be used for authentication when connecting to the ZTNA server.
- The
Zero Trust Network Accessfeature must be installed on FortiClient, in order for the device to receive a client certificate (otherwise, theZTNA Statuswould sayRevokedfor that endpoint in the EMS endpoint details). The FortiClient installer would have the following option enabled:
Configuring a ZTNA Server#
The ZTNA Server object defines both the access proxy VIP and the real servers that clients connect to. HTTPS connections are made from external clients to the access proxy VIP which are redirected to internal resources according to the service/server mappings that define the virtual host matching rules and the real sever mappings of the incoming HTTPS requests.
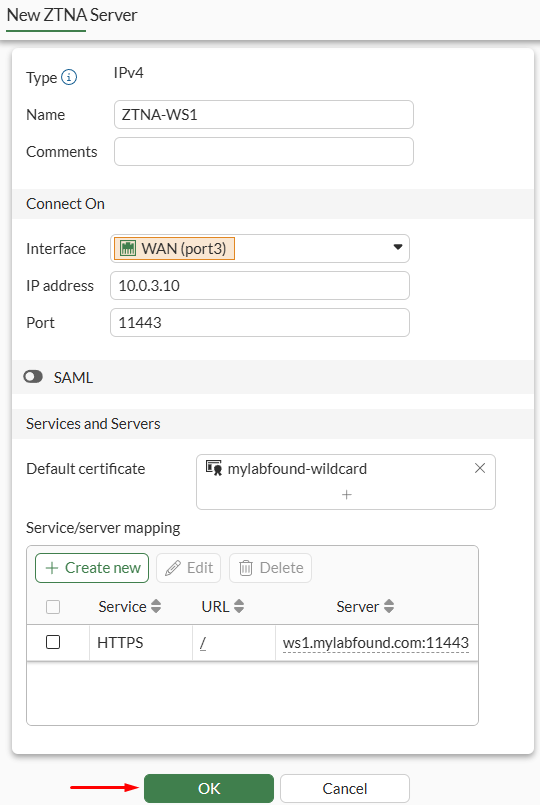
- Navigate to
Policy & Objects > ZTNA, then select theZTNA Servertab. Click onCreate New. - Set the ZTNA Server properties:
NameConnect Onsection - defines the interface, IP address and port that will be listening for client connections. This could be referred to as the access proxy VIP.Services and Servers- select the requiredDefault certificate, which will be presented to the user trying to connect to the VIP.
- Under
Service/server mappingselectCreate new:- The first options allow to define the virtual host matching rules.
- The
Pathparameter can be used to specify a URL path as a matching condition.
- The
- Under
Serversection, define the real server mapping details.- The
Address typecan be an IP or FQDN address.
- The
- The first options allow to define the virtual host matching rules.
In this example define, the FQDN of web server #1, ws1.mylabfound.com, which translates to 10.88.0.3:
- Press
OK, verify the ZTNA Server configuration, and pressOKagain:
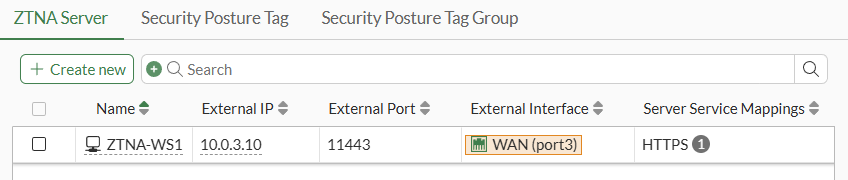
The ZTNA Server is now listed as follows:
On CLI, you can verify what objects were created after configuring the ZTNA server on GUI:
- A VIP with
access-proxytype is created using the same name as the ZTNA Server object:
config firewall vip
    edit "ZTNA-WS1"
        set uuid 7d54bf6a-c894-51f0-489a-986b6702da86
        set type access-proxy
        set server-type https
        set extip 10.0.3.10
        set extintf "port3"
        set extport 11443
        set ssl-certificate "mylabfound-wildcard"
    next
end
- An access proxy with the real server details and using the VIP:
config firewall access-proxy
    edit "ZTNA-WS1"
        set vip "ZTNA-WS1"
        config api-gateway
            edit 1
                config realservers
                    edit 1
                        set addr-type fqdn
                        set address "ws1.mylabfound.com"
                        set port 11443
                    next
                end
            next
        end
    next
end
Creating a ZTNA Firewall Policy#
A firewall policy must be in place to define who can access the ZTNA server (HTTPS Access Proxy). The Type of the firewall policy must be set to ZTNA (instead of Standard):
- Go to
Policy & Objects > Firewall Policy, selectCreate New. - Configure the firewall policy:
NameAction- AcceptType- ZTNAIncoming interfaceSource- any IP addressUser/group- noneSecurity posture tag- none (we’re not using any security posture tag at the moment)ZTNA Server- select the VIP created when the ZTNA Server was definedLogging Options- Log Allowed Traffic (All Sessions)- Leave all the other options as default.
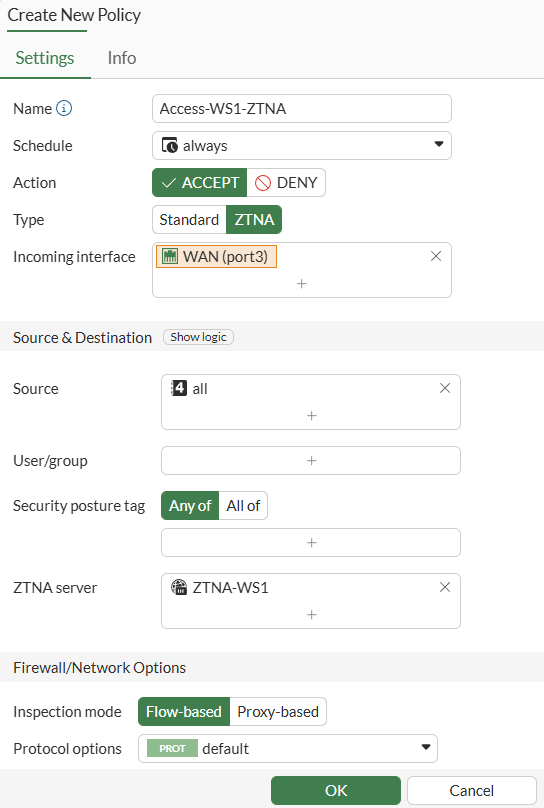
- Press
OKand verify the policy is listed as follows:

Note that the Service column is in blank, NAT is enabled and the policy Type is ZTNA.
config firewall policy
    edit 9
        set name "Access-WS1-ZTNA"
        set srcintf "port3"
        set dstintf "any"
        set action accept
        set srcaddr "all"
        set dstaddr "ZTNA-WS1"
        set schedule "always"
        set logtraffic all
        set nat enable
    next
end
Testing remote access to the ZTNA Server#
The ZTNA server (HTTPS Access Proxy) and the ZTNA firewall policy are now configured on FortiGate. To verify that the remote access to the ZTNA server works properly, the following actions are performed from a Windows 10 client with 10.0.3.2 IP address, emulating a client connected on the internet (WAN) trying to access an internal resource protected by the FortiGate:
- Verify that the client is able to resolve the web server domain:
> nslookup ws.mylabfound.com
Server:  Unknown
Address:  10.0.3.254

Non-authoritative answer:
Name:    ws.mylabfound.com
Addresses:  10.0.3.10
ws.mylabfound.com is resolved to 10.0.3.10, which belongs to the WAN side of the FortiGate (“internet”).
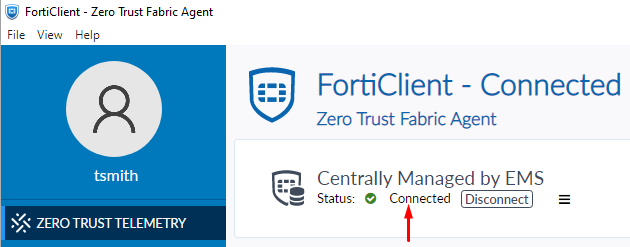
- Verify that the FortiClient is connected to the EMS:
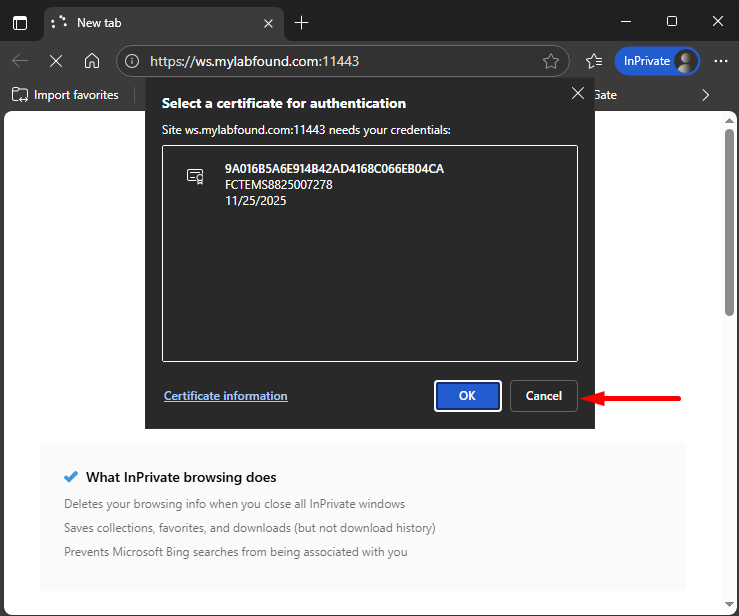
- Connect to the ZTNA server from the client:
A pop-up message show up requiring the user to select a client certificate for authentication. Select the certificate and then click OK:
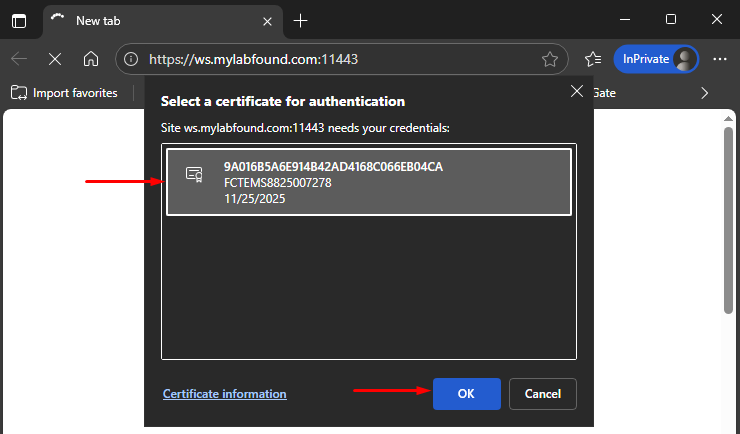
The code at the top corresponds to the Issued to field of the client certificate, which matches the FortiClient ID (on EMS).
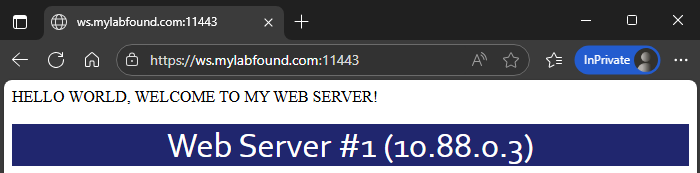
- The website should load without any restrictions:
Verifying the FortiClient certificate#
When an endpoint with FortiClient connects to EMS via Telemetry, FortiClient automatically submits a Certificate Signing Request (CSR) to EMS, which signs and then returns the client certificate (“User Verification” is recommended to be enforced so only authenticated users can connect to EMS).
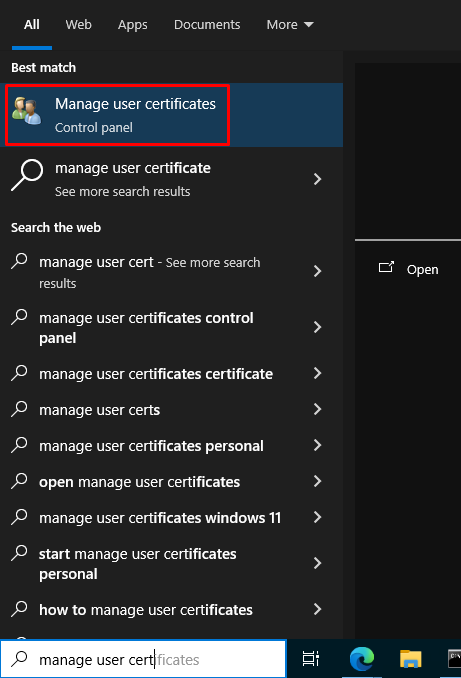
Follow these steps to find FortiClient’s client certificate on the workstation that is connected to EMS:
- Search for the
Manage user certificatesapp or equivalently run thecertmgr.mscapp:
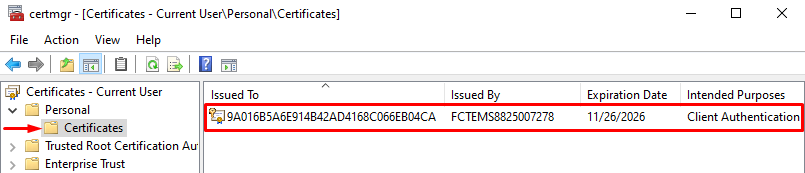
- In the user certificate store, go to
Personal > Certificates:
- Double click the certificate to check its details:
Under General tab, check the Issued to value:

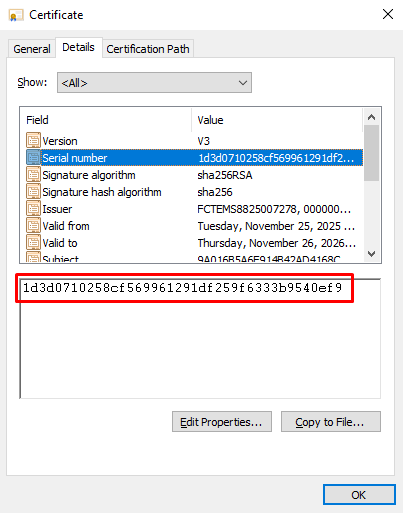
Under the Details tab, verify the certificate Serial number:
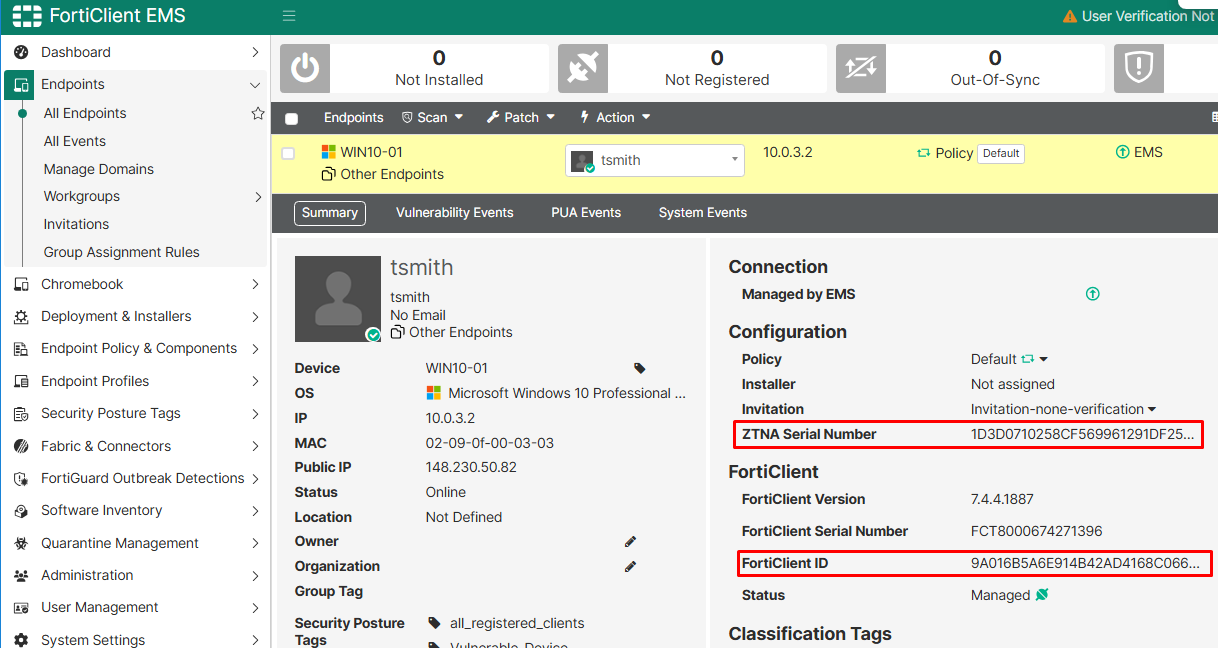
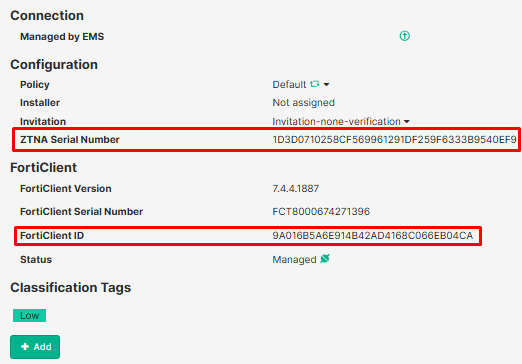
- On EMS console, the certificate information fields should match the endpoint properties:
- ZTNA Serial Number: matches certificate’s
Serial number - FortiClient ID: matches certificate’s
Issued to.
- ZTNA Serial Number: matches certificate’s
- On FortiGate, when a device connected to EMS is registered, FortiGate also receives the certificate serial number (
Client cert SN), and the FortiClient ID (FortiClient UID):
# diagnose endpoint ec-shm list
Record #0:
	IP Address = 10.0.3.2
	MAC Address = 02:09:0f:00:03:03
	MAC list =
	VDOM =  (-1)
	TOKEN VDOM =  (-1)
	EMS serial number: FCTEMS8825007278
	EMS tenant id: 00000000000000000000000000000000
	Client cert SN: 1D3D0710258CF569961291DF259F6333B9540EF9 <-----------
	Public IP address: 148.230.50.82
	Quarantined: no
	Online status: online
	Registration status: registered
	On-net status: off-net
	Gateway Interface:
	FortiClient version: 7.4.4
	AVDB version: 1.0
	FortiClient app signature version: 35.125
	FortiClient vulnerability scan engine version: 3.11
	FortiClient UID: 9A016B5A6E914B42AD4168C066EB04CA <------------
	Host Name: WIN10-01
...
Client certificate authentication options#
When a ZTNA access proxy is configured, client authentication is enabled by default. This means that when a client sends an HTTPS request to the access proxy, FortiGate challenges (WAD process) the client trying to connect to identify itself using a client certificate.
By default, FortiGate is configured to have the following behavior for incoming connections to protected ZTNA access proxy:
client-cert enable- client certificate authentication is enabled. FortiGate compares its client record (client UID and client certificate SN) with the responded client certificate. If there is a match, the connection is allowed to continue with the ZTNA processing.empty-cert-action block- when client certificate validation is enabled (client-cert enable), if the client select cancel when the certificate challenge prompts, an empty client certificate is given as response. This will block the connection.
These parameters can be configured on the VIP object:
config firewall vip
    edit <name>
        set client-cert { enable | disable }
        set empty-cert-action { accept | block }
    next
end
Next, different examples will be tested to complement the understanding of the client certificate authentication options.
- Example 1:
The default configuration is used on the VIP regarding client certificate authentication (client-cert enable and empty-cert-action block).
The client tries to connect to the ZTNA HTTPS access proxy. When prompted for a certificate, the client selects Cancel:
The client receives a block message with error code 002 (“Invalid ZTNA Certificate”).
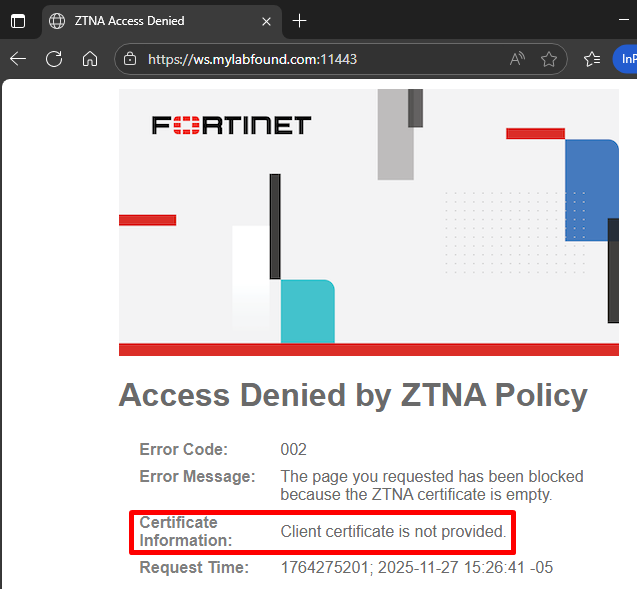
This would happen when a device with FortiClient not connected to the EMS (or without FortiClient at all) tries to access this protected website.
Check more information about ZTNA error codes here: FortiOS 7.6.0 ZTNA Reference Guide - ZTNA Error Codes.
- Example 2:
The following configuration is applied to the VIP:
config firewall vip
    edit <name>
        set client-cert enable
        set empty-cert-action accept
    next
end
The client tries to connect to the ZTNA HTTPS access proxy. When prompted for a certificate, the client selects Cancel:
The website access is allowed because of set empty-cert-action accept:
- Example 3:
The following configuration is applied to the VIP:
config firewall vip
    edit <name>
        set client-cert disable
    next
end
When using set client-cert disable, then the set empty-cert-action option is not configurable anymore.
The client tries to connect to the ZTNA HTTPS access proxy:
The client was not challenged to give any certificate. So direct access to the ZTNA HTTPS access proxy was granted.