
Setting up a dialup IPsec VPN without a dedicated FortiClient EMS (Enterprise Management Server) can seem complex. However, using the free, unmanaged version of FortiClient alongside the built-in FortiGate VPN Wizard allows you to deploy a secure, dialup remote access tunnel in minutes.
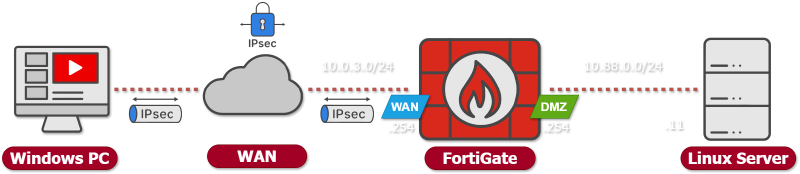
Topology#
- FortiGate:
- WAN Interface (
10.0.3.254): Receives incoming VPN connections from the external network. - DMZ Interface (
10.88.0.11): Internal network hosting the target Linux server.
- WAN Interface (
- Windows PC: Has connectivity to the WAN network and will establish an IPsec VPN with FortiGate listening on its WAN interface
- Linux Server (
10.88.0.11): the Linux server is the target of the VPN connection from the Windows PC
Initial FortiGate Configuration#
Before configuring the IPsec VPN on FortiGate and FortiClient, some previous configuration is needed as input of the FortiGate VPN Wizard.
Local User & User Group#
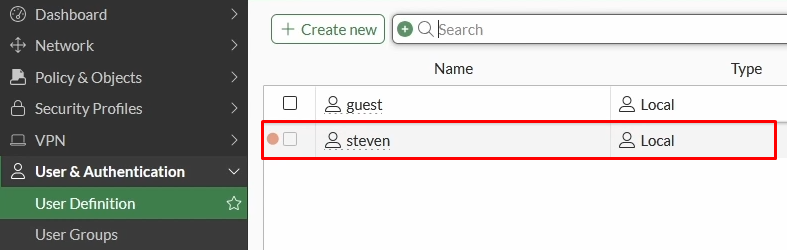
First, we need to define some mechanism of authentication for users connecting to the VPN. We’ll be using a local user authenticating to the VPN:
- Go to
User & Authentication > User Definitionand clickCreate New. - Choose
Local Userand clickNext. - Enter a
Usernameand a securePassword, then clickNextthrough the optional contact fields and hitSubmit. These credentials will be used on FortiClient for connecting to the Dialup IPsec VPN.
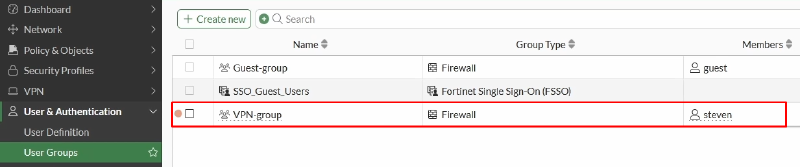
We’ll add this local user to a user group:
- Navigate to
User & Authentication > User Groupsand clickCreate New. - Set a group name (e.g.,
VPN-group), keep the type as Firewall, add the newly created user under Members, and clickOK.
Create Destination Address Object#
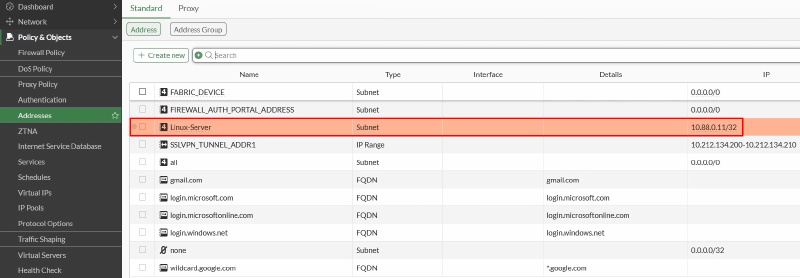
We also need to define an address object representing the IP/subnet that we want our VPN users to access remotely.
- Navigate to
Policy & Objects > Addressesand clickCreate New. - Set the name. In this example, the destination of the VPN connections is a single server on the DMZ, we’re naming it
Linux-Server. - Set the IP/Netmask to the destination IP address, which is
10.88.0.11according to our topology. - Click
OK.
FortiGate VPN Wizard#
The FortiGate VPN Wizard automates the creation of complex IPsec phase 1/2 settings, address pools for connecting clients, and necessary firewall policies.
- Go to
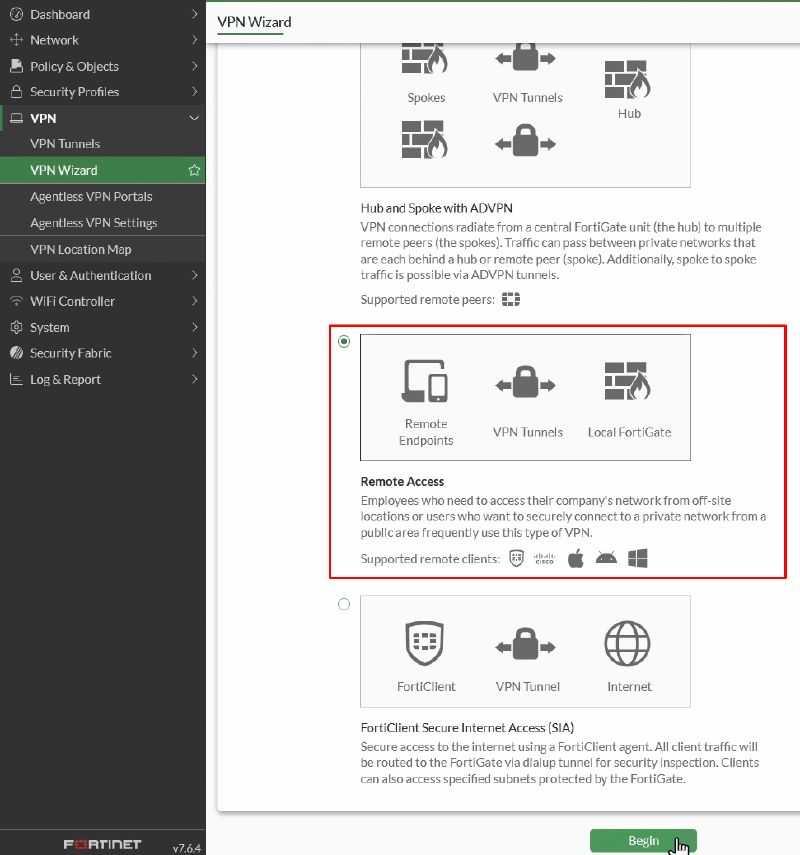
VPN > VPN Wizard. - Set a Tunnel name (e.g.,
DialupVPN), and select the VPN Template “Remote Access”. - Click on
Begin.
- For VPN Tunnel settings,
| Parameter | Value |
|---|---|
| VPN client type | FortiClient |
| Authentication method | Pre-shared key |
| Pre-shared key | (set the desired password) |
| IKE | Version 2 |
| Transport | Auto |
| Use Fortinet encapsulation | Disabled |
| NAT traversal | Enable |
| Keepalive frequency | 10 |
| EAP peer identification | EAP identity request |
| User authentication method | Phase 1 interface (select the desired user group that will authenticate using FortiClient VPN) |
| DNS Server | Use System DNS |
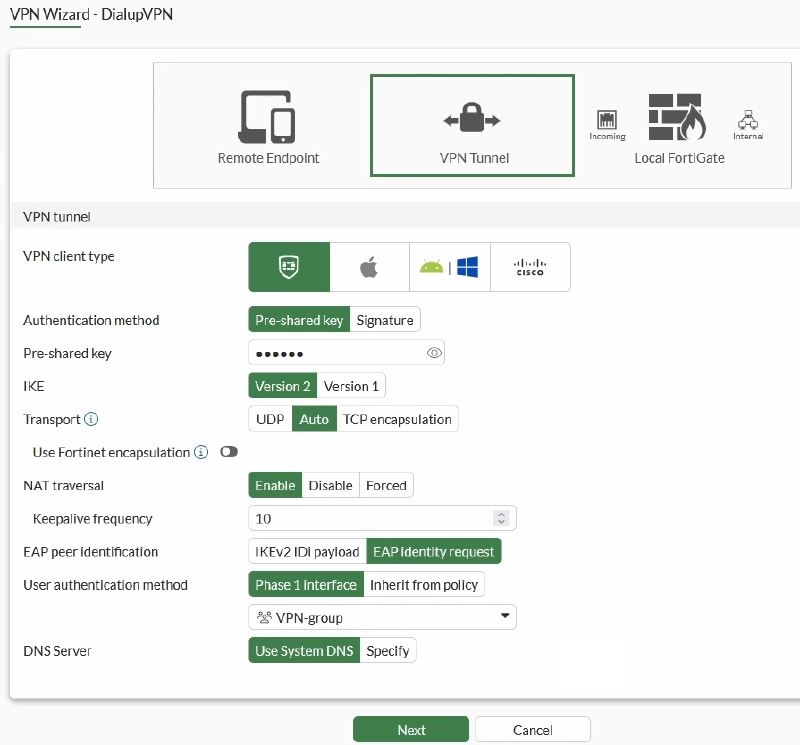
The User authentication method can be one of the following:
- Phase 1 interface: allows to select a single user group for user authentication. The specified user group is tied directly to Phase 1 configuration (
set authusrgrp <user-group-name>). - Inherit from policy: allows to select multiple user groups for user authentication. The selected users group will be automatically added in the IPsec firewall policies configured on the VPN wizard as User/group matching field.
- Click on
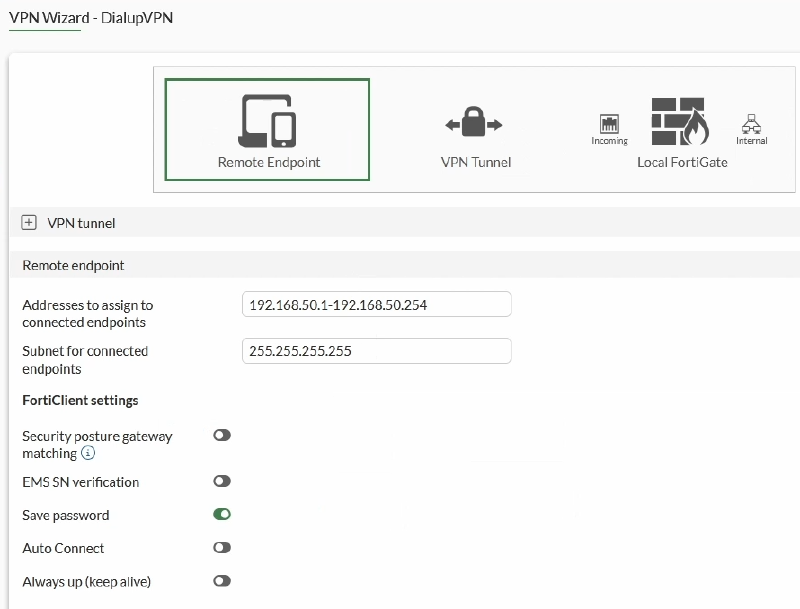
Next, and set the Remote Endpoint settings:
| Parameter | Value |
|---|---|
| Addresses to assign to connected endpoints | 192.168.50.1-192.168.50.254 |
| Subnet for connected endpoints | 255.255.255.255 |
| Security posture gateway matching | Disabled |
| EMS SN verification | Disabled |
| Save password | Enabled |
| Auto Connect | Disabled |
| Always up (keep alive) | Disabled |
- Select
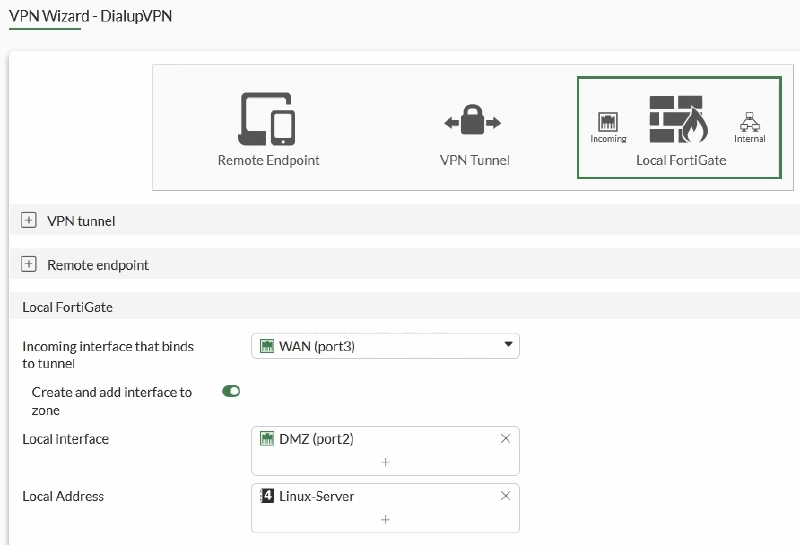
Nextand configure the Local FortiGate settings:
| Parameter | Value |
|---|---|
| Incoming interface that binds to tunnel | WAN |
| Create and add interface to zone | Enabled |
| Local interface | DMZ |
| Local Address | Select the address object we created as the destination of the VPN connections. |
- Click on
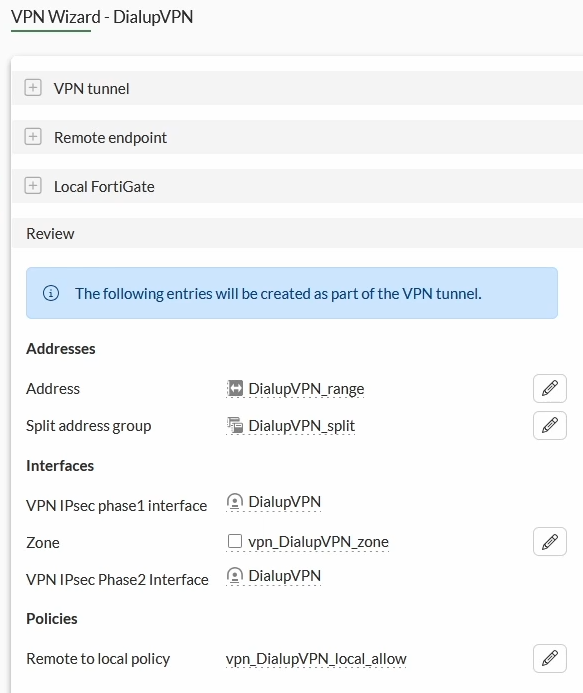
Nextone last time to see the review section. This shows us the objects that will be created automatically by the wizard.
- Address: address object for the VPN client address range. This represents the IP addresses that can be assigned to connected VPN clients.
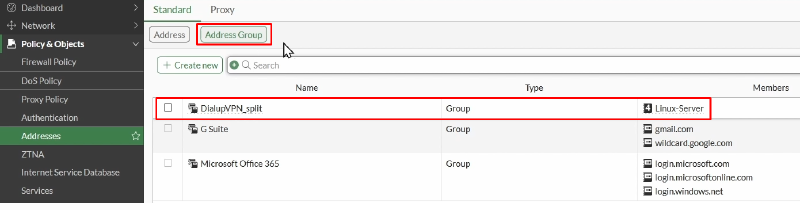
- Split address group: This is the address group that contains the local address configured previously. In our case, this is related to the Linux-Server object.
- VPN IPsec Phase 1 interface
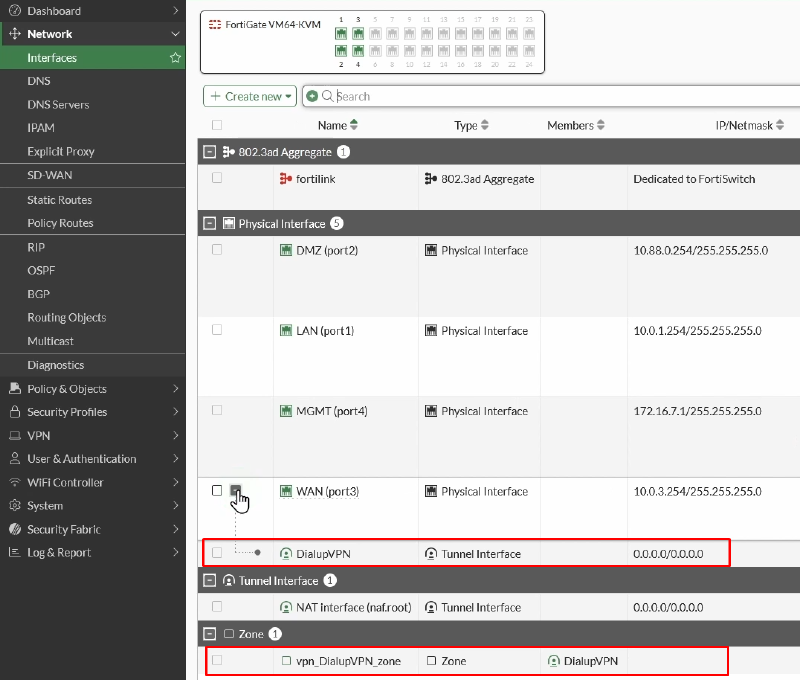
- Zone: FortiGate will create a new zone and add the IPsec interface to it.
- VPN IPsec Phase 2 interface
- Policies: remote to local firewall policy. This policy will allow traffic from the VPN clients to the local address we selected. In this case, our Linux server.
Checking the VPN Wizard Configuration#
Let’s check what was configured on FortiGate by the VPN Wizard:
IPsec VPN (Phase 1, Phase 2)#
We can check the details of the IPsec VPN created by the Wizard:
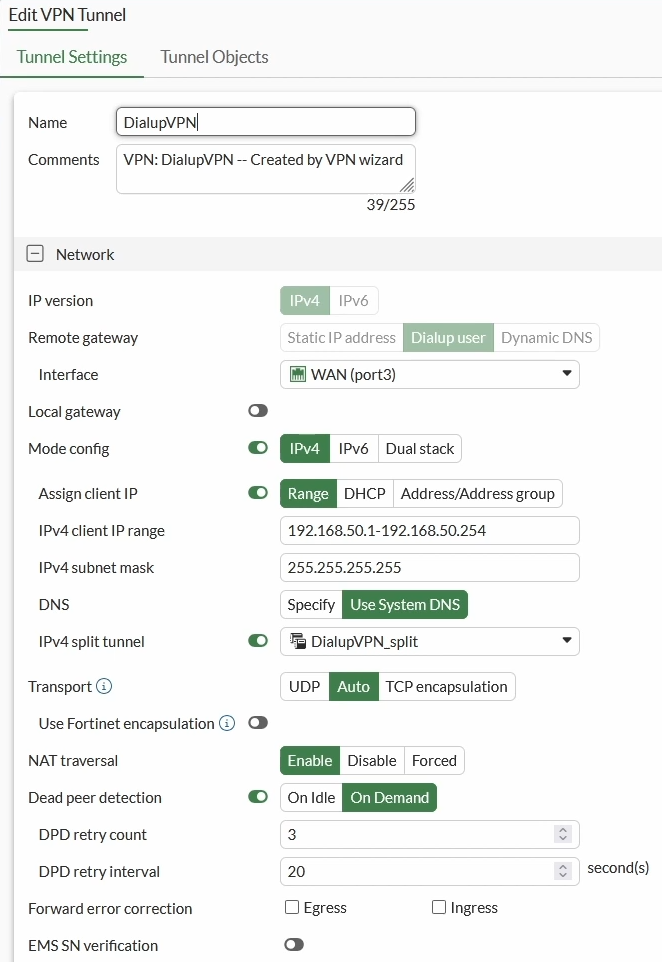
- Remote gateway: Dialup user. This means that the remote endpoint doesn’t have a fixed IP address that we need to configure on the FortiGate.
- Mode Config: enabled (IPv4). This enables dynamic address assignment to the VPN clients, according to the IP client range and subnet mask defined under IPv4 client IP range and IPv4 subnet mask.
- IPv4 split tunneling: enabled and the new address group created by the wizard is selected. This is important because we’re not necessarily sending all client traffic through the VPN.
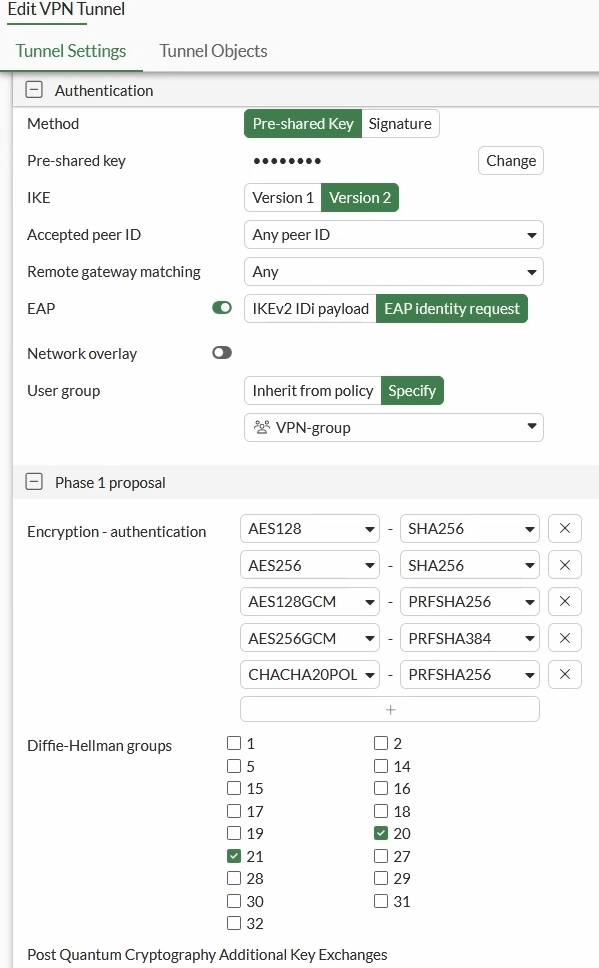
- EAP: enabled (EAP identity request). This tells us that EAP authentication is enabled and that authentication is tied to the VPN-group we created earlier.
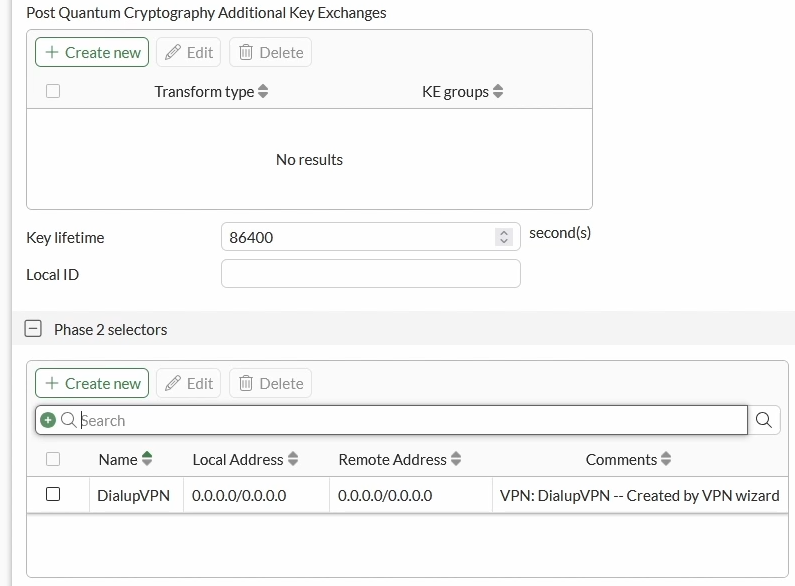
The phase 1 and phase 2 parameters are using a standard configuration regarding encryption and authentication algorithms as well as diffie hellman groups and key lifetime. We just need to take into consideration that these parameters need to match with the connecting client parameters.
We can also confirm the CLI configuration of both IPsec phase 1 interface:
config vpn ipsec phase1-interface
    edit "DialupVPN"
        set type dynamic
        set interface "port3"
        set ike-version 2
        set peertype any
        set net-device disable
        set mode-cfg enable
        set proposal aes128-sha256 aes256-sha256 aes128gcm-prfsha256 aes256gcm-prfsha384 chacha20poly1305-prfsha256
        set comments "VPN: DialupVPN -- Created by VPN wizard"
        set dhgrp 20 21
        set eap enable
        set eap-identity send-request
        set wizard-type dialup-forticlient
        set authusrgrp "VPN-group"
        set transport auto
        set ipv4-start-ip 192.168.50.1
        set ipv4-end-ip 192.168.50.254
        set dns-mode auto
        set ipv4-split-include "DialupVPN_split"
        set save-password enable
        set psksecret ENC 2q3B5WiitNZY4dRYrPUGXplw7g8+jAnhz9yiphYQE2Op/bwwym48hGrLUzop+e/vIa0+TD7tT2S9qRHkVsV2/mxcQN/9DrdNKhu9IOvBjjxrehtCjWYJ9aBEvLZJZA1ncK41OxmuZssuD7AOP9+PJticSNNgc1c/b8oOiU9JyB5afGLg/44A22PwKcEmd5w8OBta/1lmMjY3dkVA
    next
end
Address and Address Group#
- A new split-tunneling address group, with the Linux server as the unique member has been created by the VPN wizard:
- A new IP range address object representing the range of addresses that can be assigned to VPN clients has been created by the VPN wizard:

Network interface and zone#
- A network interface for the IPsec phase 1 has been created and added to a network zone:
Firewall Policy#
A new firewall policy allowing traffic coming from the IPsec VPN clients to the Linux server in the DMZ has been created by the VPN wizard:

We’re just changing the Log from UTM to All, to verify the traffic generated during our test.
Configure FortiClient#
Since we’re using the free version of FortiClient, all configurations needs to be done manually. In this lab we’re using FortiClient VPN v7.4.3.
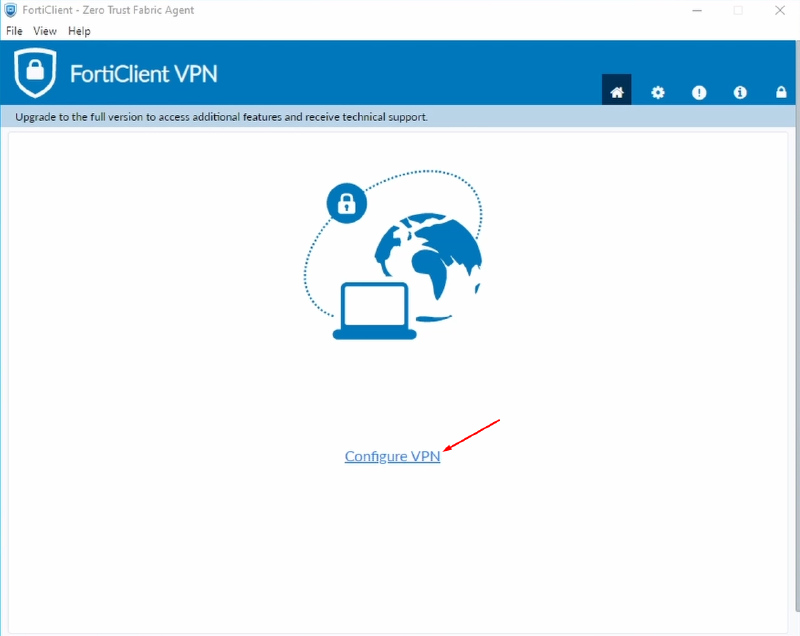
- Select
Configure VPN:
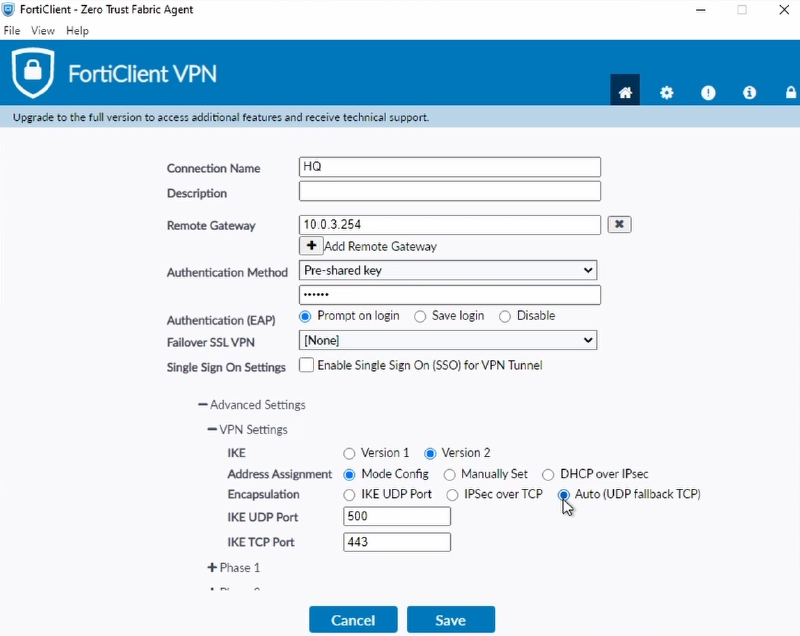
- Configure the VPN connection:
- VPN: IPsec VPN
- Connection Name: you can set your desired name for the VPN
- Remote Gateway: FortiGate WAN IP address (10.0.3.254 in this lab)
- Authentication Method: Enter the same key that we configured on the FortiGate. These two values must match exactly.
- Advanced Settings:
- IKE: Version 2
- Encapsulation: Auto
- Phase 1, Phase 2: you can leave the default values. Compatible values need to match with FortiGate VPN configuration.
SaveFortiClient configuration.
Connect to the VPN from FortiClient#
It’s time to test the VPN connection from FortiClient.
- Select the configured VPN, and insert the credentials for the user we defined earlier:
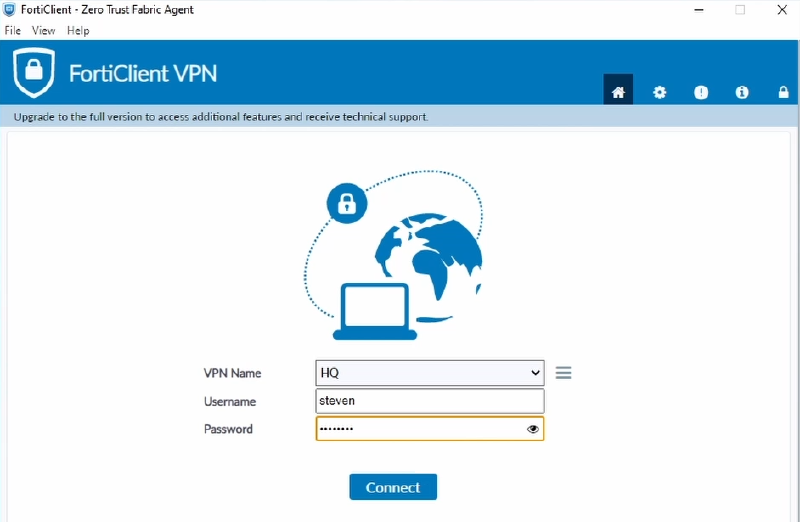
- Select
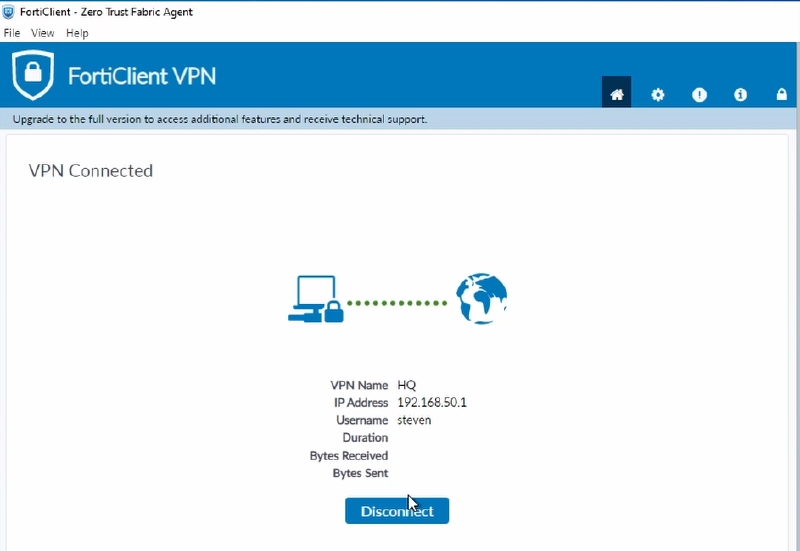
Connect. If everything went well you should see an IP address from the VPN poll is given to the client and it auto-minimizes the FortiClient app (you can open FortiClient app again from the Windows system tray):
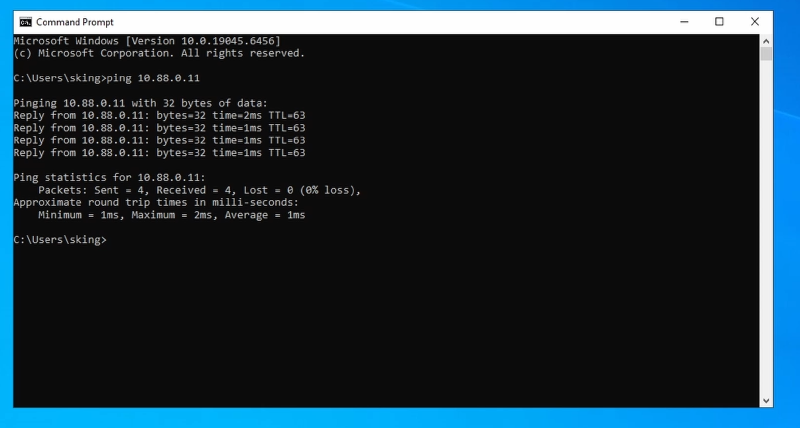
You can also test connectivity from the VPN client to the protected asset on the DMZ behind FortiGate. We can test doing a ping from the Window PC to the Linux server (10.88.0.11):
Verifying from FortiGate#
First, we can verify traffic matching bytes count has increased in the firewall policy created by FortiGate:
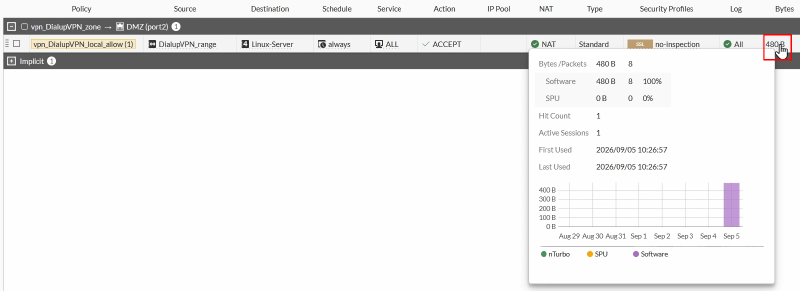
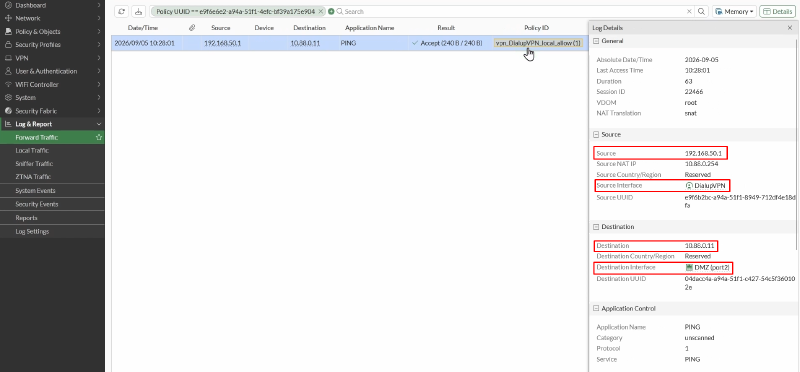
Under Log & Report > Forward Traffic, you can see traffic matching the new firewall policy:
Finally, under VPN > VPN Tunnels you can confirm a new dialup connection is up:

You can click under the status column value to get more details regarding the VPN connection:
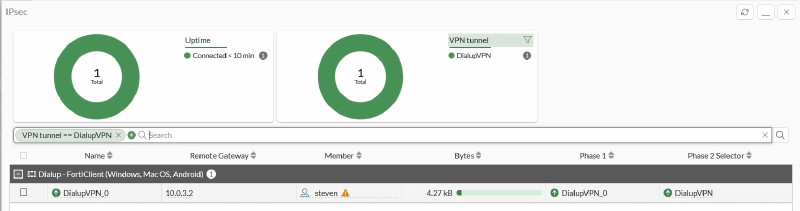
You can see the remote IP address and user connecting to the VPN.