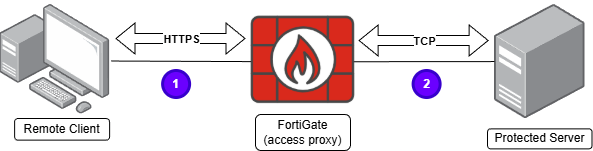
A ZTNA TCP Forwarding Access Proxy (TFAP) is a special type of HTTPS reverse proxy. As with any proxy, two different sessions are stablished:
- The client sends TCP traffic to the the access proxy (FortiGate) encapsulated in HTTPS (TCP/443).
- The FortiGate acting as a reverse proxy then forwards the traffic to the protected server over TCP using the original upper layer protocol.
In practice, TFAP can be used to securely and remotely access services like RDP, SMB, SSH, and other TCP protocols running on protected servers.
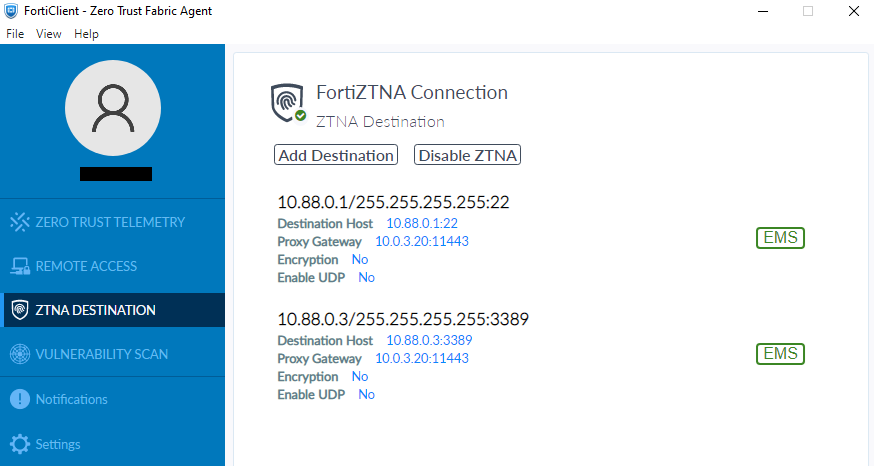
When using TFAP, multiple TCP services can be mapped to a single exposed IP address and port, even an HTTPS access proxy can be mapped to the same ZTNA server. Defining an EMS ZTNA Destinations profile allows to define what mapped TFAP services will be available to users.
Unlike an HTTPS access proxy that is accessed from the client’s browser by pointing to the proxy IP and port, TFAP services are accessed pointing to the real IP address and port where the service is running.
Topology and Pre-requisites#
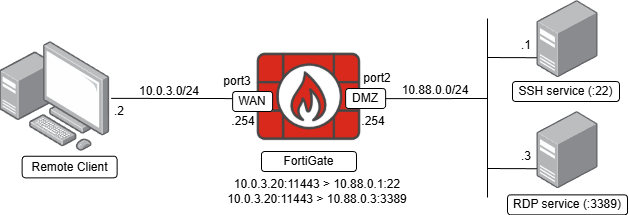
The topology used in this lab includes the following components:
- A remote client facing to the FortiGate WAN interface with
10.0.3.2IP address. This remote client needs to establish connections to the SSH and RDP services on the DMZ network. - Two services are running on the DMZ network. Both of these services must be accesible via ZTNA policies from the remote client:
- SSH service:
10.88.0.1:22 - RDP service:
10.88.0.3:3389
- SSH service:
- A FortiGate as the TFAP access proxy protecting the connections from remote clients to the protected resources.
These pre-requisites are already in place:
- FortiGate and EMS are connected to the same security fabric.
- Remote client’s FortiClient is connected to EMS with the ZTNA feature installed.
Configuring a ZTNA TFAP#
For the first service configuration, a ZTNA TCP Forwarding Access Proxy for SSH to a Windows Server is configured, following these steps:
- On FortiGate, navigate to
Policy & Objects > ZTNA > ZTNA Servers. SelectCreate New. - Define the initial ZTNA server properties:
NameConnect Onsection - set the external connection parameters including the FortiGate interface, IP address and port.Services and Servers- select theDefault certificate, which will be returned by the FortiGate for incoming connections.
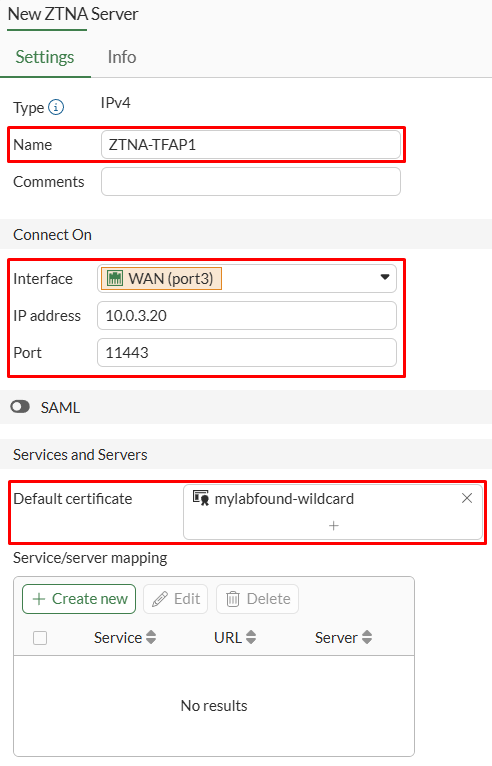
- Under
Service/server mappingsection, selectCreate newto define the real server mapping:Service- selectTCP Forwarding- Under
Serversection, select theAddressobject and listeningPortsof the real server. In this example, the SSH service is running on10.88.0.1:22
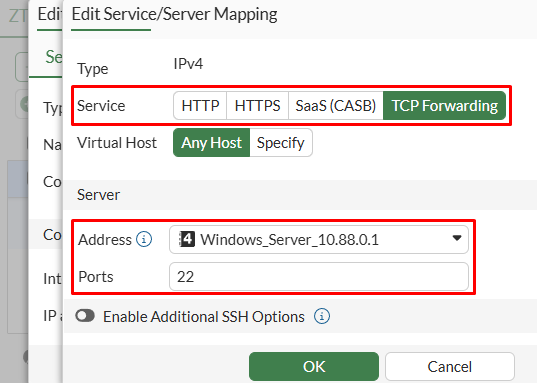
- Press
OKto save changes. Verify the new service/server mapping and pressOKagain:
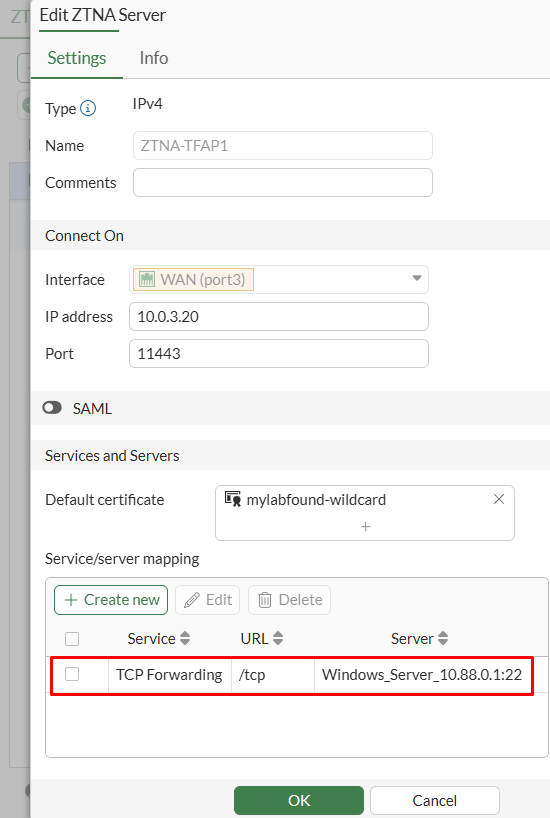
From FortiGate CLI, the new configuration can be verified:
- A new VIP with type set to
access-proxywas added:
config firewall vip
    edit "ZTNA-TFAP1"
        set uuid d6e82020-f94b-51f0-685b-2a1c15b39b4c
        set type access-proxy
        set server-type https
        set extip 10.0.3.20
        set extintf "port3"
        set extport 11443
        set ssl-certificate "mylabfound-wildcard"
    next
end
- The access proxy object using the VIP object and the
tcp-forwardingservice:
config firewall access-proxy
    edit "ZTNA-TFAP1"
        set vip "ZTNA-TFAP1"
        config api-gateway
            edit 1
                set url-map "/tcp"
                set service tcp-forwarding
                config realservers
                    edit 1
                        set address "Windows_Server_10.88.0.1"
                        set mappedport 22
                    next
                end
            next
        end
    next
end
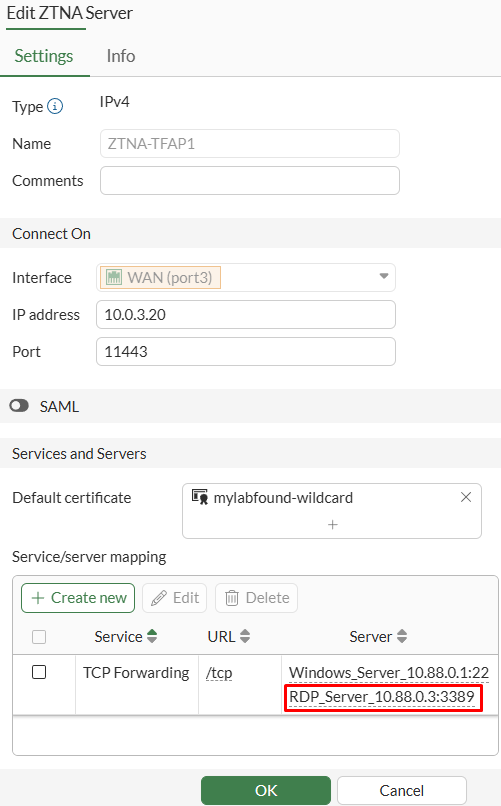
Adding more TFAP service/server mappings#
From FortiOS v7.4.3 and onwards, adding a second TCP Forwarding service/server mapping to the same ZTNA server from the GUI is not possible. CLI must be used for this purpose.
In this example, a new RDP service/server mapping will be added to the previously created ZTNA server. The real server is listening for RDP connection on 10.88.0.3:3389
On FortiGate CLI, access the config firewall access-proxy section and add a second real server entry (config realservers) to the existing ZTNA server object:
config firewall access-proxy
    edit "ZTNA-TFAP1"
        set vip "ZTNA-TFAP1"
        config api-gateway
            edit 1
                set url-map "/tcp"
                set service tcp-forwarding
                config realservers
                    edit 1
                        set address "Windows_Server_10.88.0.1"
                        set mappedport 22
                    next
                    edit 2 <----------------------------------- NEW CONFIG
                        set address "RDP_Server_10.88.0.3"
                        set mappedport 3389
                    next
                end
            next
        end
    next
end
From FortiGate GUI, the ZTNA server configuration is updated including this new real server mapping:
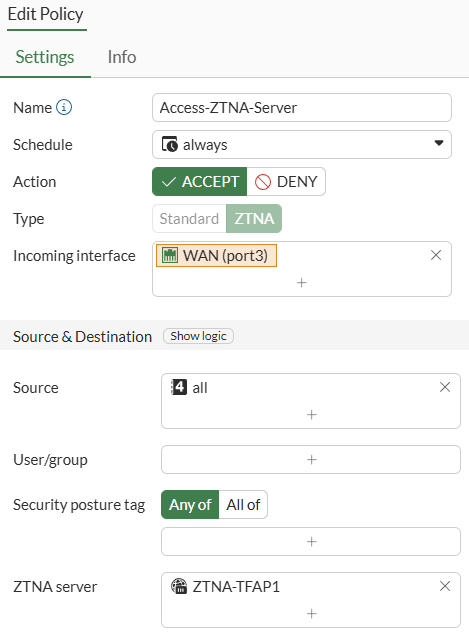
Configuring a ZTNA Firewall Policy#
The ZTNA firewall policy defines who will be able to access the protected resources via ZTNA.
Go to Policy & Objects > Firewall Policy, select Create New. All connections coming from the WAN interface trying to connect to the ZTNA server are allowed:
EMS ZTNA Application Catalog#
From FortiOS 7.6.0 (and +7.4.5) and EMS 7.4.1 (and +7.2.5), once a ZTNA server with TCP forwarding service/server mapping is created, FortiGate syncs that service to EMS applications catalog through the fabric connector. In previous FortiGate/EMS versions, applications had to be created manually.
When configuring a ZTNA destination profile, EMS administrator just need to select what ZTNA applications from the catalog are required to be available on FortiClient endpoints.
To verify the existing ZTNA applications on the catalog on EMS, navigate to Fabric & Connectors > ZTNA Applications Catalog:
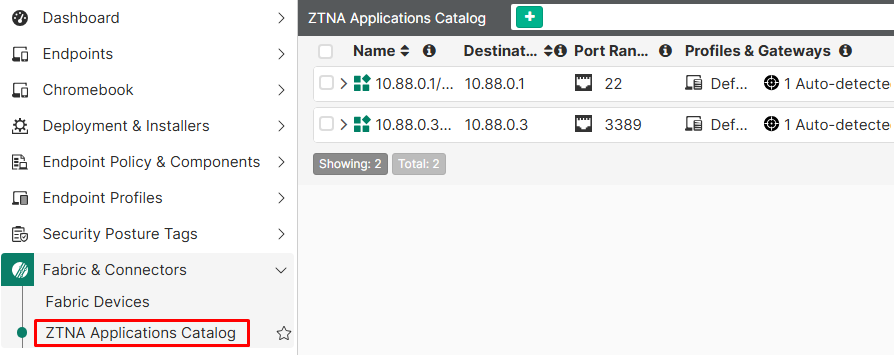
The default view is the Applications View, where ZTNA applications are listed and expanding each one give details about what fabric connector transmitted the information:
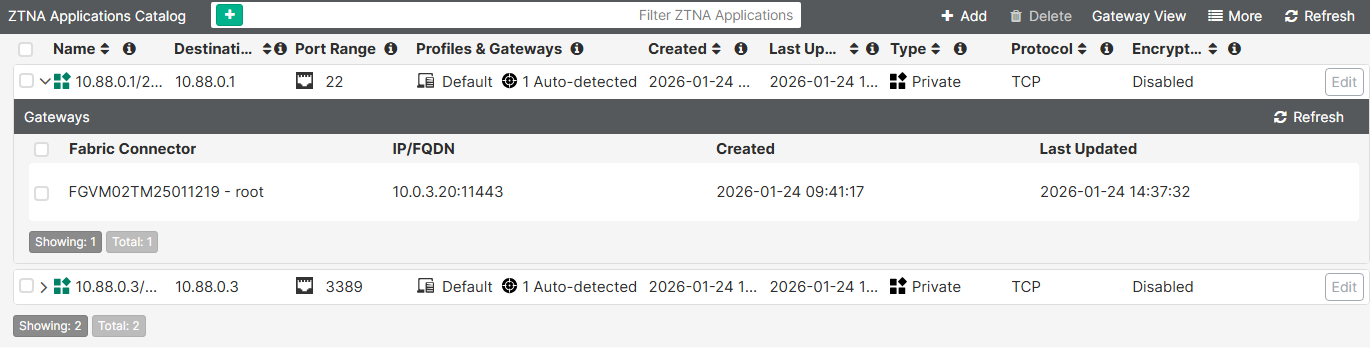
In this case, the two ZTNA TFAP mappings, including the SSH and RDP services have been synchronized properly.
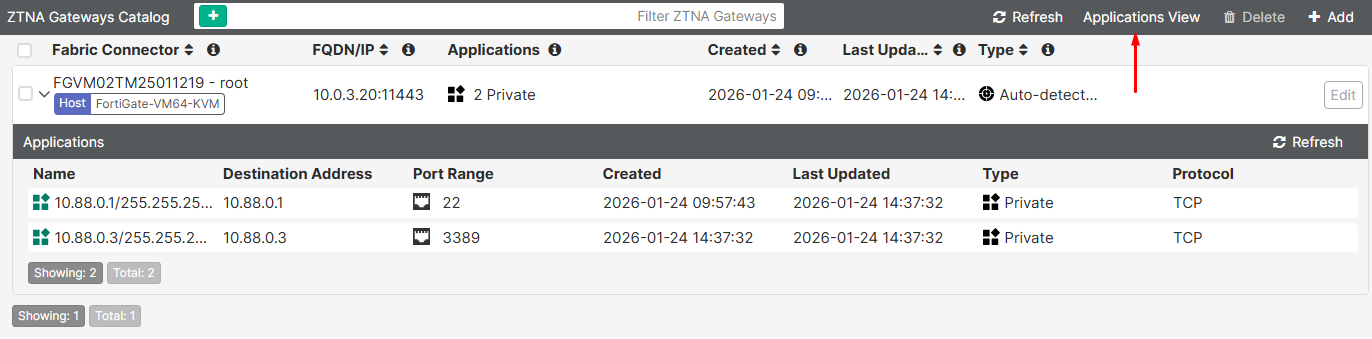
Changing to Gateway View, groups all applications by each FortiGate fabric connector:
Configuring a ZTNA Destination Profile#
Defining a ZTNA destination profile is not required when doing HTTPS reverse proxy for an HTTP web server. However, when using TCP forwarding access proxy, defining a ZTNA destination profile is required, so FortiClient is able to forward traffic to the FortiGate ZTNA server.
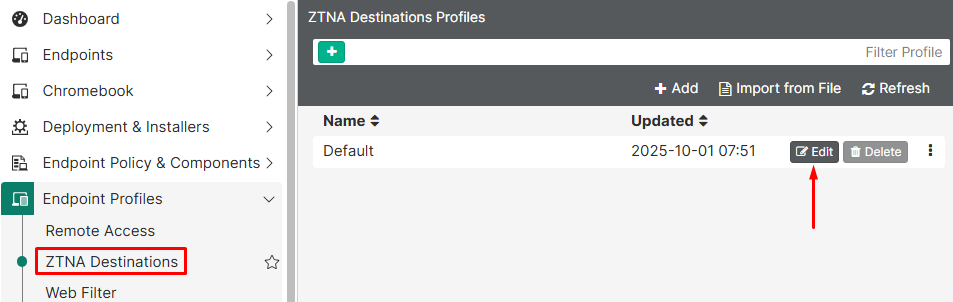
In this example, the Default ZTNA destination profile will be edited to include the previously reviewed ZTNA applications.
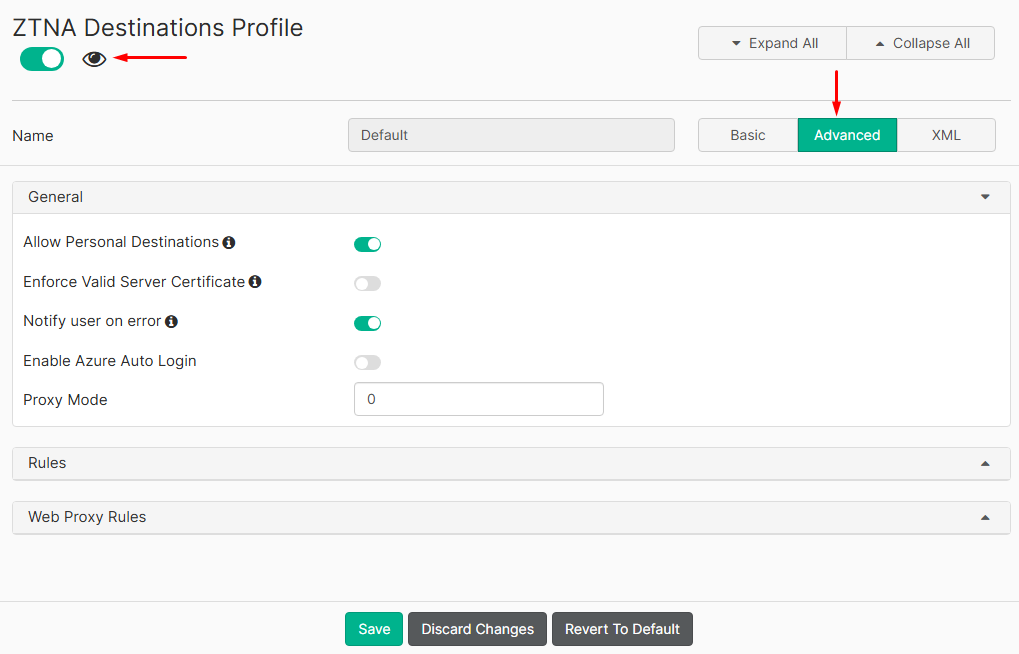
- Under
Endpoint Profiles > ZTNA Destinations, edit theDefaultprofile:
- Select the
Advancedoption, then click on the eye icon to make this feature visible to the user:
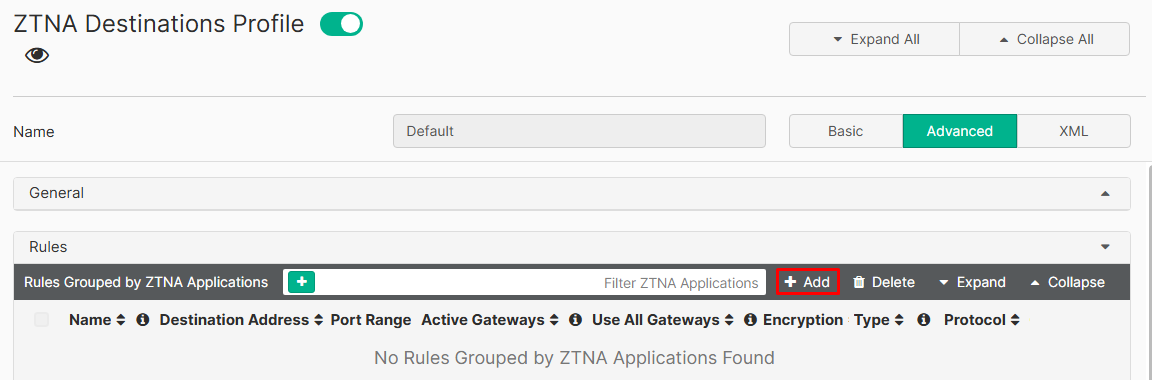
- Under
Rulessection, click on+Add:
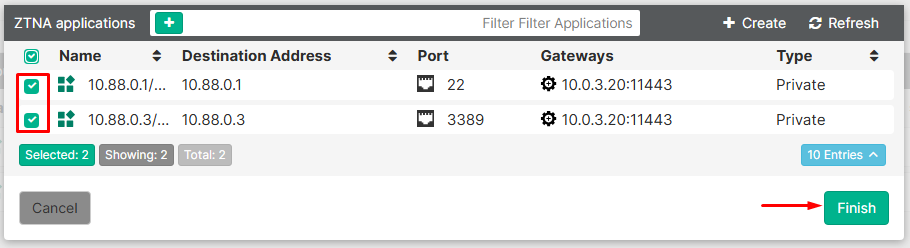
- Select the ZTNA applications and then click on
Finish:
In this example, the SSH and RDP services are selected.
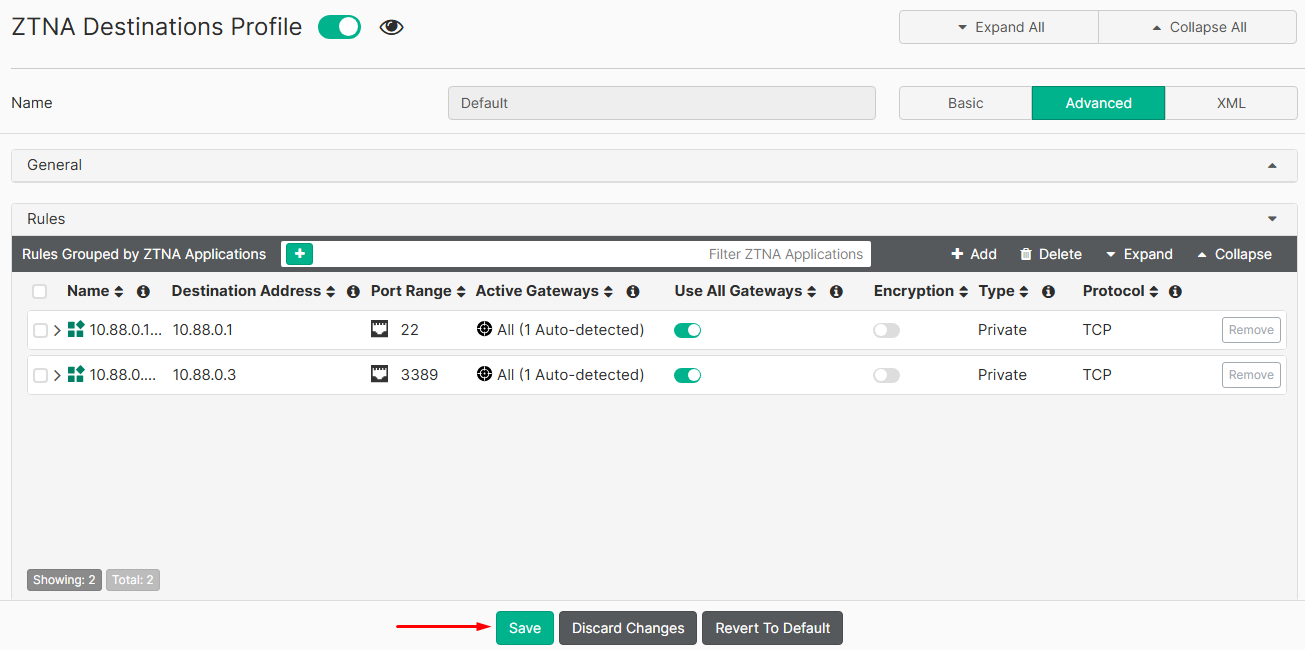
- Click on
Save:
- If FortiClient telemetry is connected to the EMS, the ZTNA Destination configuration should be received:
Testing Remote access to the TCP Forwarding Access Proxy#
To access TFAP services, clients need to connect to the real IP and port, defined in the ZTNA destinations profile received according to the EMS policies.
Following, access to the defined ZTNA TFAP services will be tested from the remote client with 10.0.3.2 IP address:
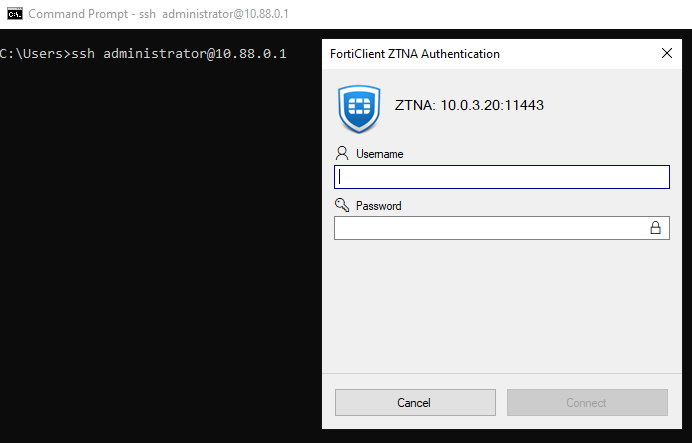
- Testing SSH access:
From the Windows remote client CMD, a SSH connection is tested to the TFAP service:

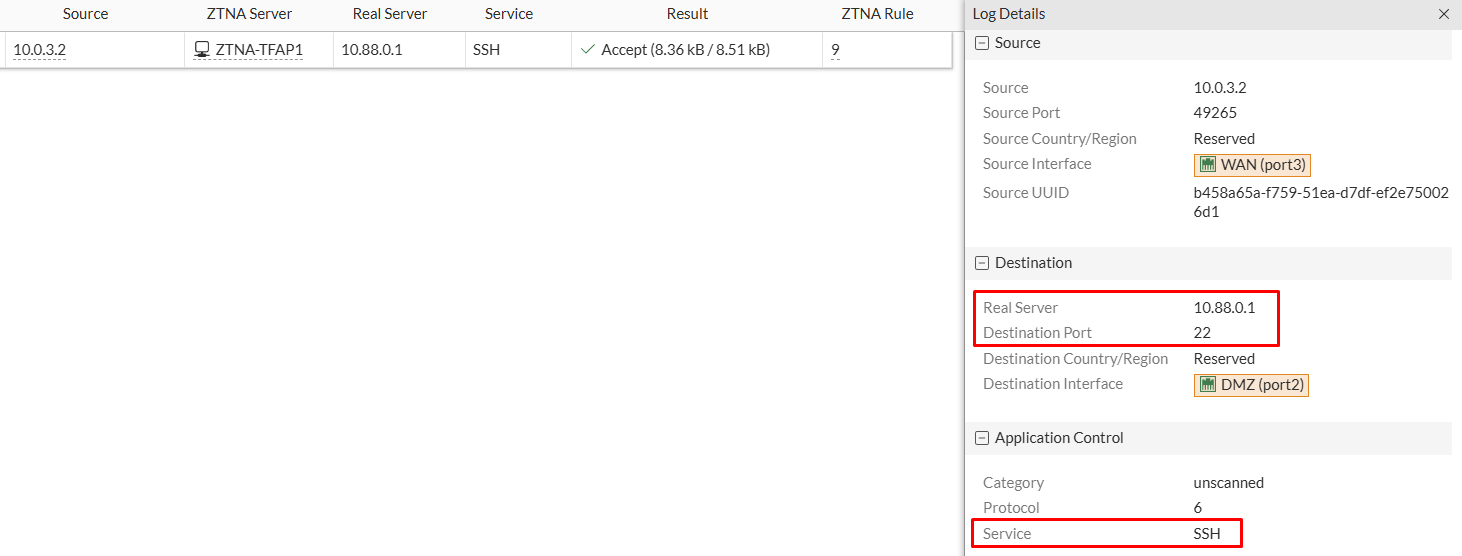
From FortiGate, ZTNA logs (Log & Report > ZTNA Traffic) indicate that the connection to the ZTNA server was accepted according to the ZTNA firewall policy. The log details show that the real server and destination port are 10.88.0.1:22 and the detected service is SSH:
In case authentication is enabled for this ZTNA server (auth rule, auth scheme, and user/group defined), FortiClient will prompt for user credentials:
FortiClient caches the authentication, so further connections to this service or another service under the same TFAP won’t require the user to authenticate again. Since credentials are cached on FortiClient, even de-authenticating the user from FortiGate won’t make to require inserting credentials again.
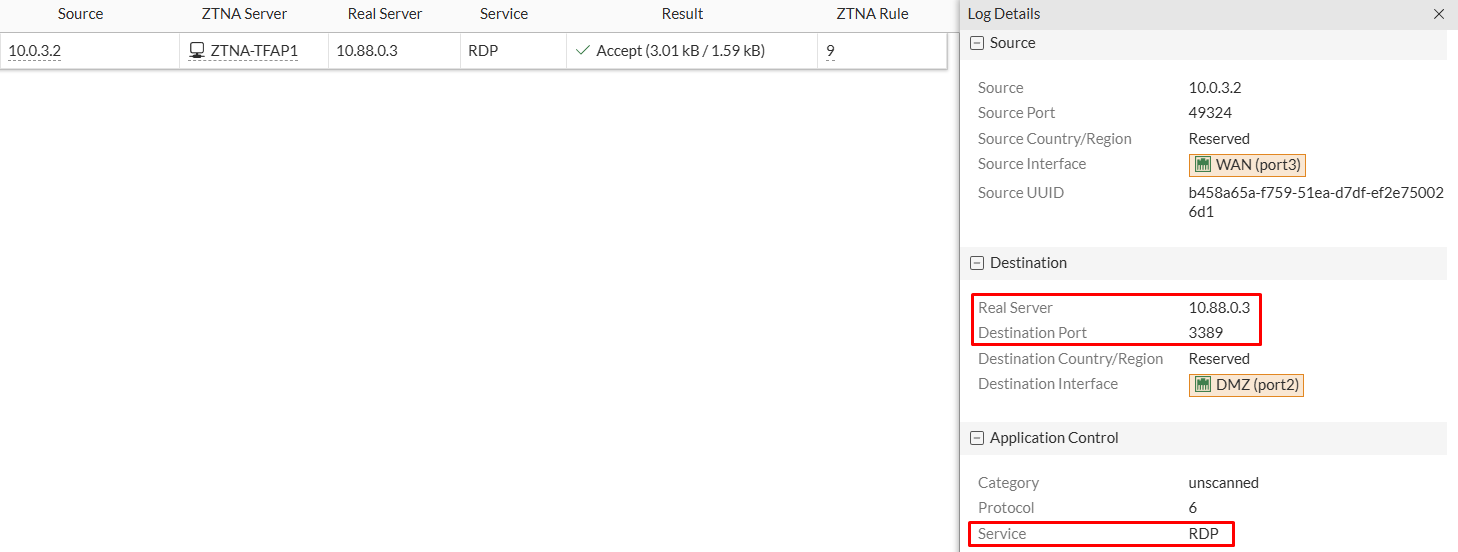
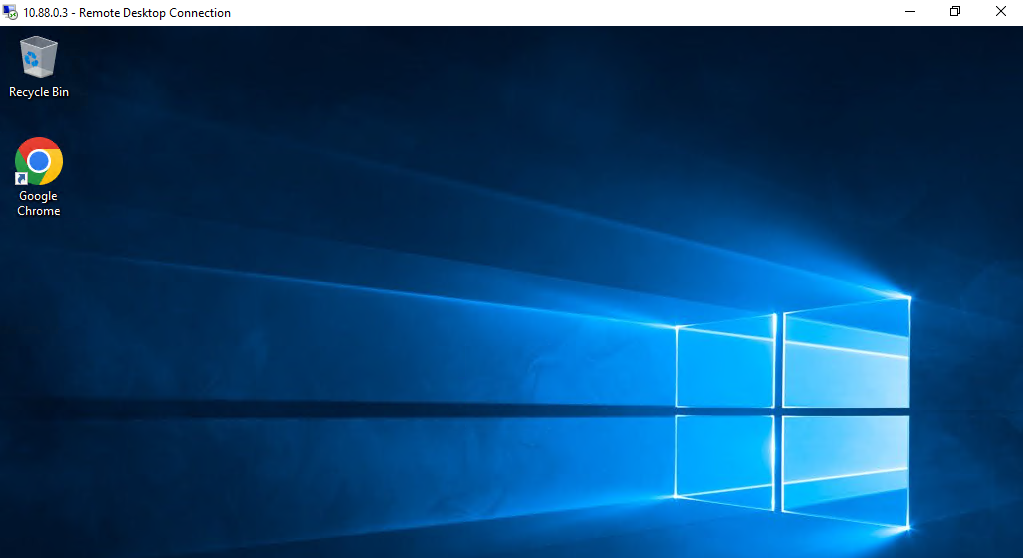
- Testing RDP access:
For testing access to the RDP TFAP service from the remote client, the Windows RDP program is used pointing to the real IP of the protected server:
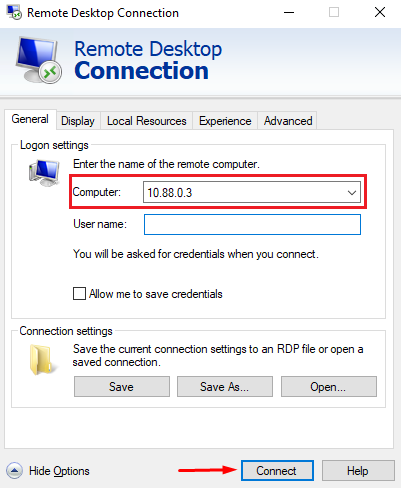
The RDP session should open normally:
ZTNA logs (Log & Report > ZTNA Traffic) show that the real server and destination port are 10.88.0.3:3389 and the detected service is RDP: