The FortiAuthenticator Agent for Windows allows organizations to enforce multi-factor authentication (MFA) directly at the Windows logon screen. By acting as a credential provider, the agent integrates seamlessly with FortiAuthenticator to validate one-time passwords (OTP) before Windows processes user credentials. This article provides a step-by-step walkthrough of deploying and configuring the Windows Agent in an Active Directory environment, including agent installation, REST API integration, domain and user handling, exemptions, administrative overrides, and enforcement options to securely protect Windows endpoints against unauthorized access.
Topology and Setup#
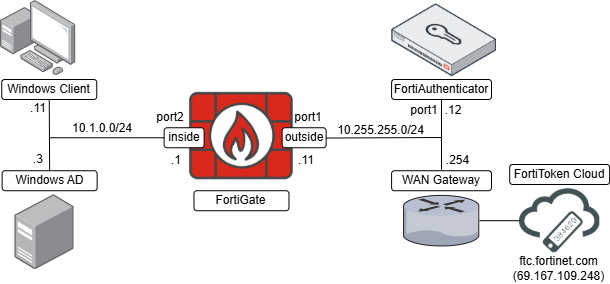
| Device | IP address |
|---|---|
| FortiGate port1 (outside) | 10.255.255.11 |
| FortiGate port2 (inside) | 10.1.0.1 |
| Windows AD | 10.1.0.3 |
| Windows Client | 10.1.0.11 |
| FortiAuthenticator | 10.255.255.12 |
| FortiToken Cloud | ftc.fortinet.com (69.167.109.248) |
Both the Windows client and the Windows server with domain services installed belong to the same network, behind FortiGate port2 interface as gateway. The FortiAuthenticator is connected on the same network as FortiGate’s port1 and the WAN Gateway. The FortiToken Cloud service is reachable through this WAN gateway.
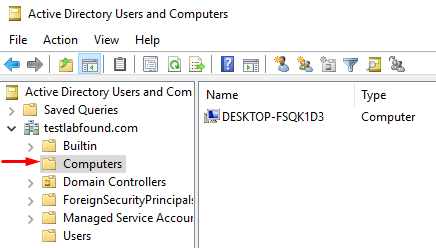
The Windows client with hostname “DESKTOP-FSQK1D3” is part of the domain “testlabfound.com” managed by the Windows AD domain controller:
Pre-requisites#
The following elements are in place in FortiAuthenticator:
- FortiAuthenticator’s port1 is configured with 10.255.255.12/24 IP address.
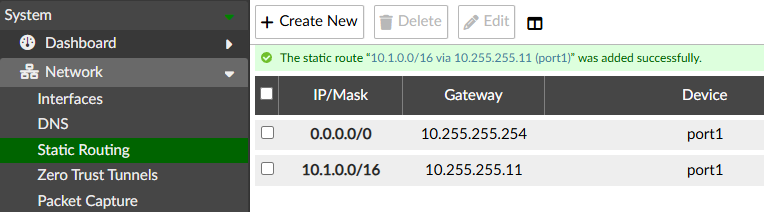
- Two static routes exist: one default route through the WAN gateway (10.255.255.254), and one route to the internal network through FortiGate port1 (10.255.255.11).
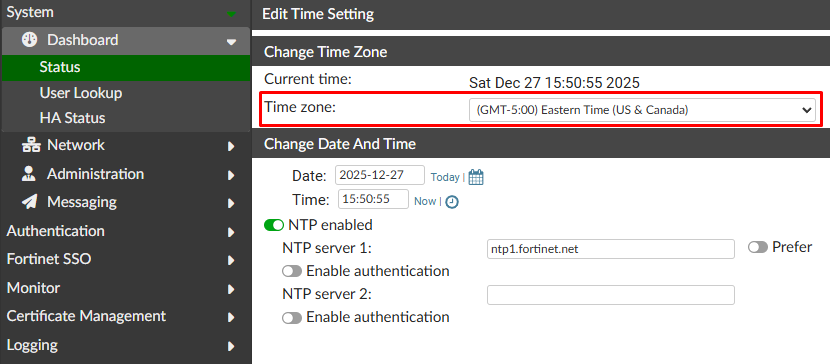
- The time zone is properly configured and the time is accurate:
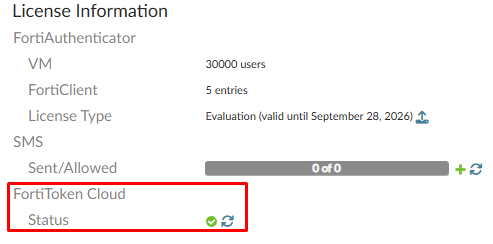
- FortiToken Cloud license is activated:
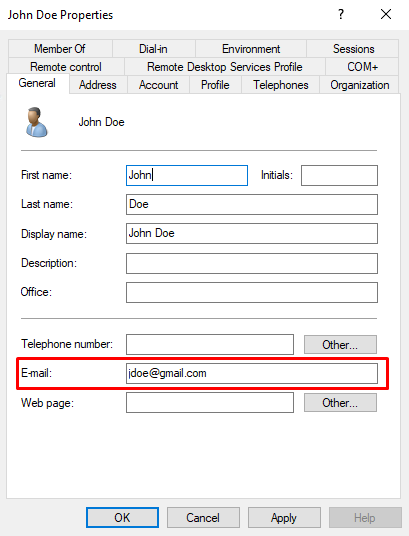
On Windows AD, an email is configured on domain users that will be provisioned with a FortiToken:
Initial FortiAuthenticator Setup#
Some general objects need to be configured as part of the integration between FortiAuthenticator and Windows Active Directory:
Remote Authentication Server#
When users are not locally created on FortiAuthenticator, a remote authentication server can be used to define the remote server where users and their credentials are defined, as well as the communication protocol with that server (LDAP, RADIUS, SAML, TACACS+, OAuth). Although remote user credentials are not stored in FortiAuthenticator, a remote user can be imported to integrate a MFA method.
To integrate FortiAuthenticator with the Windows Active Directory server via LDAP, the following steps are done:
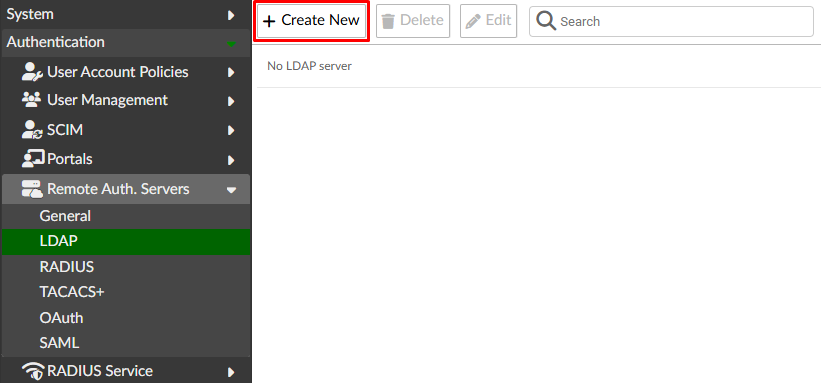
- Go to
Authentication > Remote Auth servers > LDAP. SelectCreate New:
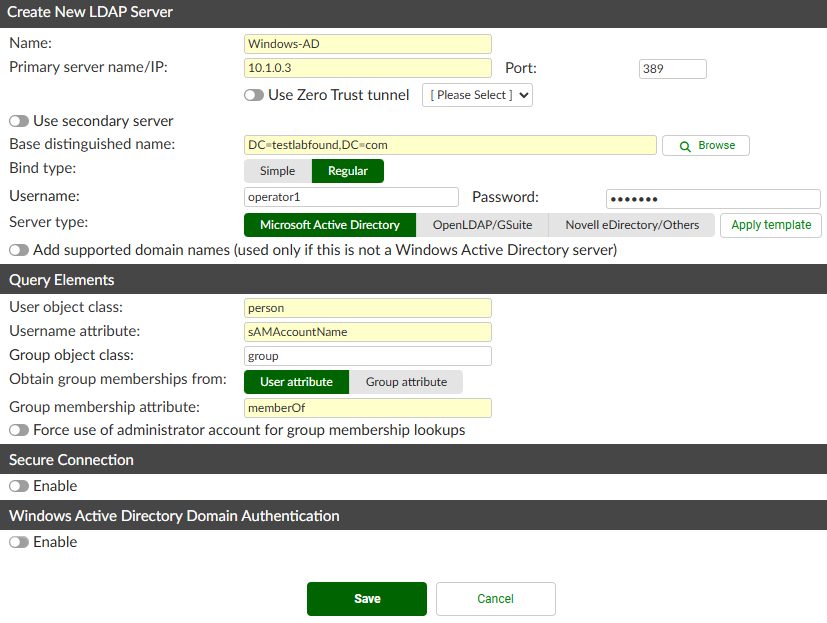
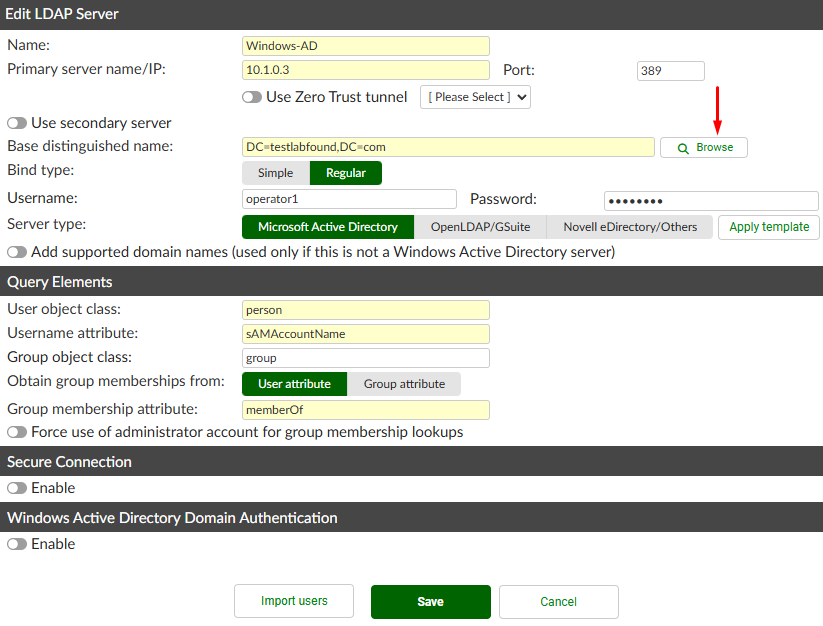
- Define the LDAP remote server settings:
Name: Windows-ADPrimary Server name/IP: 10.1.0.3Based distinguished name:DC=testlabfound,DC=com(you can use theBrowsebutton to query the server IP)Bind type: RegularUsername: operator1 (a non-admin user is used in this case)PasswordServer Type: Microsoft Active Directory
You can leave other settings as default.
Regarding the required minimum privileges for the AD user to be added, check the following references:
Note that Secure Connection is disabled, so LDAPS is not used in this scenario. Windows Active Directory Authentication is also disabled, but it can be used for allowing FortiAuthenticator to be logged in the Windows domain (required in specific use cases like 802.1X with PEAP-MSCHAPv2).
- Press
Save. Then click onBrowseto confirm the defined credentials have visibility to the desired OUs where the groups/users that will be imported to FortiAuthenticator are present:
A new pop up window appears. In this lab, the HQ OU contains the groups and users of interest to integrate with FortiAuthenticator for MFA:
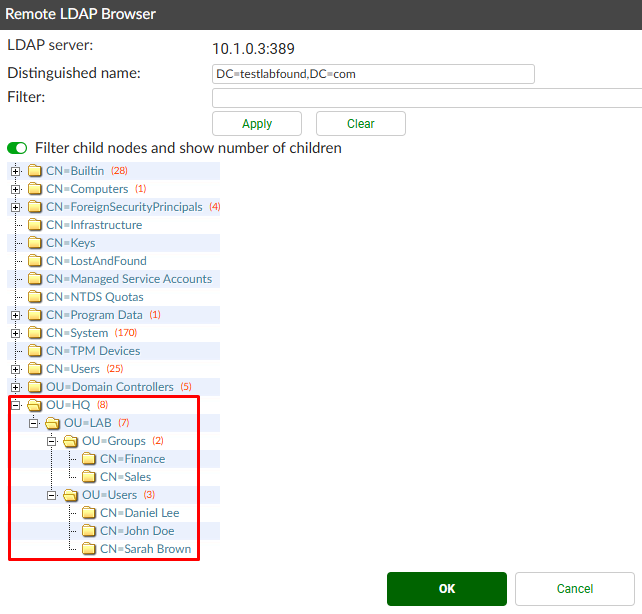
The users from the HQ OU belong to the following custom groups:
| User | Member of custom groups |
|---|---|
| jdoe | Finance, Sales |
| dlee | Sales |
| sbrown | Finance |
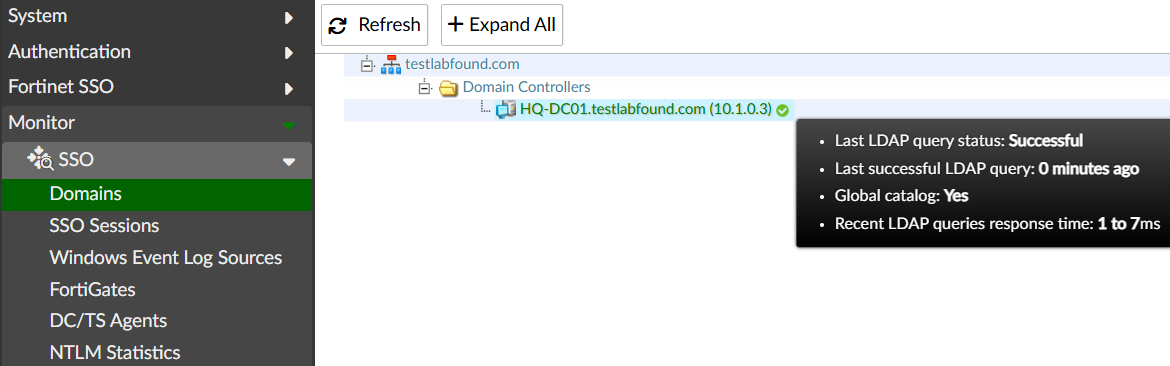
- Go to
Monitor > SSO > Domains. Expand the integrated domain, and verify the domain controller status isSucessfulby hovering over the DC node FQDN:
Realm#
Multiple domains can authenticate to a single FortiAuthenticator device by defining Realms. A realm defines against which database a user should be authenticated on FortiAuthenticator. This means that FortiAuthenticator uses a realm to identify the backend RADIUS, LDAP, or SAML authentication server used to authenticate the user.
When defining a Realm, the Name determines against what realm the authentication request is redirected for the received “user@domain”.
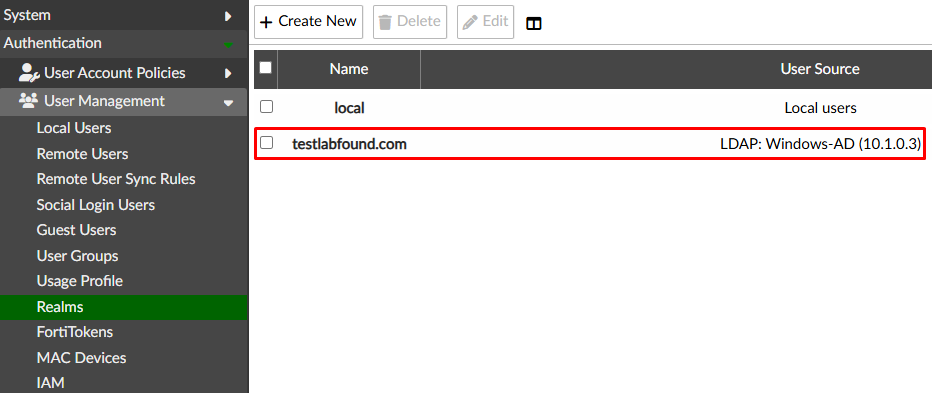
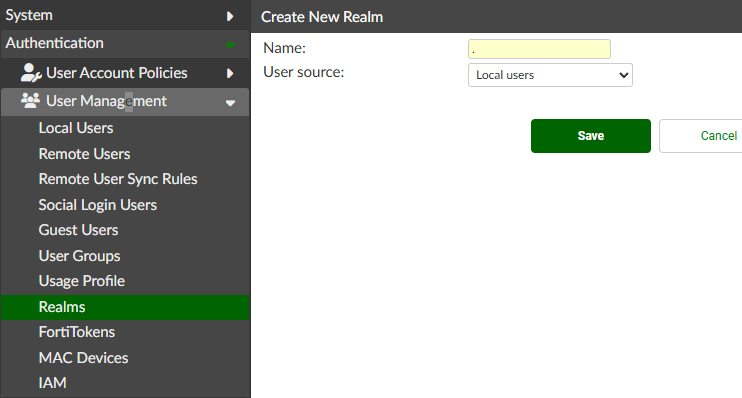
To create a realm, go to Authentication > User Management > Realms and select Create New. Define the Name and User Source (Remote Authentication LDAP Server):
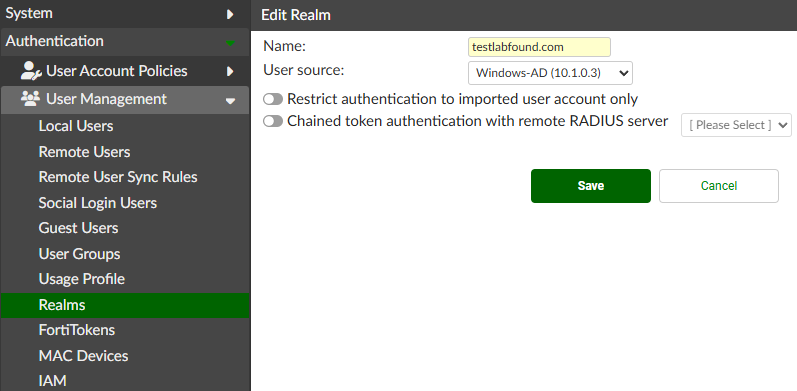
Save the changes. Verify the realm is listed:
Remote LDAP User Group#
To create a new user group go to Authentication > User Management > User Groups. Define the user group parameters:
Name: financeType: Remote LDAPUser retrieval: Set a list of imported remote LDAP usersRemote LDAP: select the created remote LDAP server
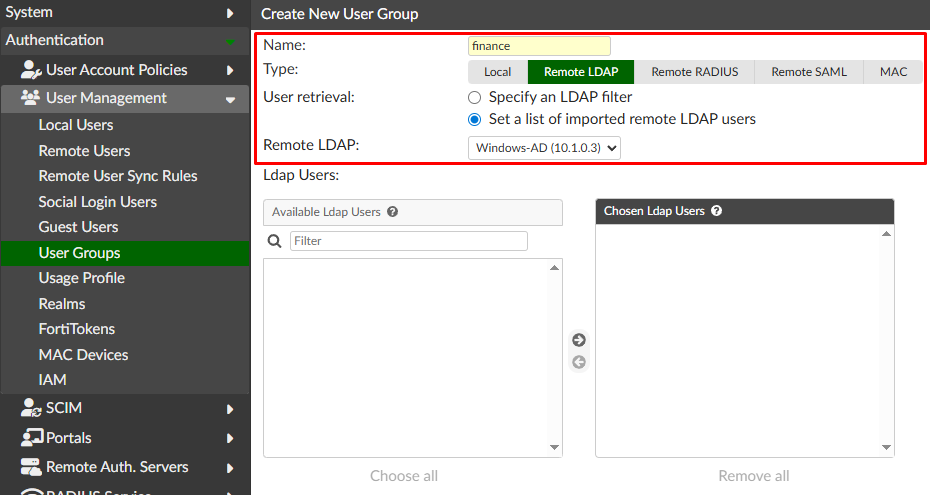
Select Save. This user group doesn’t have any synced user yet. A remote user sync rule needs to be in place to populate this user group with the filtered remote users.
Remote User Sync Rule#
This user sync rule will import the remote users that are member of the “Finance” AD group into the FortiAuthenticator “finance” local group. To configure a new LDAP remote user sync rule follow these steps:
- Go to
Authentication > User Management > Remote User Sync, selectLDAPtab, and then pressCreate Newbutton:
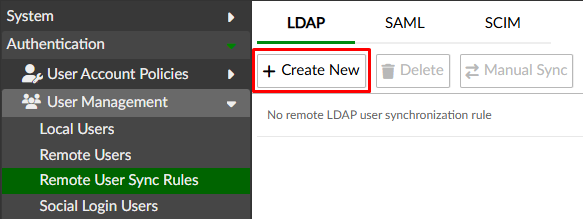
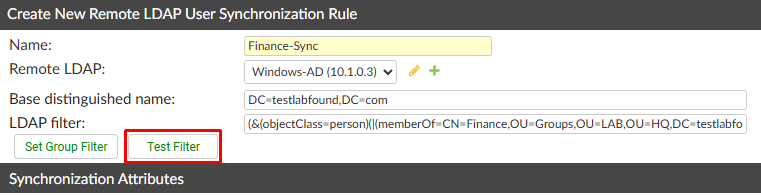
- Configure the initial parameters of the user sync rule:
Name: Finance-SyncRemote LDAP: select the created remote LDAP serverBase distinguished name(auto-populated whenRemote LDAPis selected)LDAP Filter: selectSet Group Filterbutton

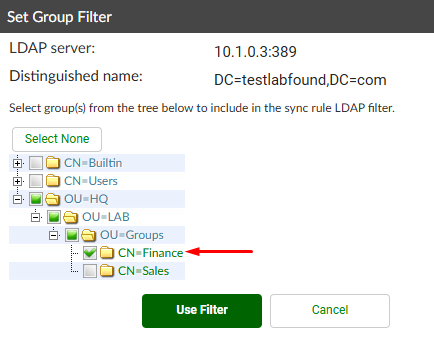
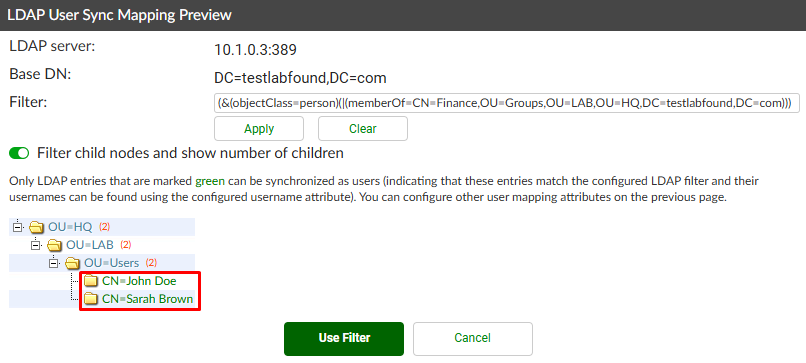
A new pop up windows appears to set the group filter. Select the Finance AD group and press Use Filter:
Next, to confirm what users that are part of the selected group are filtered, use the Test Filter button:
Two AD users belong to the Finance AD group:
- Following the remote user sync rule creation, under
Synchronization Attributessection, configure the settings:
OTP method assignment priority: in this scenario, onlyFortiToken Cloud - FortiToken Mobileis enabled.Sync as: leave the defaultRemote LDAP UserSync every: 1 hour (can be set to days/hours/minutes)Group to associate users with: “finance” (Remote LDAP User Group previously created)
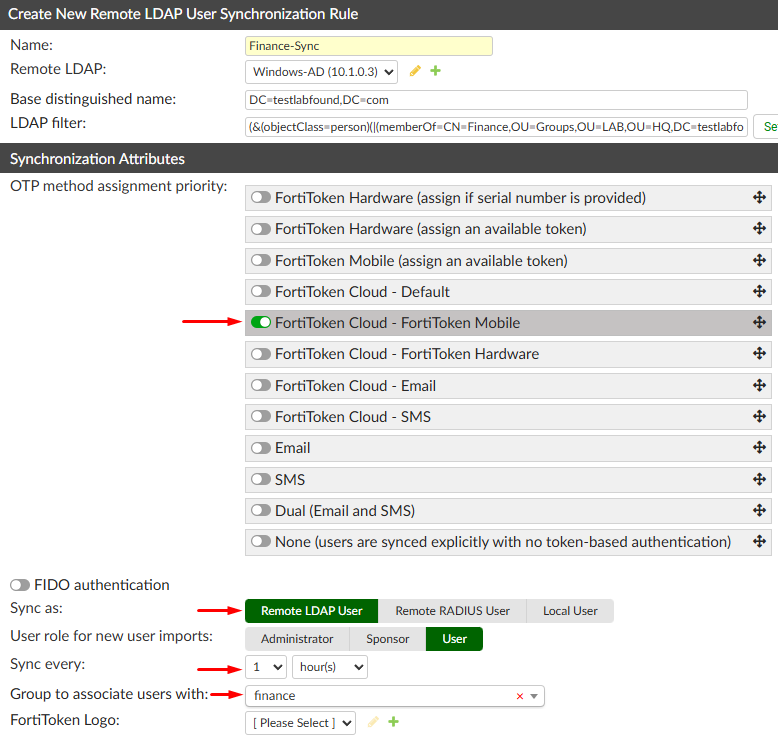
Save the changes.
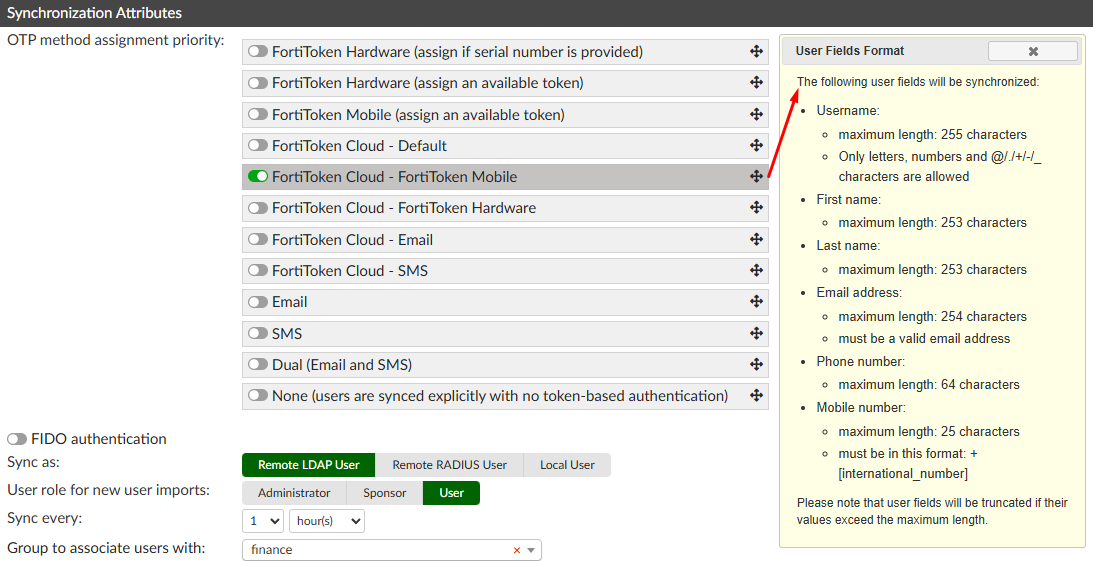
When FortiToken Cloud - FortiToken Mobile OTP method is enabled, a window message appears at the right indicating the AD user fields that will be synchronized to FortiAuthenticator:
Under the LDAP User Mapping Attributes section of the remote user sync rule creation menu, it’s defined how each AD user attribute will be mapped into FortiAuthenticator user attributes:
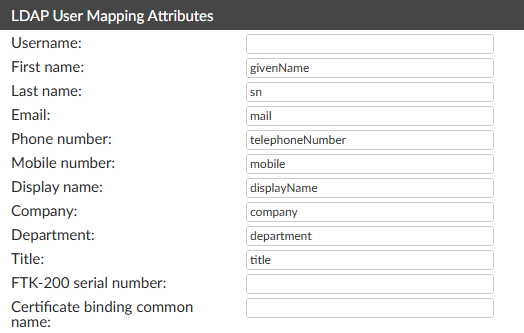
The importance of this remote user sync rule is that as new users are added to this filtered LDAP group, they will receive a FortiToken a soon as the automatic sync task runs (time according to the Sync every field value). Furthermore, once a user of that synched group is removed, the corresponding FortiToken license is released.
Synching AD Users#
Now that the remote user sync rule is configured, it’s time to sync the filtered AD users:
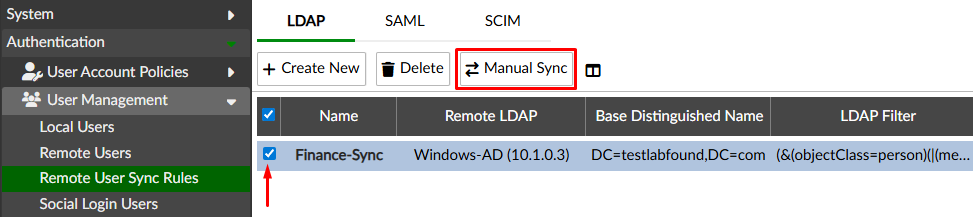
- Still under
Authentication > User Management > Remote User Sync, select the created rule and selectManual Sync:
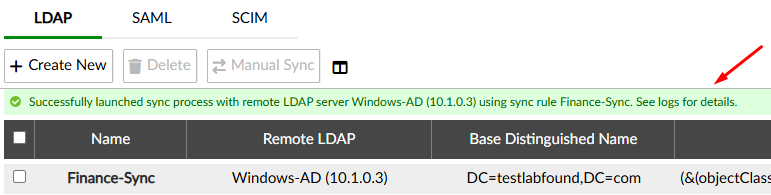
A message confirming the start of the sync process shows up:
- To confirm what users have been synched up, go to
Authentication > User Management > Remote Users:

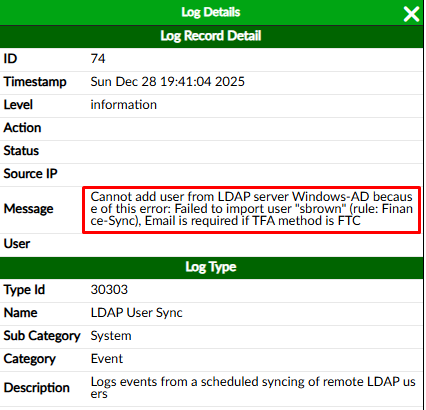
Two users belong to “Finance” AD group: “jdoe” and “sbrown”. However only “jdoe” is listed. Going to Logging > Log Access > Logs gives more hints about the reason behind this:
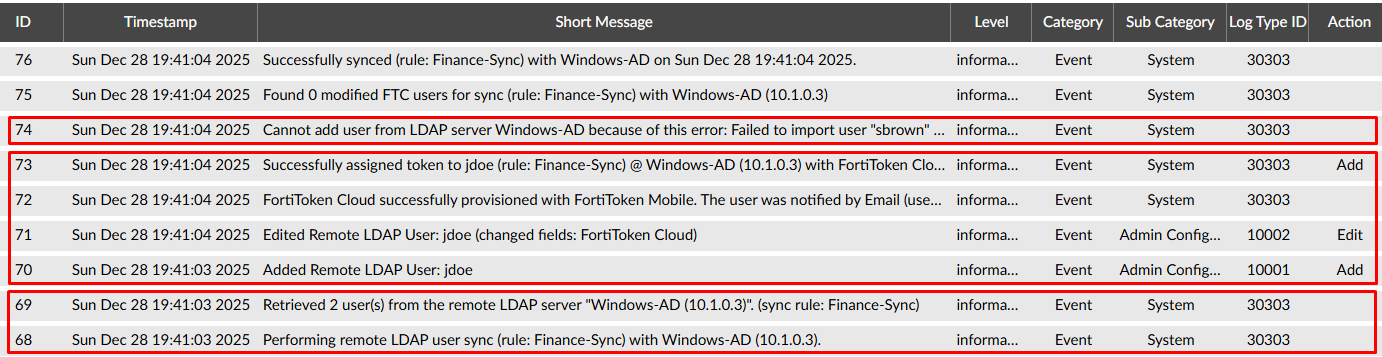
- Logs 68-69 indicate that 2 users were retrieved after performing the remote LDAP user sync. This matches the number of users that are part of the “Finance” group ("jdoe" and “sbrown”).
- Logs 70-73 indicate that “jdoe” was added as a remote LDAP user into FortiAuthenticator, and a token was successfully assigned to the user with FortiToken Cloud. The user was notified to enable this token.
- Log 74 indicate a user import error, because the user email needs to be defined if Two-Factor Authentication (TFA) method is FortiToken Cloud (FTC). As the log details show, we can determine “sbrown” doesn’t have an email configured in the AD:
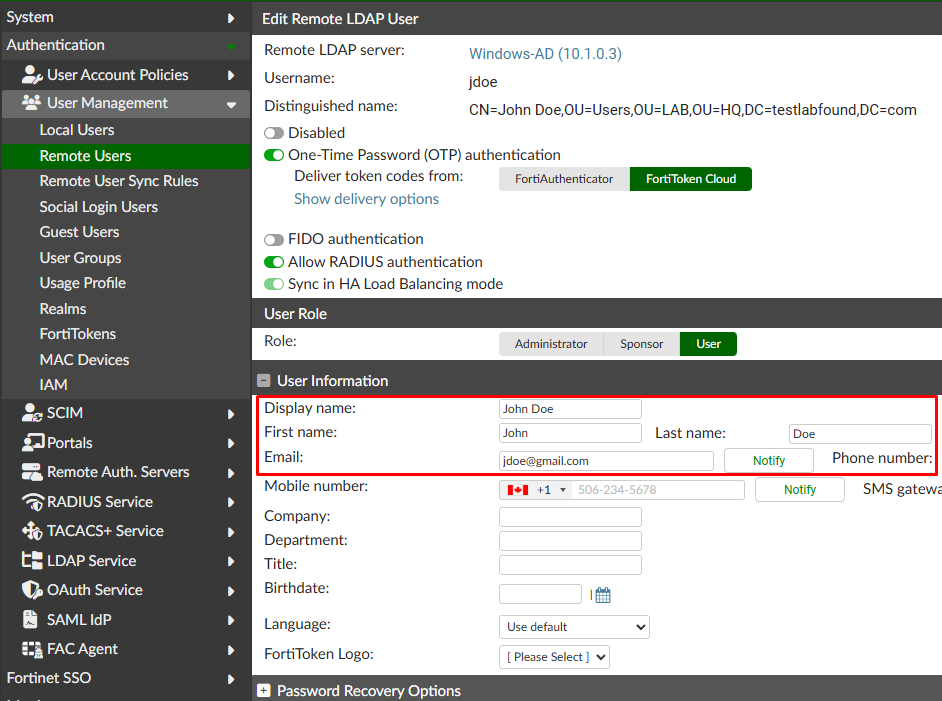
- Still under
Authentication > User Management > Remote Users, select the imported user “jdoe” to confirm their properties, underUser Informationsection:
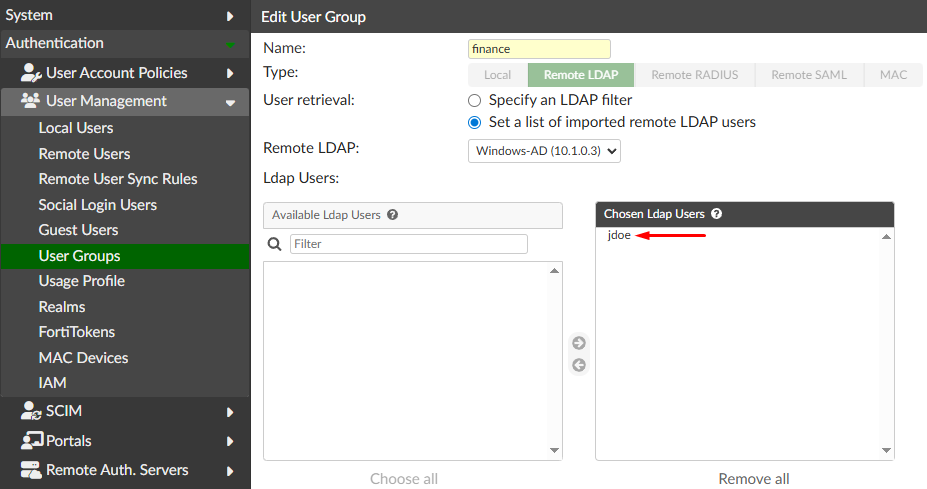
- Under
User Management > User Groups, confirm that the imported usee is part of the FortiAuthenticator user group:
Activating the FortiToken#
To provision the FortiToken on the synched user follow these steps:
- Install FortiToken Mobile Application from the Play Store or the Apple store on the smartphone device owned by the user.
- Verify an email has been delivered from fortiidentitycloud-noreply@email.fortinet.com to the AD user email with an activation code and a QR code. Use either of those two methods for activating the token:
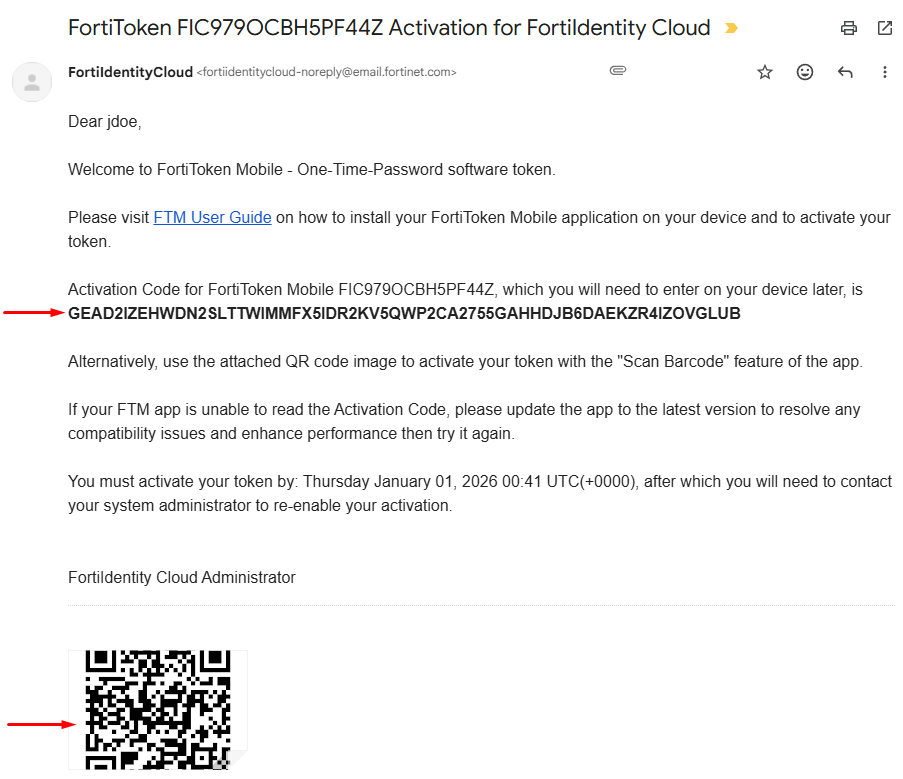
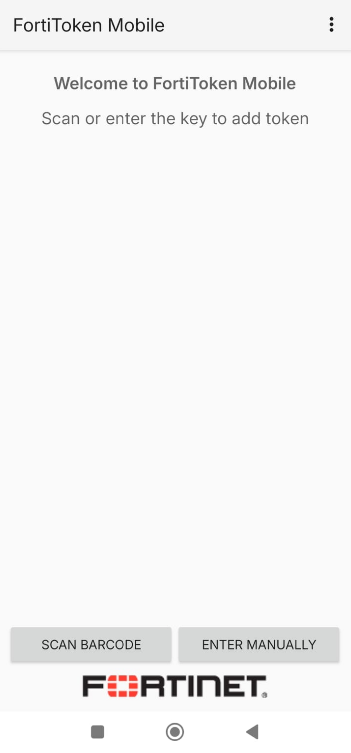
- On the FortiToken Mobile app, select
Scan Barcodeto scan the QR code orEnter Manuallyto insert the code:
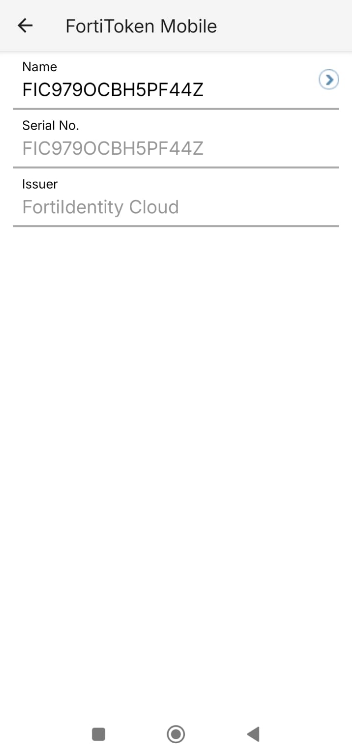
After the token is added, you can verify its serial number:
Windows FortiAuthenticator Agent Setup#
The Windows FortiAuthenticator (FAC) Agent software can be installed on Windows domain endpoints to provide FortiAuthenticator OTP in the Windows authentication process.
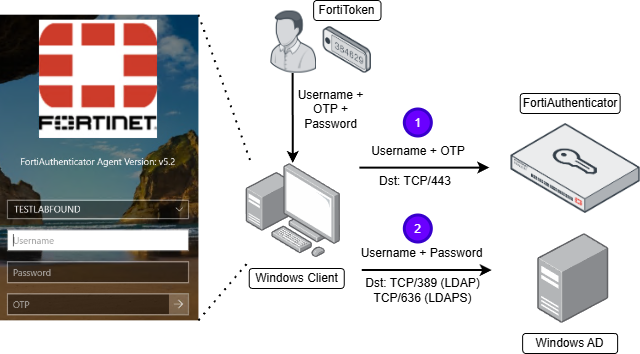
When FortiAuthenticator OTP is part of the Windows authentication process, the login becomes in a two step process, that prevents password brute force attacks:
- Username and OTP are validated via FortiAuthenticator (destination port TCP/443)
- If the previous step is valid, username and password are validated against Active Directory as a regular Windows login (destination port TCP/389 for LDAP or TCP/636 for LDAPS).
The authentication workflow when using Windows FortiAuthenticator Agent is depicted below:
Enabling REST API access on FortiAuthenticator#
FortiAuthenticator Agent for Windows communicates with FortiAuthenticator via its FAC REST API. A key is generated for a FortiAuthenticator admin and must be inserted on the agents for allowing this communication.
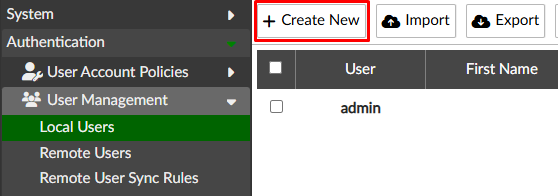
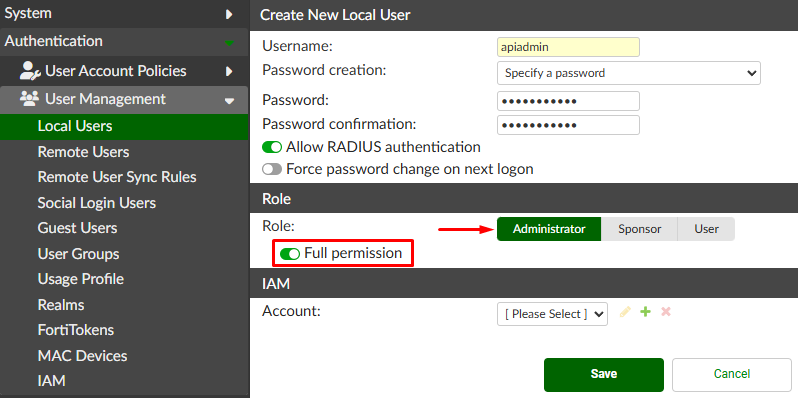
A new administrator should be created with REST API access to FortiAuthenticator:
- Go to
Authentication > User Management > Local Users, selectCreate New:
- Define the username and password. Set the
RoletoAdministratorand enable theFull permissionsoption:
Save the changes. You’ll be required to insert the currently used admin password.
- In the next screen, under
User Rolesection, enable theWeb serviceaccess option:
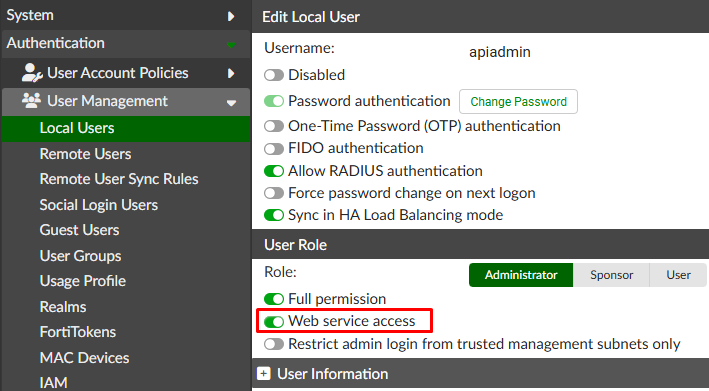
Save the changes. You’ll be required to insert the currently used admin password.
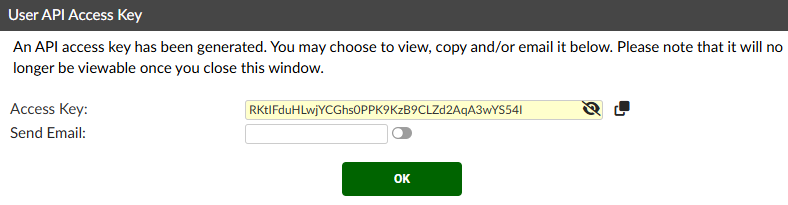
- An access key is generated, copy the value and optionally send it via email. Then press
OK
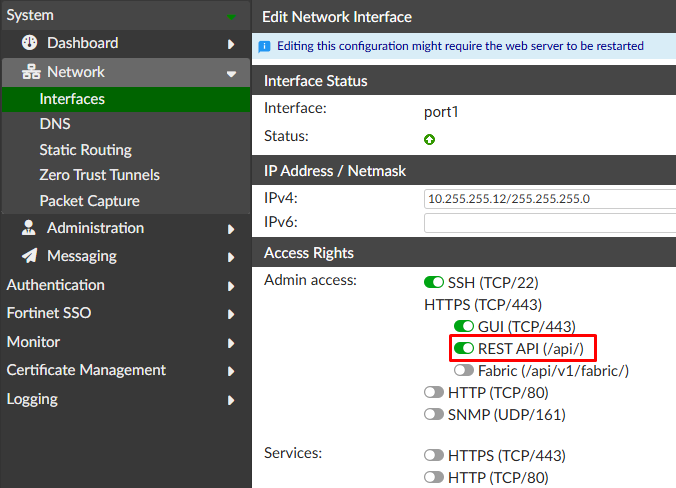
Apart from the administrator with REST API privileges, the FortiAuthenticator network interface also needs special permissions.
- Under
System > Network > Interfaces, verify the network interface has theREST API (/api/)option enabled (enabled by default):
Downloading and Installing the FortiAuthenticator Agent#
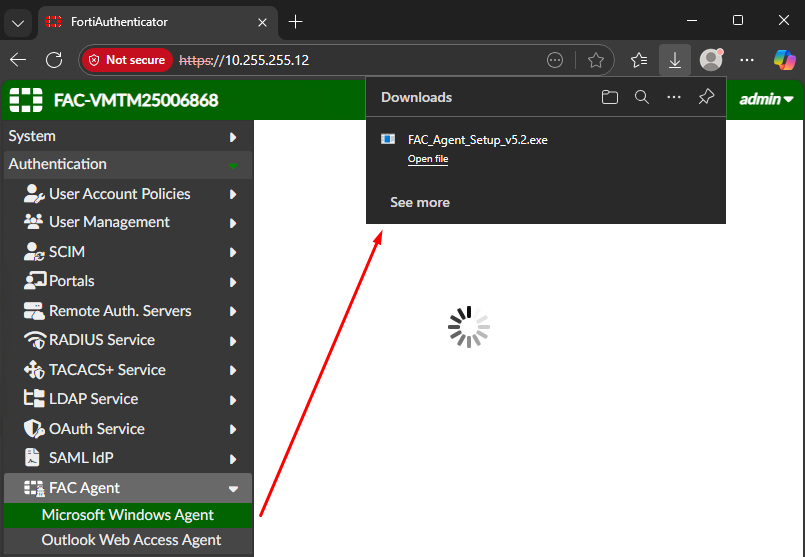
To download the agent, login to FortiAuthenticator and navigate to Authentication > FAC Agent > Microsoft Windows Agent. The download process will start automatically.
From the Windows device that will have FortiAuthenticator agent installed, follow these process:
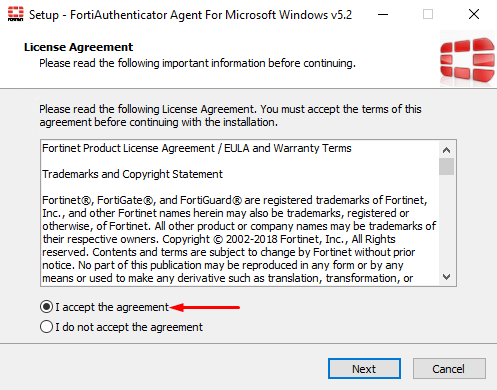
- Execute the
.exeFortiAuthenticator agent installer. - Accept the license agreement, and select
Next:
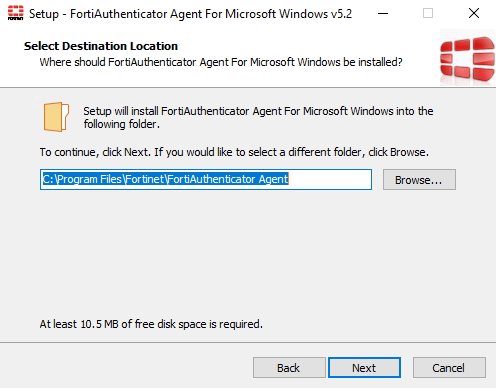
- Confirm the installation path and select
Next:
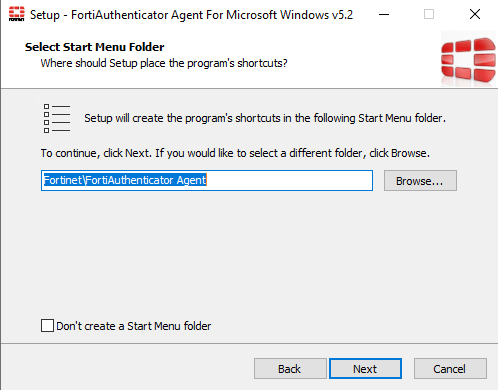
- Press
Next:
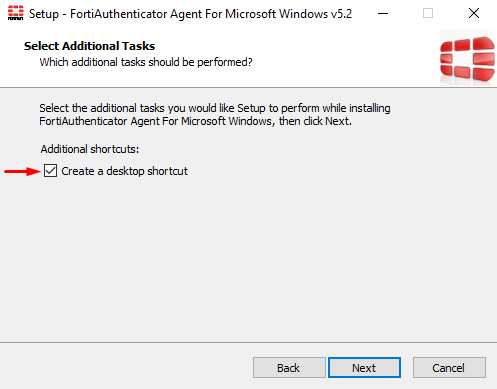
- Enable
Create a desktop shortcutif desired and click onNext:
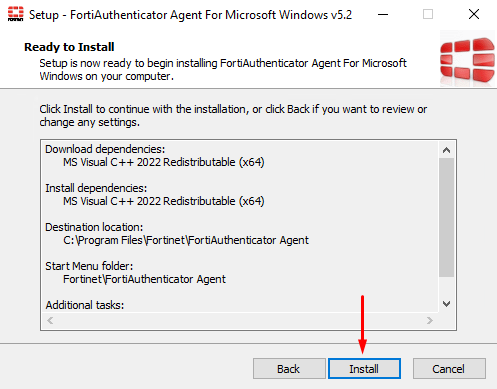
- Finally click on
Install:
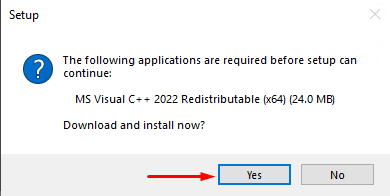
- You may be required to install MS Visual C++. Select
Yes:
- Once the installation process ends, click on
Finish:
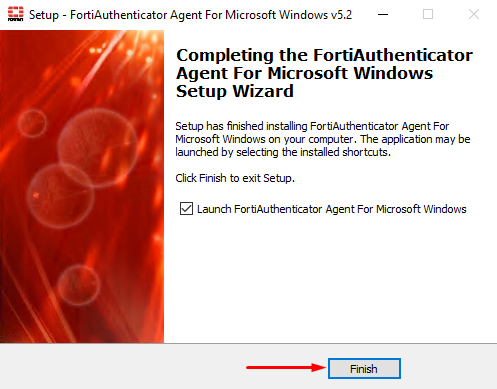
The FortiAuthenticator Agent interface is presented as follows:
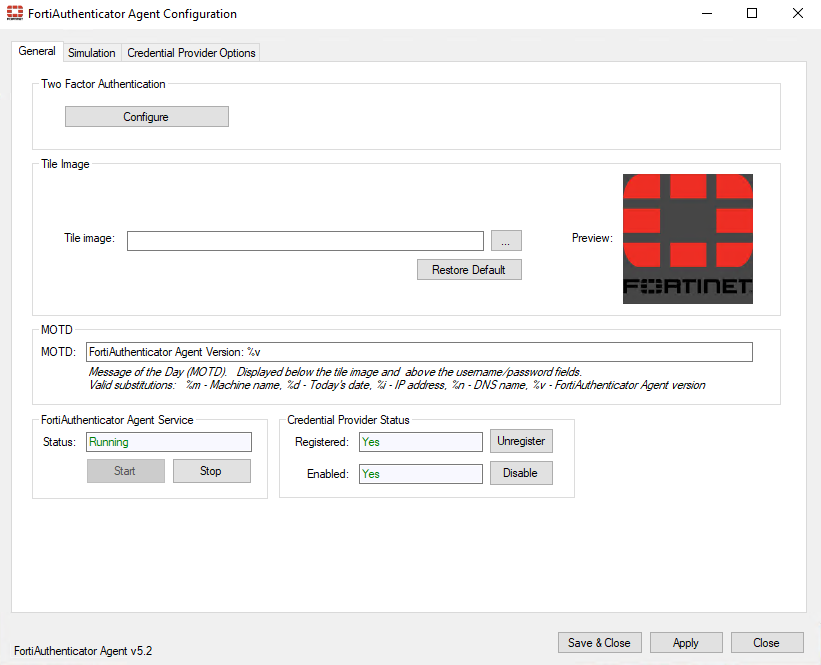
Setting up the FortiAuthenticator Agent#
Now that the FortiAuthenticator Agent is installed on the Windows host, it needs to be configured to communicate with FortiAuthenticator via its REST API.
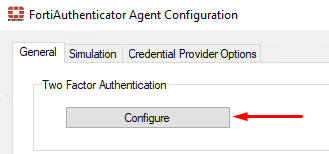
- On FortiAuthenticator Agent under,
Generaltab,Two Factor Authenticationsection selectConfigure:
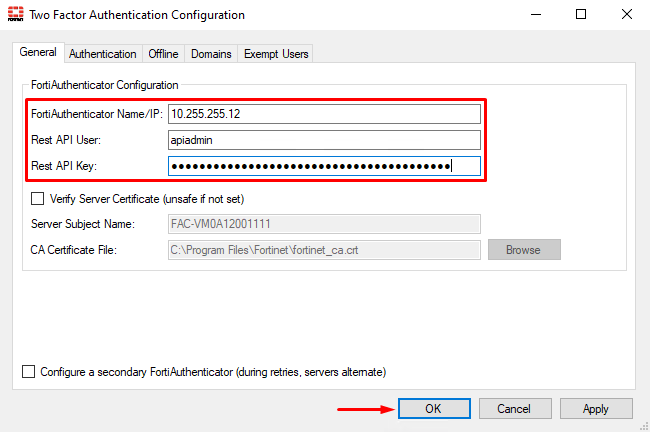
- A new window opens, under
Generaltab, set the FortiAuthenticator domain/IP, and the REST API admin username and API key:
- Open the
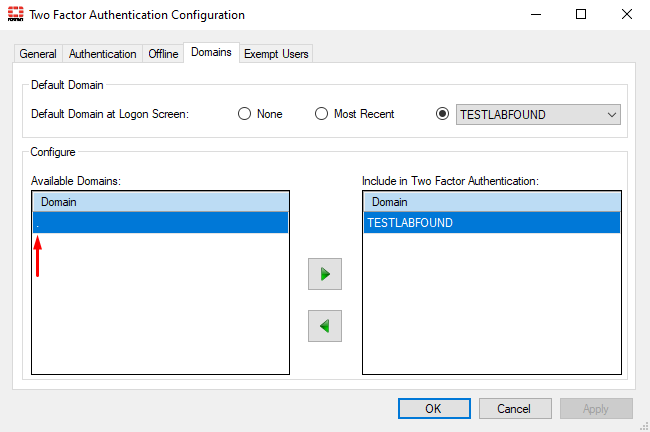
Two Factor Authenticationconfiguration again and go to theDomainstab. Here you configure the following:
Default domain at Logon screen- select the domainAvailable Domains- move the domain fromAvailable Domainsto the right (Include in Two Factor Authentication) to include it in the 2FA process.
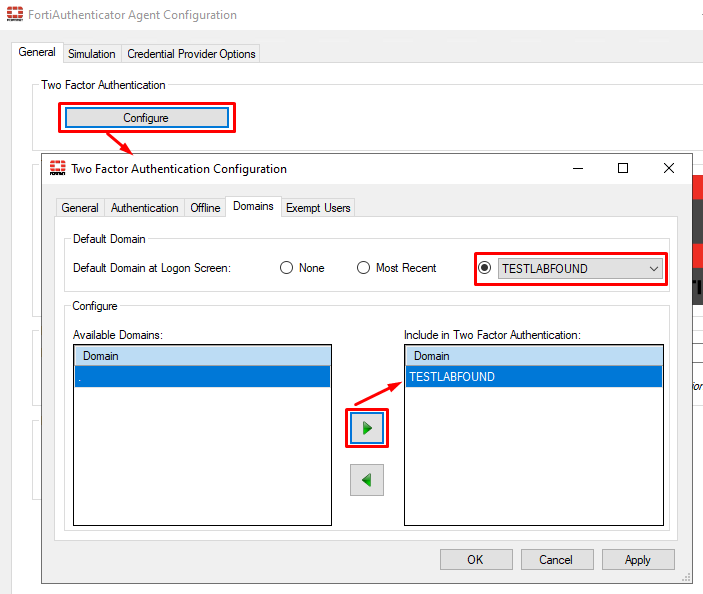
.” represents the local user. If the “.” domain is moved to Include in Two Factor Authentication, local user login will be disabled on the system by default. To enable full support for the local user, special configuration needs to be done in FortiAuthenticator as well.- Press
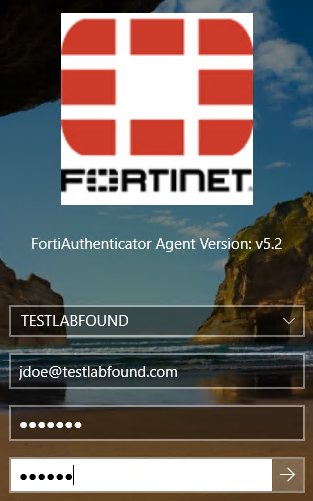
OKand thenSave & Close. - Test logging in to the Windows host with the domain user enabled with FortiToken “jdoe”:
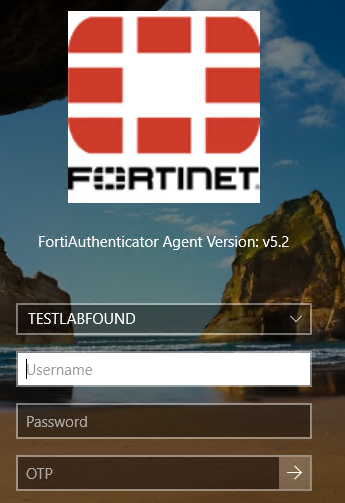
Select the domain, insert the username, password, and OTP to complete the login process successfully:
Login with a local user or a domain user without a OTP enabled is still possible on this Windows host where the agent has been installed. For example, selecting the default sign-in option with the domain user “sbrown” doesn’t require a OTP to login:
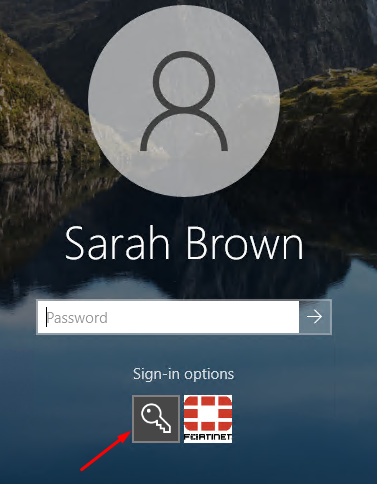
This is because the FortiAuthenticator agent enforcement hasn’t been enabled yet, which is located under the Credential Provider Options tab of the agent interface (will be seen later).
Configuring an exempt user (for bypassing 2FA)#
An exempt user is capable of login to the PC without 2FA. This results handy in situations where for whatever reason it’s not possible to login to the PC anymore.
To configure an exempt user/group follow these steps on the FortiAuthenticator agent:
- Under
Generaltab, onTwo Factor Authenticationsection, selectConfigure. - Navigate to
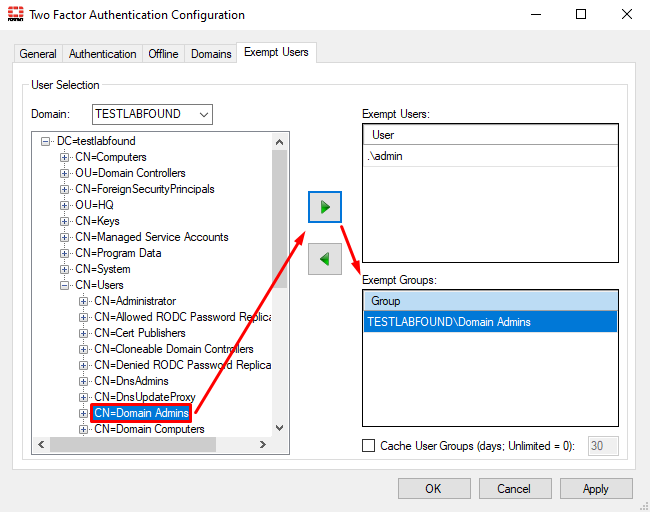
Exempt Users. Select theDomainandUser nameto be exempted and then click on the right arrow. In this example, the local user.\adminand the “Domain Admins” group will be exempted:
- For exempting a local user, select “
.” as the domain and specify the user:
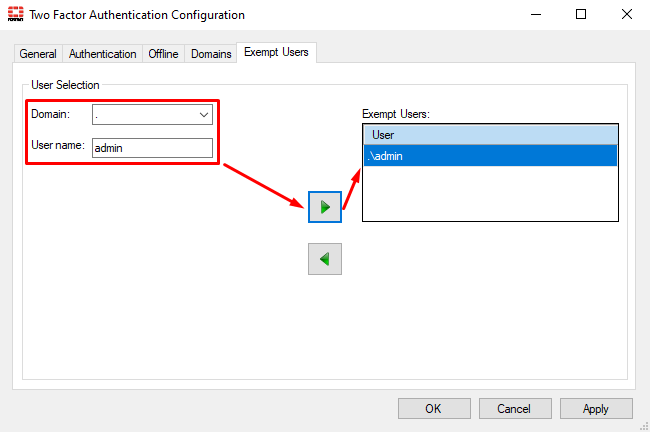
.” domain (i.e. no domain) hasn’t been moved from Available Domains to Include in Two Factor Authentication under the Domains tab. Once the “.” domain (i.e. no domain) is moved to Include in Two Factor Authentication, an OTP will be enforced for local users that are not listed under Exempt Users.- For exempting a domain group, select the domain, and then select the desired group:
To test the exempt user “admin”, select “.” or (No Domain) in the domain field and insert the exempted username and password, leaving the OTP field blank:
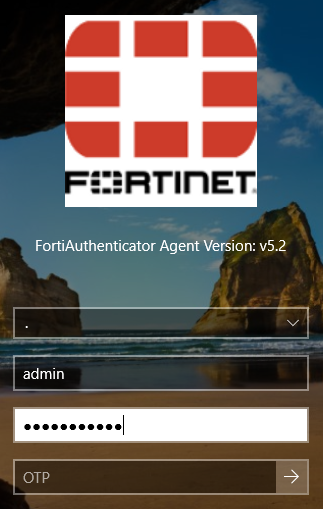
To test the exempt user “administrator@testlabfound.com” that is part of the exempted group, specify the domain, and password. Leave the OTP field blank:
Configuring an admin override#
Admin override users can be configured to use their token to log on other users into their systems. This means that the admin override user just provides a OTP to a different user inserting their regular username and password in the login. This is useful in situations where the user doesn’t have access to its token because, for example it’s forgotten or lost, and there are no other backup options for MFA.
The AD user “sking”, which is not currently part of the AD group synched by a remote user synch rule, will be manually imported to FortiAuthenticator and then configured as an admin override on FortiAuthenticator Windows agent.
To manually import a user on FortiAuthenticator and enable OTP, follow these steps:
- On FortiAuthenticator, go to
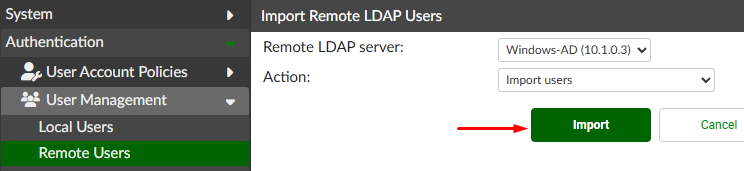
Authentication > User Management > Remote Users. UnderLDAPtab, select theImportbutton:
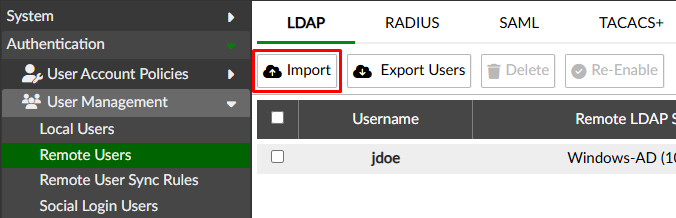
- Define the
Remote LDAP serverand theAction, then click onImport:
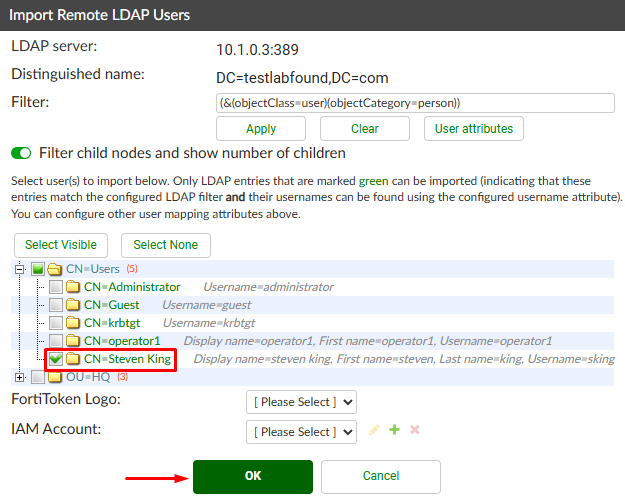
- A new windows appears. Select the desired user to be imported and press
OK:
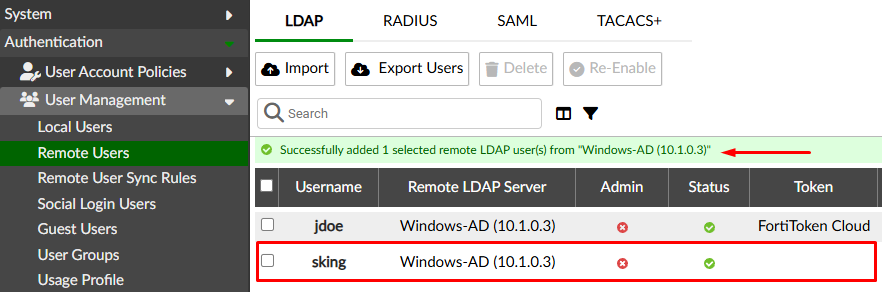
- A successful message should be shown. Select the user to further configure him:
- On the
Edit Remote LDAP Usermenu follow these process:
- Enable
One-Time Password (OTP) authenticationDeliver token codes from: FortiToken CloudDeliver token code by: FortiToken - Mobile- Activation delivery method:
Email
- Configure the user
Email
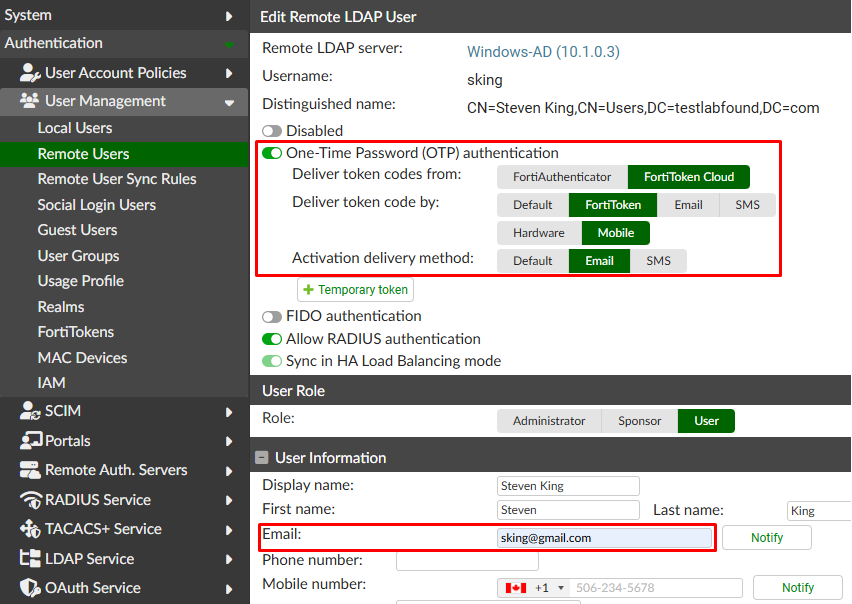
- Press
Saveand the user should received an email with the information to provision its FortiToken via code or QR code. - Provision the token using FortiToken Mobile for the user “sking”.
To configure the user as admin override user on FortiAuthenticator follow these steps:
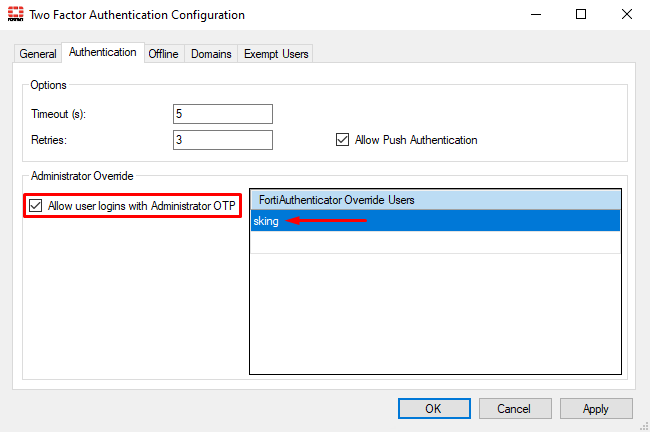
- Under
Generaltab, onTwo Factor Authenticationsection, selectConfigure. - Go to the
Authenticationtab. Here, enableAllow user logins with Administrator OTPand configure the override user at the right:
- Press
OKand save the changes.
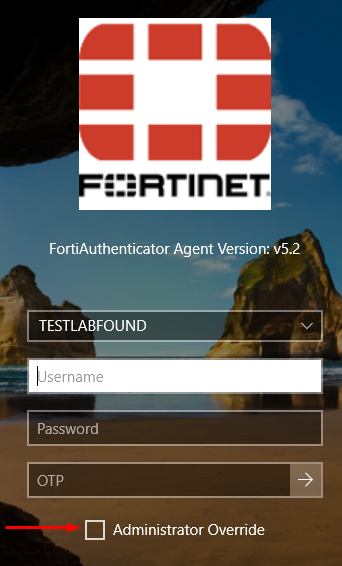
To test the admin override usage, trying login in with “jdoe” user:
- Verify that a new
Administrator Overrideoption shows up when trying to login with FortiAuthenticator Agent:
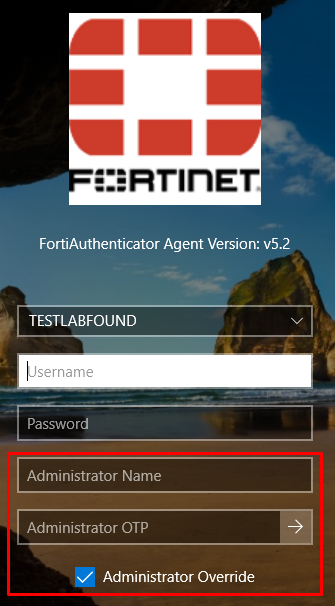
- When this option is enabled, two new field must be filled -
Administrator NameandAdministrator OTP, which correspond to the admin override:
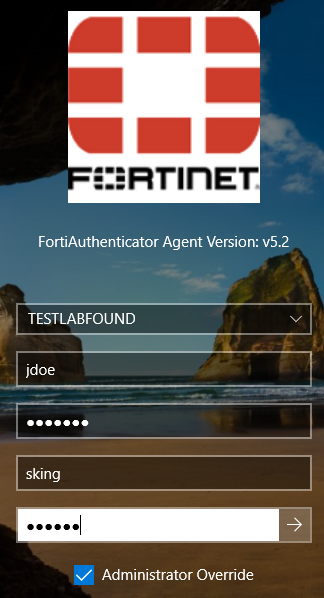
- In the following example, we’re simulating an scenario where the user “jdoe” doesn’t have access to its FortiToken OTP, so the admin override “sking” is assisting him with its own OTP:
Enforcing FortiAuthenticator Agent Login#
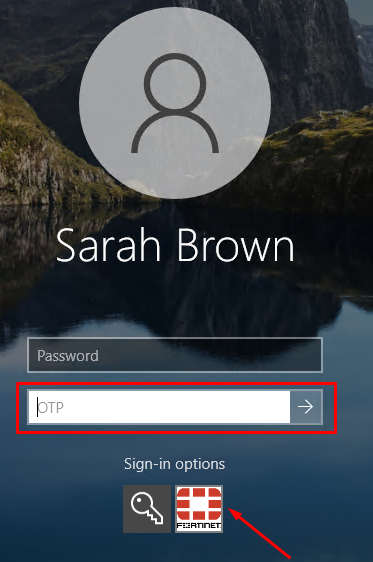
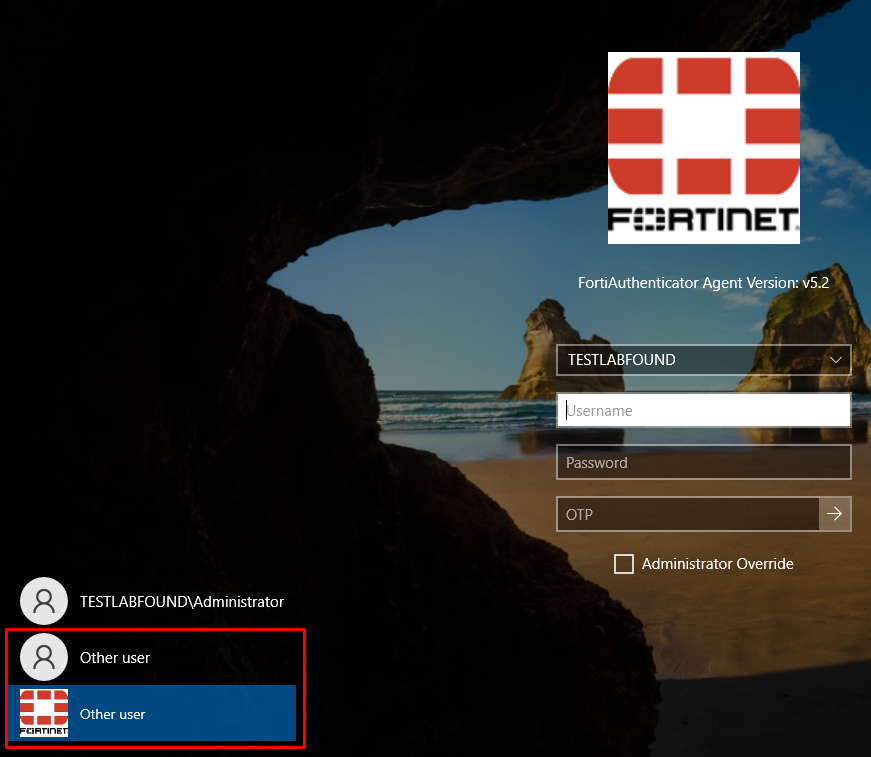
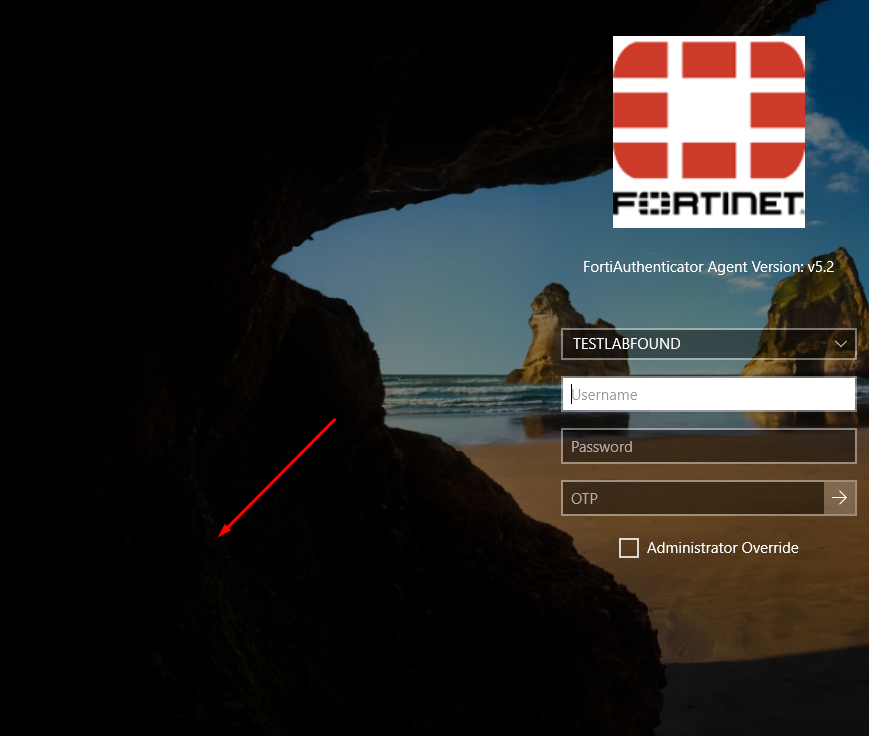
Up to this point, FortiAuthenticator Agent is configured for log in users with OTP. However, users can still bypass this MFA login, by selecting Other user option at the left of the login screen which doesn’t have the Fortinet logo. This option corresponds to the built-in Windows login mechanism:
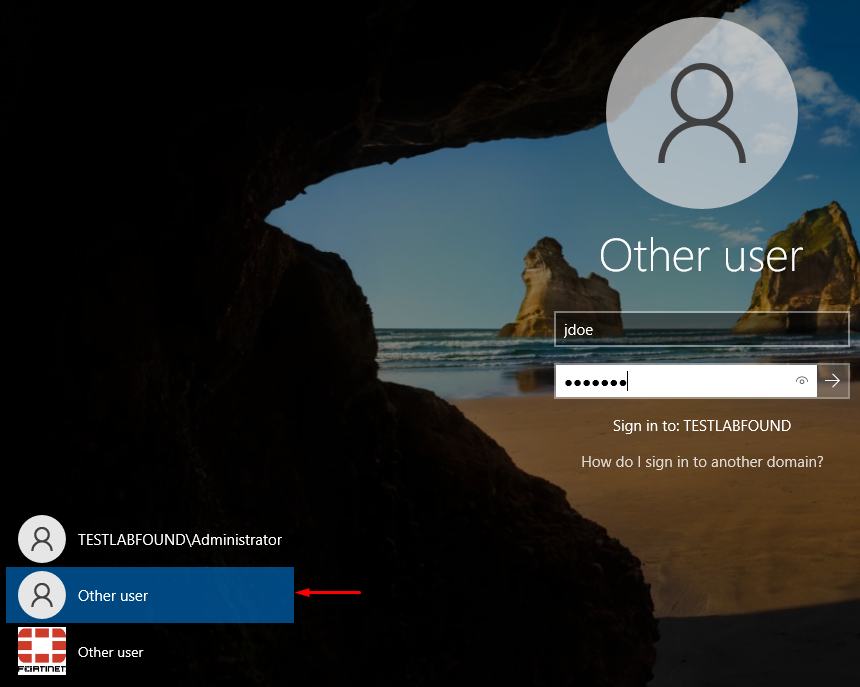
For example, the user “jdoe” which has a FortiToken associated can still login via the built-in Windows login mechanism without inserting any OTP:
To disable the built-in Windows login mechanism, i.e. just leaving FortiAuthenticator Windows agent as the only login mechanism, open the FortiAuthenticator Agent program. Under Credential Provider Options, disable Permit Built-in Password Providers. Then click Save & Close to apply changes:
Permit Built-in Password Providers, it’s recommended to have at least one exempt user with administrative access to the system. This would result useful in situations where FortiAuthenticator Agent malfunctions and it needs to be bypassed.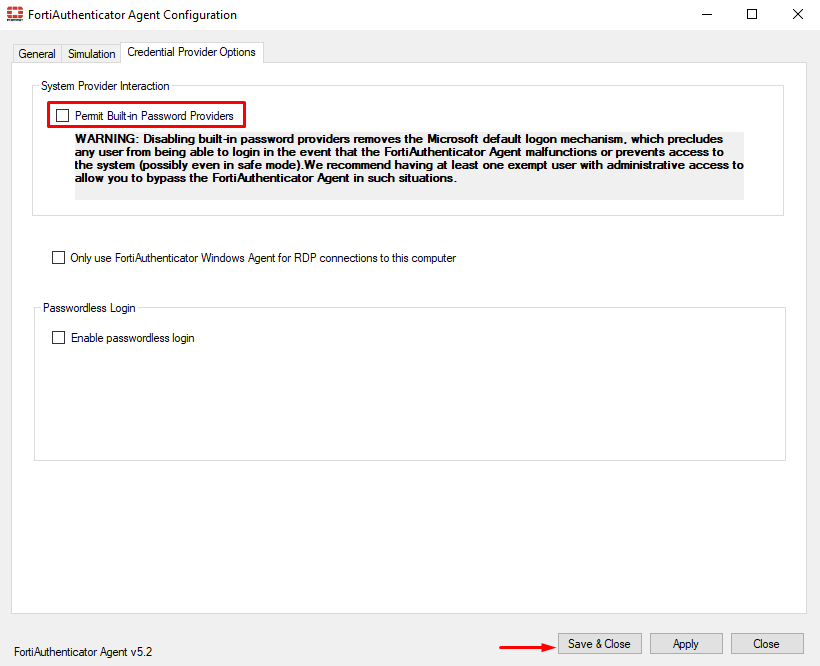
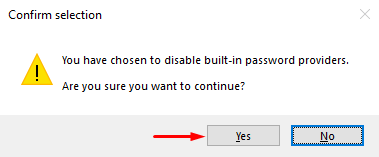
Confirm the changes, pressing Yes:
Now, when trying to login, no other login mechanism option is available apart from the FortiAuthenticator agent login:
Enabling 2FA for Local Users#
Reference: Technical Tip: Windows 2FA login using local users on FortiAuthenticator
By default, local users on Windows can login without inserting any OTP. The reason is that the “.” domain (i.e. no domain) hasn’t been moved from Available Domains to Include in Two Factor Authentication under the Domains tab:
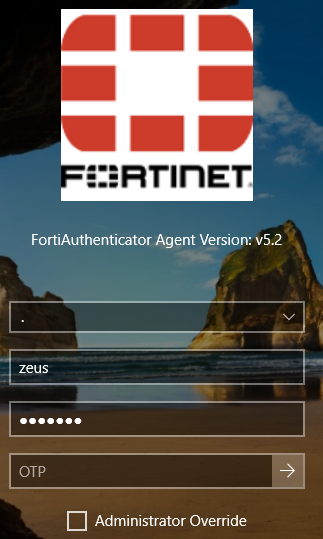
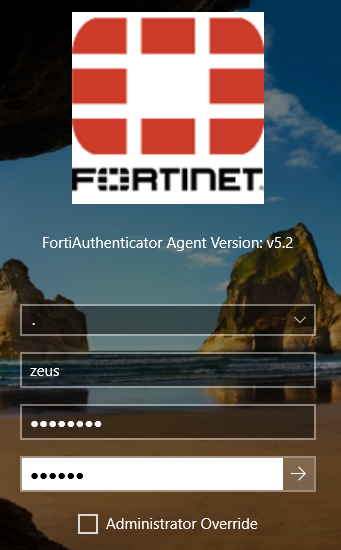
For example, a local user “zeus” can successfully login by selecting the “.” domain or (No domain) and just providing the username and password:
To enforce 2FA for local users, follow these steps:
- On FortiAuthenticator, go to
Authentication > User Management > Realmsand create a realm for the “.” domain (i.e. no domain):
- Navigate to
Authentication > User Management > Local Usersand set the username and password of the Windows user (credentials must match):
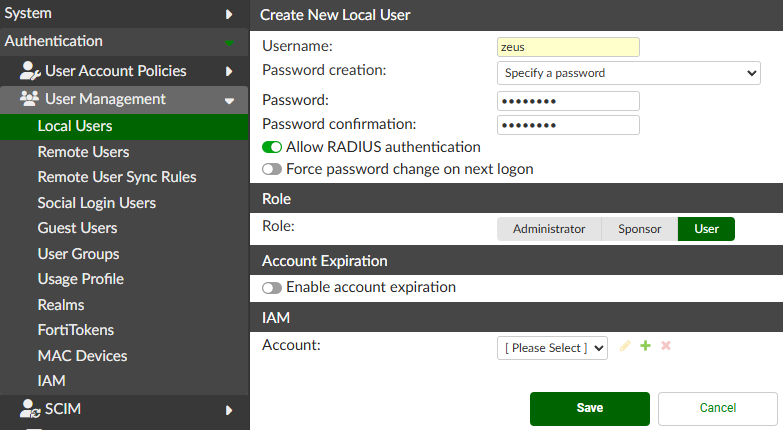
- Click on
Saveand then enable the 2FA for local user by enablingOne-Time Password (OTP) authenticationand defining theEmail:
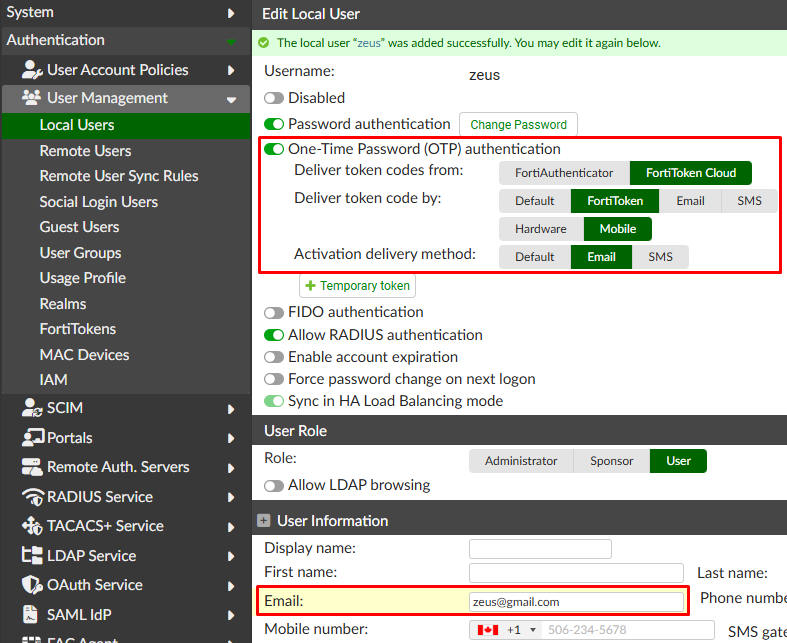
- After saving, the token activation information is send to the specified email. Enable the token for the user.
- On FortiAuthenticator agent, move the “
.” domain (i.e. no domain) toInclude in Two Factor Authentication:
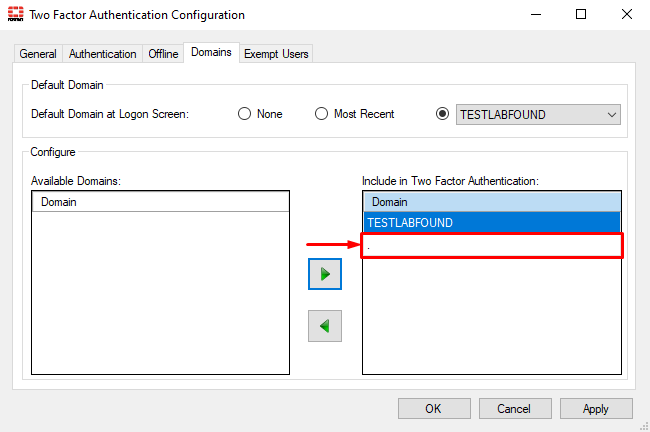
Now 2FA will be enforced for local users that are not listed under Exempt Users.
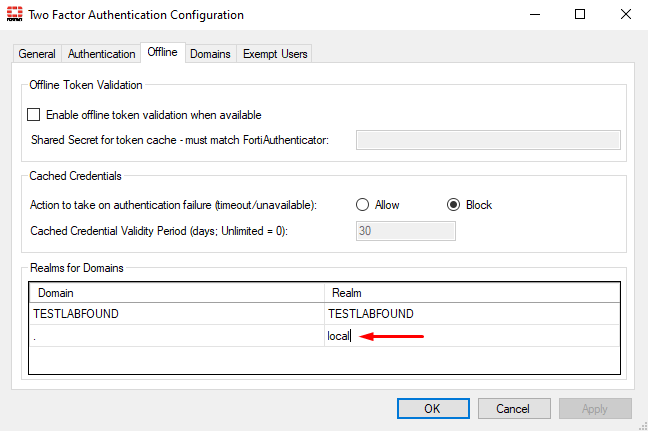
- By default, the override user won’t work with local user logins. A workaround is to change the local real name from “
.” to any real name, e.g.localunder theGeneraltab of FortiAuthenticator agent:
Reference: Troubleshooting Tip: The override user is not working when using local admin
domain\overrideuser- On the Windows device, try logging in with the local user, inserting the password an OTP:
In case the password of the local user on FortiAuthenticator doesn’t match the one on Windows device, this is the expected behavior:
- If inserted credentials match with the local user on FortiAuthenticator, push OTP will be received as the user credential is verified with FAC. But, once the OTP is inserted,
User name or password is incorrecterror will be shown because credentials doesn’t match the Windows one. - If inserted credentials doesn’t match the one of the local user in FortiAuthenticator, no push OTP will be received by the user because of an invalid credentials on FAC.